Overclocking Raspberry Pi is a way to get the maximum out of the Raspberry Pi hardware. Device makers many times fix the components to work at lower speeds to improve reliability/life while also ensuring adequate performance. However, for many enthusiasts who are always hungry for speed and power, there is no such term as "adequate performance". Overclocking is common among such folks. While Raspberry Pi, the sub-$50 micro-computer, comes with decent amount of power and speed for many operations its not enough for a smooth experience on some of the XBMC media center operating systems such as OpenELEC, Xbian, or Raspbmc. In fact, some of the observed lags and unresponsiveness observed in my comparison of these operating systems could be reduced or eliminated by overclocking Raspberry Pi. Before you jump in, here are a some things you should know before overclocking Raspberry Pi.
| Build a Low-Cost Raspberry Pi Media Center | Price |
|---|---|
| Raspberry Pi 4B Starter Kit with case, power adapter, and heat sinks | ~$82.00 |
| Sandisk Ultra 32GB Micro SDHC UHS-I Card 98 MB/s | ~$8.00 |
| SANOXY Wireless USB PC Remote Control Mouse for PC | ~$8.00 |
Table of Contents
Raspberry Pi Defaults
Before you begin changing the default clock speeds, it is essential to understand what the default clock settings on the Raspberry Pi are. So here it goes.
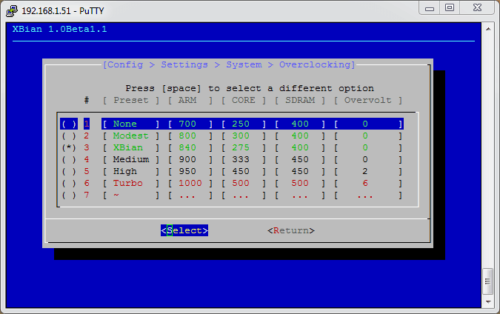
ARM (arm_freq): 700 MHz
Core (core_freq): 250 MHz
SDRAM (sdram_freq): 400 MHz
Overvolt: 0
Some people have these in their fingertips and some distros identify the default settings in their over clocking options/settings. Xbian, for example, shows the default settings under "None" (meaning no overclocking) as shown in the picture below (highlighted in Blue). On OpenELEC you might find this in the config.txt file.
Nevertheless, before overclocking Raspberry Pi, it is a good idea to learn the default clock settings.
Understanding Raspberry Pi Overclocking Settings
Now that you know what the default clock settings are, let us see what those frequencies/clock parameters mean. While there are several clock settings, the parameters of importance for most media center enthusiasts are: arm_freq, core_freq, sdram_freq, and Overvolt. Others such as h264_freq (hardware video block frequency), isp_freq (image sensor pipeline block), v3d_freq (3D block), and gpu_freq (controls h264_freq, isp_freq, and v3d_freq simultaneously) will not be covered within this post.
ARM or arm_freq: ARM processor frequency (in general terms speed) in MHz.
CORE or core_freq: GPU (Graphical Processing Unit) frequency in MHz.
SDRAM or sdram_freq: SDRAM frequency in MHz.
Overvolt or over_voltage: More/Less voltage to be supplied to Raspberry Pi over the default 1.2 V. More work needs more energy. So, while overclocking it is essential provide a stable voltage that supports the overclocked speeds. Increase or decrease by 1 equals an increase (overvolting) or decrease (undervolting) in voltage of 0.025 V. There are 2 types of overvolting (aka Turbo Mode): Dynamic (on-need basis) and Forced (enabled at all times). Note that Forced overvolting voids the warranty or Raspberry Pi.
All these clock settings are entered in the config.txt file, which can found inside /flash in OpenELEC and /boot in Xbian and Raspbmc. This basic information is a good primer for the purposes of overclocking Raspberry Pi to speed up your media center. Any more complex applications would require a deeper knowledge. A good place to start is here.
Best Android TV Boxes:
- NVIDIA SHIELD TV Pro Home Media Server - $199.99
- Amazon Fire TV Streaming Media Player - $89.99
- WeTek Play 2 Hybrid Media Center - $134.00
- Kukele Octacore Android TV Box - $179.99
- U2C Android TV Box - $95.99
Check Current Settings
One of the things you should be aware of is how to check the current clock settings. This will come in handy to verify if your Raspberry Pi overclocking was successful. There are couple of ways to check this. If you are able to SSH into your Raspberry Pi system, then use the following command:
cat /proc/cpuinfo
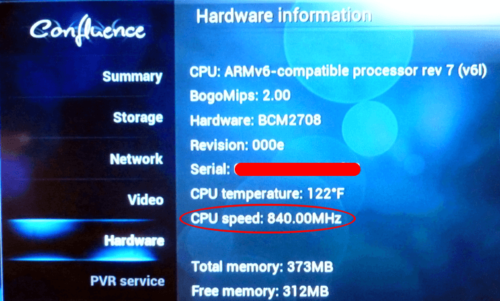
You should see an output like the one below. Note the BogoMIPS value of 840.00, which is the MHz to which my Raspberry Pi was overclocked to.
Processor       : ARMv6-compatible processor rev 7 (v6l)
BogoMIPS        : 840.00
Features        : swp half thumb fastmult vfp edsp java tls
CPU implementer : 0x41
CPU architecture: 7
CPU variant     : 0x0
CPU part        : 0xb76
CPU revision    : 7

Hardware        : BCM2708
Revision        : 000f
Serial          : 00000000xxxxxxxxx
Alternatively, you can verify the CPU frequency from within the XBMC interface by going to Settings->System Info.
Risks of Overclocking Raspberry Pi
Overclocking Raspberry Pi allows you to get the best out of your device. But some do it without understanding the risks involved. It is ABSOLUTELY important that you understand what you are getting into. So here are few risks you should be aware of:
- Life reduction - components may fail sooner
- Heat generation - operating at higher speeds generate more heat (heat sinks are recommended)
- File corruption - many have observed file corruptions at unoptimized overclocking settings
- Warranty-Voiding - forced overvolting will void your warranty
There you go. All the basic information you need to know about overclocking Raspberry Pi.


![10 Best Plex Client Devices [2022] - STUTTER-free Streaming Best Plex Client Devices](https://www.smarthomebeginner.com/images/2022/02/best-nas-for-plex-server-featured-images-from-pexels-photography-maghradze-ph-3764958-e1648542743772.jpg)

![10 Best Jellyfin Client Devices [2022] - 4k, Hardware Transcoding, etc. Jellyfin Roku App](https://www.smarthomebeginner.com/images/2021/02/jellyfin-roku-client-app-ft.jpg)