qBittorrent is not the most common bittorent client for Linux or other platforms and I think it should be. qBittorrent webui is like a thin client yet feature-rich and aesthetically pleasing. In this post, I will explain how to install qBittorrent on Ubuntu. On Windows, nothing beats µtorrent. On Linux platforms, Transmission and Deluge are the most common bittorrent downloaders. Installing Deluge and Transmission torrent softwares requires quite a bit of work and requires creation of users/groups and setting permissions. While they "may" provide a layer of security, are cumbersome and if not setup properly can result in errors. My recent experience with qBittorrent was eyeopening and it is quickly becoming my favorite torrent client on Linux. Compared to Deluge and Transmission, qBittorrent installation on my headless Ubuntu server was a cakewalk. Now, let us see how to setup server running Ubuntu 12.04 with qBittorrent webui. Full-fledged GUI installation is just one more step away.
Looking for an automated solution? Try our AtoMiC ToolKit, which makes installation and management of Home Server software such as SickBeard, CouchPotato, Torrent clients, etc. easy.

Table of Contents
About qBittorrent
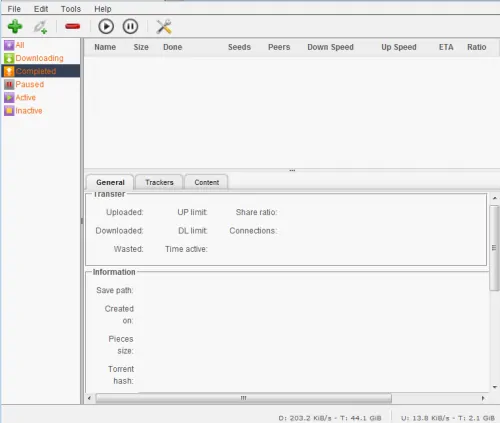
qBittorrent project aims to provide a Free Software alternative to µtorrent. It is simple, easy to install, and yet provides a feature-full UI and Webui. It runs and provides the same features on all major platforms (Linux, Mac OS X, Windows, OS/2, FreeBSD). Below are some of its notable features:
- Polished µTorrent-like User Interface
- Well-integrated and extensible Search Engine
- Simultaneous search in most famous BitTorrent search sites
- Per-category-specific search requests (e.g. Books, Music, Movies)
- All Bittorrent extensions
- DHT, Peer Exchange, Full encryption, Magnet/BitComet URIs, ...
- Remote control through Ajax qBittorrent webui. qBittorrent web interface is nearly identical to the regular UI
- Advanced control over trackers, peers and torrents
- Torrents queueing and prioritizing
- Torrent content selection and prioritizing
- UPnP / NAT-PMP port forwarding support
- Available in ~25 languages (Unicode support)
- Torrent creation tool
- Advanced RSS support with download filters (inc. regex)
- Bandwidth scheduler
- IP Filtering (eMule and PeerGuardian compatible)
- Sequential downloading (aka "Download in order")
- Available on most platforms: Linux, Mac OS X, Windows, OS/2, FreeBSD
As you can qBittorrent offers competitive features. Now, let me describe how to install qBittorrent.
Step 1: Add qBittorrent Repository
qBittorrent and qBittorent webui are readily available in Ubuntu repository. However, Ubuntu repository is usually a bit slow on updating versions. So if you are like me and would like to have the latest version as soon as possible, then add the PPA repository as described below. If not proceed to step 2.
sudo add-apt-repository ppa:qbittorrent-team/qbittorrent-stable
Step 2: Install qBittorrent Webui
Then update packages list and install qBittorrent webui:
sudo apt-get update
sudo apt-get install qbittorrent-nox
For full GUI software, install qBittorrent along with qBittorrent-nox:
sudo apt-get update
sudo apt-get install qbittorrent qbittorrent-nox
You are done installing qBittorrent webui. Unlike Transmission and Deluge, there is no user, group, or permission changes needed.
Best Standalone Bittorrent Downloaders:
Step 3: Starting qBittorrent
If you installed the GUI, then qBittorrent can be started from the menu. If you disabled your GUI or if you installed only qBittorent webui, then you can start qBittorrent using the following command:
qbittorrent-nox
After you install qBittorrent webui, you can access the web interface by going to (where 8080 is the default listening port):
http://localhost:8080
If your qBittorrent is on your internal network and doesn't block port 8080 you can also access it through its network IP address (see example below):
http://192.168.X.X:8080
If you have port forwarding enabled on your router and you have a domain name referring your server running qBittorrent, you may also view your qBittorrent web interface through the internet using your domain name:
http://domain.com:8080
Choose the access method that applies to your case. The default username and password are:
Username: admin
Password: adminadmin

It is strongly advised that you change the username / password as soon as possible as it is a security risk to leave the default values. I recommend that this be one of the first things you do after you install qBittorrent. You can choose a new username / password from Options > Preferences window in the Web UI. The new parameters will be taken into account instantly, without restarting qBittorrent.
If you already have a server listening on port 8080, then start qBittorrent webui using the following command:
qbittorrent-nox --webui-port=XXXX
Where, XXXX is your desired unique and available port number. Even if you do not have anything running on port 8080 I still recommend that you run qBittorrent on a different random port for security reasons.

Step 4: Autostart qBittorrent Webui
Starting qBittorrent from commandline is cumbersome. To autostart qBittorrent web interface during boot, create the file /etc/init.d/qbittorrent-nox-daemon and add the following contents (Credit: launchpadlibrarian.net) to it:
#! /bin/sh
### BEGIN INIT INFO
# Provides:          qbittorrent-nox
# Required-Start:    $remote_fs $syslog
# Required-Stop:     $remote_fs $syslog
# Default-Start:     2 3 4 5
# Default-Stop:      0 1 6
# Short-Description: Starts QBittorrent
# Description:       Start qbittorrent-nox on start. Change USER= before running
### END INIT INFO

# Author: Jesper Smith
#

# Do NOT "set -e"

# PATH should only include /usr/* if it runs after the mountnfs.sh script
PATH=/sbin:/usr/sbin:/bin:/usr/bin
DESC="QBittorrent"
NAME=qbittorrent-nox
DAEMON=/usr/bin/$NAME
DAEMON_ARGS=""
PIDFILE=/var/run/$NAME.pid
SCRIPTNAME=/etc/init.d/qbittorrent
USER=[USERNAME]

# Exit if the package is not installed
[ -x "$DAEMON" ] || exit 0

# Read configuration variable file if it is present
[ -r /etc/default/$NAME ] && . /etc/default/$NAME

# Load the VERBOSE setting and other rcS variables
. /lib/init/vars.sh

# Define LSB log_* functions.
# Depend on lsb-base (>= 3.0-6) to ensure that this file is present.
. /lib/lsb/init-functions

#
# Function that starts the daemon/service
#
do_start()
{
	# Return
	#   0 if daemon has been started
	#   1 if daemon was already running
	#   2 if daemon could not be started
	start-stop-daemon -c $USER -b -t --start --quiet  --exec $DAEMON  \
                || return 1

	start-stop-daemon -c $USER -b --start --quiet --exec $DAEMON -- \
		$DAEMON_ARGS \
		|| return 2
	sleep 1
}

#
# Function that stops the daemon/service
#
do_stop()
{
	start-stop-daemon -c $USER --quiet  --stop --exec $DAEMON
	sleep 2
	return "$?"
}


case "$1" in
  start)
	[ "$VERBOSE" != no ] && log_daemon_msg "Starting $DESC" "$NAME"
	do_start
	case "$?" in
		0|1) [ "$VERBOSE" != no ] && log_end_msg 0 ;;
		2) [ "$VERBOSE" != no ] && log_end_msg 1 ;;
	esac
	;;
  stop)
	[ "$VERBOSE" != no ] && log_daemon_msg "Stopping $DESC" "$NAME"
	do_stop
	case "$?" in
		0|1) [ "$VERBOSE" != no ] && log_end_msg 0 ;;
		2) [ "$VERBOSE" != no ] && log_end_msg 1 ;;
	esac
	;;
  status)
       status_of_proc "$DAEMON" "$NAME" && exit 0 || exit $?
       ;;
  restart|force-reload)
	log_daemon_msg "Restarting $DESC" "$NAME"
	do_stop
	case "$?" in
	  0|1)
		do_start
		case "$?" in
			0) log_end_msg 0 ;;
			1) log_end_msg 1 ;; # Old process is still running
			*) log_end_msg 1 ;; # Failed to start
		esac
		;;
	  *)
	  	# Failed to stop
		log_end_msg 1
		;;
	esac
	;;
  *)
	#echo "Usage: $SCRIPTNAME {start|stop|restart|reload|force-reload}" >&2
	echo "Usage: $SCRIPTNAME {start|stop|status|restart|force-reload}" >&2
	exit 3
	;;
esac
If you prefer to download the above code, you may do so you using the download button below:
Change USER=MyUserName to the name of the user whom you want to run qBittorrent daemon as. Also, change DAEMON_ARGS="--webui-port=XXXX" to the port number to which you want qBittorrent to listen. Save and exit. Set correct permissions for the file:
sudo chmod 755 /etc/init.d/qbittorrent-nox-daemon
Then, update the startup scripts using the following command:
sudo update-rc.d qbittorrent-nox-daemon defaults
From your next reboot, qBittorrent webui should start automatically. You can also manually start, stop, and restart qBittorrent-nox using the following commands:
sudo service qbittorrent-nox-daemon start
sudo service qbittorrent-nox-daemon stop
sudo service qbittorrent-nox-daemon restart
For convenience, you could create bash aliases as described in this post. For example, qbitstart could execute sudo service qbittorrent-nox-daemon start. To do so, add the following bash aliases to your /home/user/.bash_aliases:
alias qbitstop='sudo service qbittorrent-nox-daemon stop'
alias qbitstart='sudo service qbittorrent-nox-daemon start'
alias qbitrestart='sudo service qbittorrent-nox-daemon reload'
Step 5: Configure qBittorrent
If you decided to install qBittorrent GUI then configuration is easy through the desktop interface. If you decided to install qBittorrent webui only then you can use the web interface to edit certain settings (not all options are available through webui). The settings are stored in qBittorrent.conf file located in ~/.config/qBittorrent/. You can also manually edit this file to configure qBittorrent. Make a backup copy of the default file. You can edit it using the following command:
nano ~/.config/qBittorrent/qBittorrent.conf
Not all options (eg. Share Ratio) are available. You can manually enter share ratio by adding the following line to the file:
BittorrentMaxRatio=2.5
Save, exit, and restart qBittorrent. Good and recommended further information on configuring qBittorrent is available here and here
Step 6: Enable Secure HTTPS Access
A SSL connection offers encryption and therefore more privacy. First make sure openssl is installed on your Ubuntu server. If not install it. Then, create certificate files as shown below:
mkdir ~/.config/qBittorrent/ssl
cd ~/.config/qBittorrent/ssl
openssl genrsa -des3 -out qbittorrent.cert 1024
openssl req -new -key qbittorrent-key -out qbittorrent-cert
Follow the on-screen instructions. Just press enter to choose the defaults or customize it as you please. At the end, leave the "challenge password" empty. The qbittorrent.cert and qbittorrent.key files will be generated in ~/.config/qBittorrent/ssl/ folder.
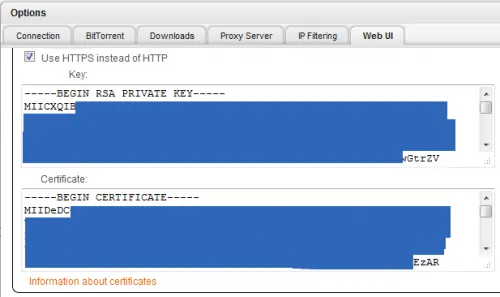
Then open settings through qBittorrent webui, enable HTTPS access, and copy the contents of qbittorrent.key and qbittorrent.cert into the Key and Certificate fields, respectively as shown in the image below.

You should not be able to access qBittorrent web interface only using HTTPS. Since, the certificate is self-signed you may receive a warning from your browser. Ignore the warning.
Best Standalone Bittorrent Downloaders:
Step 7: Optional Improvements
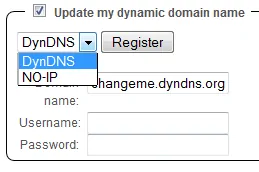
- If you would like to be able to access qBittorrent webui from the internet then it might be easier to setup Dynamic DNS service. This way you can reach your server with a nice URL (example: http://myqbittorrent.dyndns.org) instead of the
http://ipaddress:port. You can get free domain names through services like DynDNS.com. qBittorrent webui has in-built capability to update your Dynamic DNS service. Currently it supports DynDNS and NO-IP.
For a guide to setup DDNS autoupdate client on Linux, refer to this post. - To remotely control qBittorrent using your Android phone, check this post.
There you go. Install qBittorrent webui and enjoy downloading.


![Ultimate Docker Media Server: With 60+ Docker Compose Apps [2024] Ultimate Docker Media Server](https://www.smarthomebeginner.com/images/2024/01/Docker-Series-02-Docker-Stack.png)


![Ultimate Synology NAS Docker Compose Media Server [2022] Synology Docker Media Server](https://www.smarthomebeginner.com/images/2020/07/synology-docker-media-server-ft.jpg)