Kodi MySQL setup allows you to share your media library, its meta data, and watched status, with other Kodi / XBMC boxes in your network. This allows you to pause on one device and continue on another. Kodi device includes any device that runs a media center OS with Kodi, including OpenELEC, Xbian, Raspbmc, or the newer OSMC. This would also mean that you do not have to maintain, scan, and update multiple Kodi libraries. In our recent, Plex vs Kodi comparison, one of the biggest advantages of Plex was its centralized media server that keeps all devices in sync. Setting up Kodi MySQL database sharing will overcome that limitation. So let us see how Kodi MySQL setup is done.
Table of Contents
Requirements for Kodi MySQL Setup
First of all, if you are using only one Kodi device there is no reason to setup Kodi MySQL library sharing. To share Kodi library with other devices, you will need access to a MySQL database server. You may setup a LAMP Server with Ubuntu, which is one of the most common uses of a home server. If you are not comfortable with commandline work, you may also need to setup a GUI such as phpMyAdmin for your MySQL server. If you do not have or want to setup a local MySQL server then you may use an externally hosted MySQL database but that is a topic for another post.
Here are the complete requirements for Kodi MySQL Setup:
- Kodi Device - any device running Kodi on any operating system
- Every XBMC/Kodi "client" must run the same version of XBMC/Kodi. But Kodi could be on different operating systems. All minor updates within a same version (14.1, 14.2 in Kodi or 5.0.1, 5.0.2, etc. in OpenELEC) should work together successfully. Check the database version table to ensure that the Video DB and Music DB version numbers are the same for the different Kodi versions you are using.
- MySQL database server
Assuming that you have all of the above ready, let us look at how to setup a XBMC shared database with MySQL. I will show Kodi MySQL setup using both commandline and phpMyAdmin and you choose which one to follow. If you have another MySQL GUI such as Adminer, that should work too.
1. Export Local Library
I strongly suggest recreating your media library from scratch on MySQL (just personal preference). If you want to do that skip this step. But if you would like to not go through re-scanning your entire library then you may export your current library for importing later into your MySQL media library. Go to Settings->Video->Library and click "Export video library".
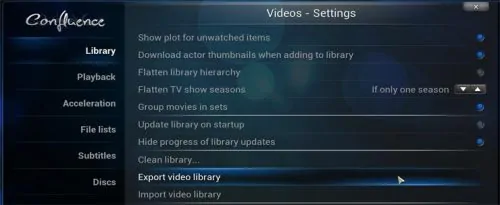
In the questions that follow, answer as shown below.
Export to a single file or separate files per entry? - Separate
Export thumbnails and fanart? - Yes
Export actor thumbnails? - Yes
Overwrite old files? - Yes
Same way, export the your Music library as well. If you have any questions or you want to understand how Kodi media library exporting and importing work, check Kodi Wiki. Once done, exit Kodi.
2. Customize Local MySQL Server
If you are not on the system running the MySQL server, then you may have to SSH into your remote server. Open commandline and edit the /etc/mysql/my.cnf file.
sudo nano /etc/mysql/my.cnf
Find the line that says bind-address = 127.0.0.1 and comment it out by adding a # in front. Then right blow that add another line that says bind-address = 0.0.0.0, as shown in the picture below.

Restart your MySQL server using sudo restart mysql command for changes to take effect. Your MySQL server will now accept connection from remote clients.
The next step is to setup your MySQL database for Kodi library sharing. I am going to show both commandline and phpMyAdmin setup (you only need to follow one). If you are using phpMyAdmin on your own server, you may want to implement a few of the phpMyAdmin tweaks.
3.1 Commandline MySQL Setup
Connect to your MySQL Server using the following command:
mysql -u root -p
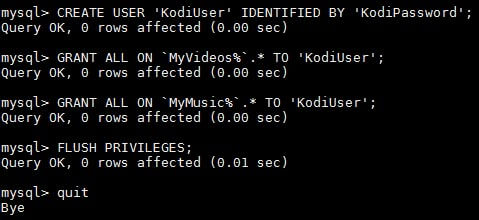
When asked, type in your password for the MySQL root user and press enter. You should now be in the MySQL prompt that looks like mysql>. Now let us create a user that Kodi will use to access your Kodi / XBMC shared database. At the MySQL prompt, type the commands listed below in sequence. Replace all KodiUser and KodiPassword instances with your desired username and password, respectively, for database access.
CREATE USER 'KodiUser' IDENTIFIED BY 'KodiPassword';
GRANT ALL ON `MyVideos%`.* TO 'KodiUser';
GRANT ALL ON `MyMusic%`.* TO 'KodiUser';
FLUSH PRIVILEGES;
quit
The first command creates the user that will access the Kodi shared database and the second command provides the user with all privileges to only the databases created by Kodi (MyVideosXX and MyMusicXX - XX is the database version). This provides better security as this Kodi database user will not have access to other databases you may have. Note that MyVideosXX and MyMusicXX are the default names used by Kodi (recommended). If you use a different database name than the default ones, then you will have to replace MyVideos% and MyMusic% in the above code block with your custom database names. A successful execution of the above commands should produce an output as shown in the screenshot below.
3.2 phpMyAdmin MySQL Setup
In phpMyAdmin, click on "SQL" tab at the top. In the textbox below copy and paste all of the code block from previous page except the quit at the end, as shown in the picture below. Click "GO" to create KodiUser.
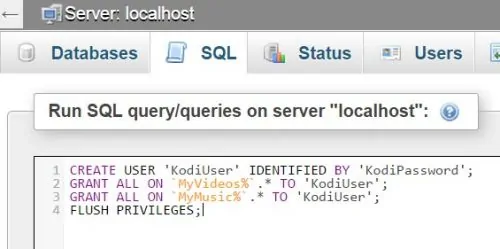
Now the KodiUser will be restricted to Kodi databases (MyVideosXX and MyMusicXX) only. Your Kodi MySQL Setup is now almost done.
4. Setup Kodi MySQL Library
Once the Kodi MySQL setup is done, you will have to modify your advancedsettings.xml to tell Kodi to use MySQL database for library. This is one of the 5 settings I always have on my advancedsettings.xml. If you do not know how to edit your advancedsettings.xml, read that post. advancedsettings.xml file is located in Kodi's userdata folder. Location of this folder on different operating systems can be found here. If you do not already have an advancedsettings.xml file in your userdata folder then you can create one and add the code block below. If you already have one, then add the code block below ensuring that videodatabase, musicdatabase, and videolibrary sections do not already exist. If they already exist then you will have to either replace, merge, or update the existing settings with the code below depending on your situation.
<advancedsettings>
  <videodatabase>
    <type>mysql</type>
    <host>XXX.XXX.XXX.XXX</host>
    <port>3306</port>
    <user>KodiUser</user>
    <pass>KodiPassword</pass>
  </videodatabase>
  <musicdatabase>
    <type>mysql</type>
    <host>XXX.XXX.XXX.XXX</host>
    <port>3306</port>
    <user>KodiUser</user>
    <pass>KodiPassword</pass>
  </musicdatabase>
  <videolibrary>
    <importwatchedstate>true</importwatchedstate>
    <importresumepoint>true</importresumepoint>
  </videolibrary>
</advancedsettings>
Replace XXX.XXX.XXX.XXX with the IP address of the MySQL server. It is best to assign a static IP address for the host running the MySQL server. Also replace Kodiuser and KodiPassword with the actual username and password that you chose during MySQL setup. In this Kodi MySQL setup tutorial, we are letting Kodi create databases with the default names: MyVideosXX and MyMusicXX (recommended). If for whatever reason your databases have different names (typically the case if database is hosted on external free MySQL databases) then you will have to use the name tag within both videodatabase and musicdatabase sections to specify the custom name of the database. The names for video and music databases should be different. The custom database name can be added to videodatabase and musicdatabase sections as shown below (replace DatabaseName with actual database name):
<name>DatabaseName</name>
5. Import Kodi Media Library
Fire up Kodi now and you should be using MySQL and ready to share Kodi database with other Kodi boxes. If you get Kodi initialization failed error, it is probably because Kodi was unable to create the required databases/tables. Check your database permissions.
The library should be blank right now and everything should work exactly the same as before. Your existing media sources should still be there. If that is the case, just set content type and scan it in as if you were setting up your library for the first time. Kodi will use the .nfo files you exported earlier to import your library, including watched status, etc. So your will be back to the status you were before switching to Kodi MySQL shared library. If you did not export your existing library then all your media will be scraped freshly. Depending on your media library size this could take a while.
Recommended HTPC / Home Server Builds:
- Best Home Theater PC Build 2017 to do it all (Plex, Kodi, NAS, Gaming)
- Best Emby Server builds 2018 – Pre-built and DIY options
- Medium Budget 4K HTPC Build 2017 for Kodi, Plex and Gaming
- Cheap 4K HTPC Build for Kodi, OpenELEC, and LibreELEC 2017
- Low Power Home Server Build 2017 for Network File and Media Storage
- Best HTPC for Kodi with 4K on a Medium Budget 2017 (~$400)
- Energy efficient budget HTPC-NAS combo build 2016
If you need additional explanation, refer to Kodi Wiki on how to add videos and music to your library. You will now be able to add and update library from any of the devices that share this Kodi MySQL library. All the devices will be in sync.
6. Setup Other Kodi Devices
 The final step is to setup Kodi MySQL library sharing on other devices. If all your media is stored on a central server, media is shared with Kodi devices through SMB or NFS (NFS is better), and your sources are setup to use these remote locations then the process is quite easy. Just copy of the
 advancedsettings.xml and sources.xml files from your first device and copy them in to the userdata folder of all Kodi devices that you want to sync to your shared MySQL library. Once pasted, start Kodi, and you are good to go. [Read: 10 Tweaks to improve XBMC performance]
Summary
That is all there is to letting Kodi share MySQL library with other devices in your network. All properly configured Kodi devices on your network should be able to synchronize MySQL library with a central database. There are more uses to this than just setting up a shared library. With a little bit of tweaking you can setup Kodi / XBMC multiple libraries for different Kodi profiles. For example, restricting your kids to a specific library. More articles on these topics will come later. For now, switch to Kodi MySQL setup and enjoy sharing / syncing media with other media boxes on your network.


![10 Best Plex Client Devices [2022] - STUTTER-free Streaming Best Plex Client Devices](https://www.smarthomebeginner.com/images/2022/02/best-nas-for-plex-server-featured-images-from-pexels-photography-maghradze-ph-3764958-e1648542743772.jpg)
![15 Best Jellyfin Plugins [2023] - Supercharge your Media Server Jellyfin Intros Plugin Preview Pre-Roll](https://www.smarthomebeginner.com/images/2022/08/jellyfin-intros-preroll-preview.jpg)
![15 Best Plex Alternatives [2022] - FREE and BETTER Options Best Plex Alternatives feature image](https://www.smarthomebeginner.com/images/2022/08/best-plex-alternatives-feature-image.gif)
![10 Best Emby Client Devices [2023] - 4k, Hardware Transcoding, etc. setup emby server with raspberry pi](https://www.smarthomebeginner.com/images/2017/02/setup-emby-server-with-raspberry-pi.jpg)
![10 Best Jellyfin Client Devices [2022] - 4k, Hardware Transcoding, etc. Jellyfin Roku App](https://www.smarthomebeginner.com/images/2021/02/jellyfin-roku-client-app-ft.jpg)