You may have read my Docker Traefik media server guide. Can you build that on a Synology NAS? Definitely. In this post, I will show you how to build a Synology Docker Media Server with Traefik and Docker Compose.
In my Docker Traefik guide, I hinted at being able to use the same Docker Compose snippets from my GitHub Repo to build Synology DSM docker media server. Since then I have received several requests for a guide on how to do this.
It took a while but here it is. In this post, I will show you how to build a Synology Traefik Docker stack using Docker Compose instead of Synology DSM's Docker GUI app.
Note that this guide is to be followed in conjunction with my Docker Traefik guide. Therefore, I will refer you back to the other guide instead of duplicating the information here.
In essence, this guide focusses on setting up/preparing your NAS to be able to build a Docker Traefik stack on Synology DSM using Docker Compose examples from my GitHub Repo.
Table of Contents
- Synology Docker Background Info
- Docker and Docker-Compose on Synology NAS
- Synology Traefik Docker Stack Setup
- Known Issues
- Security Improvements
- Synology DSM Docker Traefik Stack - Final Thoughts
My setup is constantly changing and evolving. It is practically not possible for me to keep this guide up-to-date with all the changes I am making. Therefore, you most probably will find differences between what is written in this guide and what is on my repository.
So I strongly recommend checking the Changelog on my GitHub repo to look at the recent changes and relevant explanations. Every few months, I will update this guide so it catches up to my GitHub repo. When I do, the changelog for this guide (see below) will be updated.
Changelog
- July 23, 2020 - Added info on how to free up ports 80 and 443. Added information on using Docker Socket Proxy and Docker Secrets. Removed changing ownership of docker socket for security.
Synology Docker Background Info
In 2019, I moved from an HTPC NAS Combo server to separate Intel NUC Home Server and Synology NAS. [Read: Moving from a Home Server to NAS (Synology) – The why, learnings, and tips]
One of the main reasons for my move was that I wanted a set it and forget it box for Plex, file storage, and database services. With hardware transcoding support, Synology DS918+ was one of the best media server for Plex at the time.
Another enticing factor about Synology was its support for Docker. In this Synology DSM docker guide, I will share how to use Docker Compose to easily setup a media server on Synology DS918+. This guide should work on any Synology model that supports Docker.
Is a Synology Powerful Enough for Docker Media Server?
As I have said in my other posts, I run over 60 docker containers on my Intel NUC home server, which is the heart of my smart home setup.
I am still in the process of deciding which containers need to be on Synology and which ones should be on my NUC home server. Please follow my GitHub Repo to see my latest setup.
For testing, I added a few of those containers to my Synology NAS and the resource usage is shown below.
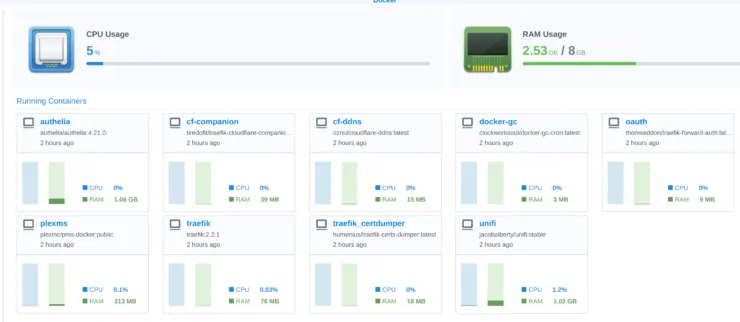
Here are some notes:
- Plex is running in docker but was not playing anything at the time this screenshot was taken.
- Except Unifi controller and Plex, the rest of the containers are not resource hungry.
- CPU usage is modest at 5% but the stack is using 2.53 GB of my 8 GB RAM memory.
Streaming something on Plex should only increase the CPU marginally as the DS918+ model support hardware transcoding. In a separate guide, I will show you how to enable Plex hardware transcoding support with Docker Compose on Synology NAS. If you cannot wait, you can check my GitHub Repo.
Once more resource-hungry apps are added (eg. Radarr, Sonarr, SABnzbd, etc.), RAM could fill up quite easily. As a comparison, with 63 containers, I am using about 15 GB of RAM memory on my Intel NUC home server.
RAM will be one of the biggest limitations in a Docker Synology server setup.
My Synology NAS
My DS918+ model came with 4 GB. Officially, this model supports up to 8 GB of RAM (2x4 GB). But unofficially, you can go to 16 GB of RAM. This is the case for several of the newer and mid to high tier Synology models. So be sure to research your model.
Here are the upgrades I did for my Synology NAS:
- RAM - Added additional 4 GB. Not all makes and models are compatible. Synology branded RAMs are expensive. But Crucial 4GB 204-pin SODIMM DDR3 PC3-14900 worked.
- 2 x HP EX920 M.2 256GB PCIe Nvme SSD for Caching, which is averaging nearly 100% fill and 92% hit rate per month.
I recommend adding the M2 cache, which will prolong the life of your NAS drives. It will also improve the performance of your Plex UI (loading thumbnails, etc.).
My Synology NAS is being backed up to Google Drive (business account gives your unlimited storage even though it says 1 TB/user) using the built-in Cloud Sync app. [Read: Fix for Synology Cloud Sync stops syncing with “up-to-date” message]
RAM Upgrade on Synology NAS
Upgrading RAM on Synology is quite easy. However, not all RAM models/brands are compatible. Here is a summary of compatible RAM upgrades for common/recent Synology models.
| Synology Models | Memory Type | Official (Synology Memory) | Third-Party Memory |
|---|---|---|---|
| DS920+, DS720+, DS420+, DS220+ | DDR4-2666 non-ECC unbuffered SO-DIMM 260 pin 1.2V | D4NESO-2666 4GB | Crucial 4GB Crucial 8GB Crucial 16GB |
| DS1019+, DS918+, DS218+, DS418play | DDR3L-1866 non-ECC unbuffered SO-DIMM 204 pin 1.35V | D3NS-1866L 4GB | Crucial 4GB Crucial 8 GB Crucial 16GB |
| Other Synology models | Crucial brand memories with the same spec as the official RAMs should work. | ||
| Synology j models | RAM memory cannot be upgraded | ||
If you plan to set up a well rounded Docker media server on Synology NAS, then I strongly recommend upgrading the RAM.
Why use Docker Compose on Synology instead of Synology DSM Docker GUI?
Synology DSM has a great GUI for docker. It allows you to browse images, setup containers, and manage them from the web interface. So why use Docker Compose instead?
Well, if Docker makes installing apps easier, then Docker Compose takes it to another level.
It makes your stack portable and moving from one machine to another a breeze. For example, when I recently upgraded my Intel NUC from Linux Mint 19 to POP OS 20.04, all I had to do was setup the OS, install docker and docker-compose, and start the stack. I was back in business in literally 30 min.
Similarly, when I moved some of my apps from Intel NUC to Synology Docker, all I had to do was copy over the docker-compose to Synology and start it.
Essentially, Docker Compose eliminated the hundreds of clicks and steps that would have needed to setup the same stack using the Synology DSM Docker GUI.
Be the 1 in 200,000. Help us sustain what we do.Join Us (starting from just $1.67/month)
Docker and Docker-Compose on Synology NAS
With all the background information taken care of. Let us now move on to setting up a docker media server on Synology using Docker-Compose. Once again, I remind you that this Synology Docker Compose tutorial is more of preparing your Synology so you can follow from Docker Traefik tutorial than going into the nitty-gritty details of the whole setup process.
I want to warn you that if you prefer not to get your hands dirty with commandline then this Docker Compose Synology tutorial is not for you. Having said that, if you go through the process of learning, you will be so happy that you did.
1. Install Docker on Synology
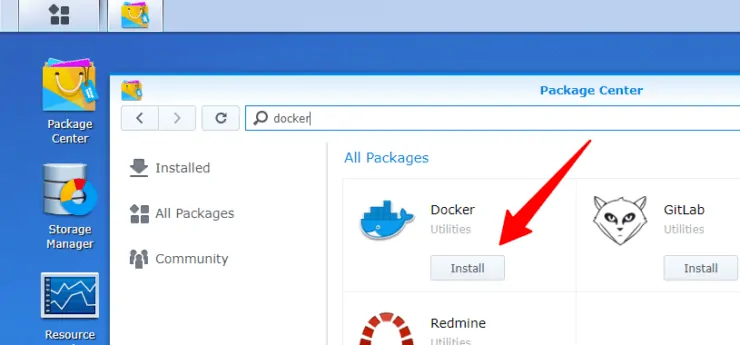
First, the easy step. Install Docker on Synology Disk Station Manager. Open Synology DSM package center, search for Docker, and install it as shown in the screenshot below.
Unlike on Linux, the Synology Docker installation installs both Docker Engine and Docker Compose.
2. SSH into Synology DSM
Synology does not provide a terminal interface via the WebUI. So you will need to SSH into Synology from another machine.
To enable SSH on Synology, open control panel and go to Terminal & SNMP as shown below. Check Enable SSH service. The default port is 22. You may change the port to something else for additional security.
Here is one more benefit of Docker Compose on Synology, you can follow my Guacamole Docker guide and setup a browser-based remote desktop client on Synology. Once done, your Synology terminal is available from anywhere. All you need is a browser.
After enabling SSH, connect to your Synology DSM's SSH terminal from a remote machine. On Windows, you could one of the recommended SSH clients or even Windows PowerShell.
3. Install Docker Compose on Synology
Wait, I thought you said Synology's Docker package installs both Docker and Docker Compose.
Yes, I did say that. But Synology's docker packages usually tend to be quite old.
At the time of writing this, the currently available versions of Docker and Docker Compose are 19.03.12 and 1.26.2, respectively. But here is what Synology Package Center installs:

Although you can upgrade Docker, it is quite tricky and can be problematic. So I won't cover it here. So let's install latest Docker Compose on Synology DSM.
To install Docker Compose on Synology NAS, SSH into the NAS and issue the follow commands in sequence:
sudo su
cd /var/packages/Docker/target/usr/bin/
mv docker-compose docker-compose_bak
The last command backs up the current docker-compose. Next, let's download the latest Docker Compsose file:
curl -L https://github.com/docker/compose/releases/download/X.XX.X/docker-compose-`uname -s`-`uname -m` -o docker-compose
Be sure to replace the X.XX.X with the latest docker compose release number from here (1.26.2 at this time).
Then, give execute privileges to docker-compose:
chmod +x docker-compose
Now if you check the Synology Docker-compose version, you should see the latest version active.

Ok, we are inching closer to setting up a Synology Traefik Docker stack using Docker Compose.
4. Enable Home Folder for User
This is an optional convenience step and is not necessary. I like to use bash_aliases to simplify docker-compose commands.
For that, you will have to enable Home Folder for the user on Synology NAS.
To enable user home folder on Synology DSM, open control panel and go to User->Advanced. Scroll down and enable user home service as shown below.

Note that the location of the home folder may be different based on how your Synology volumes are set up. I only have one volume.
When the Docker package is installed on Synology DSM, a new shared folder for docker is created: /volume1/Docker (the volume number could be different in your case). Let's call this the "Docker Root" folder.
Let's give the Synology user read-write access to the Docker shared folder. Open control panel, go to User, highlight the main user (the user you normally login as), and click the Edit button.
Then go to the permissions tab and enable Read/Write for the user on the Docker shared folder, as shown below.

6. Change User and Docker Socket Permissions
Running and managing docker containers requires sudo privileges. So this means you will have to type sudo for every docker command or switch to the root user account. Otherwise, you will see the following error:

Running Docker Commands As Non-Root Causes Errors
You can get around this by adding the current user to the docker group using the following command:
sudo synogroup --add docker username
Replace username with your username.
7. Setup Bash Aliases on Synology
As I mentioned before, this is a convenience step. Doing so makes it easy to start up and down the Synology Docker Compose stack (eg. dcup2 to start the traefik 2 docker stack). You can read more about in my docker traefik guide.
For a full list of shortcut bash aliases check my GitHub Repo. All of these commands should work on Synology DSM as well.
To setup bash aliases on Synology, create a bash_aliases text file in a known location. For simplicity, let's creates file called bash_aliases.txt inside the docker root folder (/volume1/Docker).
Then, add contents from bash aliases example file from my repo. Customize it to your liking but ensure that the path to the docker-compose files are correct.
Next, run the following two commands in sequence (not as root but as the user). The second command will create a symbolic link to the bash aliases text file and the last command will update the shell session with updated bash aliases.
cd /var/services/homes/username
ln -s /volume1/docker/bash_aliases.txt .bashrc
. ~/.bashrc
Again, username should be your username. Once done, you should see .bashrc symlinked to the bash_aliases.txt file, as shown below (using the command ls -al.

That is it for prep work. Let's move on to setting up Traefik on Synology using Docker Compose.
8. Ensure Ports 80 and 443 are Free
Traefik requires ports 80 and 443 to be free. Some Synology apps such as (WebStation, PhotoStation, Nginx Reverse Proxy, etc.) use these ports.
You can check if these ports are being used with the following command, which shows all ports that currently have a service listening on it:
sudo netstat -tulpn | grep LISTEN
Alternatively, you can filter by ports 80 and 443:
sudo netstat -tulpn | grep LISTEN | grep '80\|443'
The output should not show any services with port 80 and 443. If ports 80 and 443 are free, you won't see these ports on the above list/output. If other apps are using them, then you may see the name of app (eg. WebStation).
What to do if ports 80 and 443 are being used on Synology DSM?
If ports are being used by an app (more often than not, it will be Nginx webserver), your option is to see how you can manually change the port on which the app listens. For example, Synology (Nginx) uses ports 80 and 443.
To make Nginx listen on ports other than 80 and 443 on Synology, check my guide on freeing ports 80 and 443 on Synology for a script that can do this.
During boot, the script will find ports 80 and 443 in Nginx config files and change them to 81 and 444. And because we are doing this using a script at boot, this change will continue to happen even after DSM upgrades (which normally will reset the ports).
Once Traefik is up you can always put the apps behind Traefik using rules folder (as described later) with service listening at an alternative port (81 and 444 in the example above).
Synology Traefik Docker Stack Setup
In this Synology Traefik tutorial, I will walk you through setting up Traefik v2 using docker-compose. All of the docker-compose files in my Docker Traefik repo can be used on Synology with little to no changes. So, I will not go into detail.
Instead, I will show two examples: 1) how to get Traefik v2 up and running with LetsEncrypt certificate and 2) setup portainer for managing the containers.
Before proceeding, review and follow the following sections from my previous guide:
- Basics of Traefik reverse proxy setup (knowledge)
- Traefik configuration (knowledge)
- Prep work for Traefik 2 (required)
- Setup HTTP Authentication Credentials - Follow the Traefik 2 guide and create .htpasswd file inside a folder called shared in the docker root folder.
- Create .env file with the required environmental variables: DOCKERDIR (docker root folder /volume1/Docker), PUID, PGID, TZ, SERVER_IP, DOMAINNAME_HOME_SERVER, CLOUDFLARE_EMAIL, and CLOUDFLARE_API_KEY.
- Create Traefik 2 folders and files in the docker root: traefik2/traefik.log, traefik2/rules/, and traefik2/acme/acme.json. Ensure that acme.json file permissions are set to 600.
- Create Traefik 2 Network: t2_proxy
Let's now start creating the Synology docker-compose file in the docker root folder (/volume1/Docker).
For simplicity and compatibility with the existing files in my GitHub repo, I am calling my Synology Docker-Compose file docker-compose-t2-synology.yml. You can call it docker-compose.yml if you prefer. Just make sure your bash aliases are edited accordingly.
1. Docker Compose Network Block
First, let's add the network block as explained previously.
version: "3.7"

########################### NETWORKS
networks:
  t2_proxy:
    external:
      name: t2_proxy
  default:
    driver: bridge

########################### SERVICES
services:
# All services / apps go below this line
2. Traefik Docker Compose on Synology
All the pieces that are in the Synology Traefik docker-compose have already been explained in my previous guide. I will only touch on a few key points as needed.
Here is the full Traefik v2 docker-compose for Synology:
  # Traefik 2 - Reverse Proxy
  traefik:
    container_name: traefik
    image: traefik:chevrotin # the chevrotin tag refers to v2.2.x
    restart: unless-stopped
    command: # CLI arguments
      - --global.checkNewVersion=true
      - --global.sendAnonymousUsage=true
      - --entryPoints.http.address=:80
      - --entryPoints.https.address=:443
      # Allow these IPs to set the X-Forwarded-* headers - Cloudflare IPs: https://www.cloudflare.com/ips/
      - --entrypoints.https.forwardedHeaders.trustedIPs=173.245.48.0/20,103.21.244.0/22,103.22.200.0/22,103.31.4.0/22,141.101.64.0/18,108.162.192.0/18,190.93.240.0/20,188.114.96.0/20,197.234.240.0/22,198.41.128.0/17,162.158.0.0/15,104.16.0.0/12,172.64.0.0/13,131.0.72.0/22
      - --entryPoints.traefik.address=:8080
      - --api=true
      # - --api.insecure=true
      # - --serversTransport.insecureSkipVerify=true
      - --log=true
      - --log.level=DEBUG # (Default: error) DEBUG, INFO, WARN, ERROR, FATAL, PANIC
      - --accessLog=true
      - --accessLog.filePath=/traefik.log
      - --accessLog.bufferingSize=100 # Configuring a buffer of 100 lines
      - --accessLog.filters.statusCodes=400-499
      - --providers.docker=true
      - --providers.docker.endpoint=unix:///var/run/docker.sock
      # - --providers.docker.defaultrule=HostHeader(`{{ index .Labels "com.docker.compose.service" }}.$DOMAINNAME_HOME_SERVER`)
      - --providers.docker.exposedByDefault=false
      # Add dns-cloudflare as default certresolver for all services. Also enables TLS and no need to specify on individual services.
      - --entrypoints.https.http.tls.certresolver=dns-cloudflare
      - --entrypoints.https.http.tls.domains[0].main=$DOMAINNAME_HOME_SERVER
      - --entrypoints.https.http.tls.domains[0].sans=*.$DOMAINNAME_HOME_SERVER
      - --providers.docker.network=t2_proxy
      - --providers.docker.swarmMode=false
      - --providers.file.directory=/rules # Load dynamic configuration from one or more .toml or .yml files in a directory.
      # - --providers.file.filename=/path/to/file # Load dynamic configuration from a file.
      - --providers.file.watch=true # Only works on top level files in the rules folder
      # - --certificatesResolvers.dns-cloudflare.acme.caServer=https://acme-staging-v02.api.letsencrypt.org/directory # LetsEncrypt Staging Server - uncomment when testing
      - --certificatesResolvers.dns-cloudflare.acme.email=$CLOUDFLARE_EMAIL
      - --certificatesResolvers.dns-cloudflare.acme.storage=/acme.json
      - --certificatesResolvers.dns-cloudflare.acme.dnsChallenge.provider=cloudflare
      - --certificatesResolvers.dns-cloudflare.acme.dnsChallenge.resolvers=1.1.1.1:53,1.0.0.1:53
      - --certificatesResolvers.dns-cloudflare.acme.dnsChallenge.delayBeforeCheck=90 # To delay DNS check and reduce LE hitrate
    networks:
      t2_proxy:
        ipv4_address: 192.168.254.254 # You can specify a static IP
    # networks:
    #   - t2_proxy
    security_opt:
      - no-new-privileges:true
    ports:
      - target: 80
        published: 80
        protocol: tcp
        mode: host
      - target: 443
        published: 443
        protocol: tcp
        mode: host
      - target: 8080
        published: 8080
        protocol: tcp
        mode: host
    volumes:
      - $DOCKERDIR/traefik2/rules:/rules # file provider directory
      - /var/run/docker.sock:/var/run/docker.sock:ro
      - $DOCKERDIR/traefik2/acme/acme.json:/acme.json # cert location - you must touch this file and change permissions to 600
      - $DOCKERDIR/traefik2/traefik.log:/traefik.log # for fail2ban - make sure to touch file before starting the container
      - $DOCKERDIR/shared:/shared
    environment:
      - CF_API_EMAIL=$CLOUDFLARE_EMAIL
      - CF_API_KEY=$CLOUDFLARE_API_KEY
    labels:
      - "traefik.enable=true"
      ## HTTP-to-HTTPS Redirect
      - "traefik.http.routers.http-catchall.entrypoints=http"
      - "traefik.http.routers.http-catchall.rule=HostRegexp(`{host:.+}`)"
      - "traefik.http.routers.http-catchall.middlewares=redirect-to-https"
      - "traefik.http.middlewares.redirect-to-https.redirectscheme.scheme=https"
      ## HTTP Routers
      - "traefik.http.routers.traefik-rtr.entrypoints=https"
      - "traefik.http.routers.traefik-rtr.rule=HostHeader(`traefik.$DOMAINNAME_HOME_SERVER`)"
      ## Services - API
      - "traefik.http.routers.traefik-rtr.service=api@internal"
      ## Middlewares
      - "traefik.http.routers.traefik-rtr.middlewares=chain-basic-auth@file"
For an explanation of the sections, review my Traefik 2 guide.
Ensure that you have the chain-basic-auth middleware file in the rules folder for basic authentication. Without the middleware file Traefik won't start.
Save the docker-compose file.
3. Testing Synology Traefik Dashboard
To start the docker-compose stack, use the following command:
docker-compose -f /volume1/Docker/docker-compose-t2-synology.yml up -d
Alternatively, you can use either dcup2 or dcrec2 traefik, if you have the right bash_aliases setup.
Next, follow the logs to look for any errors. The docker command to look up logs on Synology is different from the command on a generic Linux install. I had issues using docker-compose logs command due to the way log driver is implemented in the Synology docker package.
To review the real-time logs on Synology commandline, use the following command (or dclogs traefik if bash aliases is setup):
docker logs -tf --tail="50" traefik
Review the logs and look for successful DNS validations and LetsEncrypt certificate generation, as explained in my docker Traefik 2 guide.
The screenshot below shows successful LetsEncrypt certificate generation using Traefik on Synology NAS.
Now if you open the Traefik dashboard and look at the certificates, you should see the right certifications as shown below.
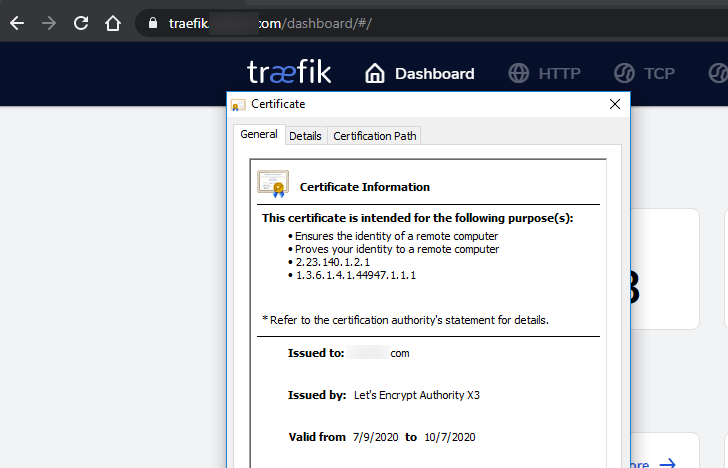
If your certificate is good, then congratulations! You are ready to roll.
Be the 1 in 200,000. Help us sustain what we do.Join Us (starting from just $1.67/month)
4. Adding Portainer to Synology Docker Media Server
Let's add portainer as an example. Here is the docker-compose snippet to use:
  # Portainer - WebUI for Containers
  portainer:
    container_name: portainer
    image: portainer/portainer:latest
    restart: unless-stopped
    command: -H unix:///var/run/docker.sock
    networks:
      - t2_proxy
    ports:
      - "$PORTAINER_PORT:9000"
    volumes:
      - /var/run/docker.sock:/var/run/docker.sock:ro
      - $DOCKERDIR/portainer/data:/data # Change to local directory if you want to save/transfer config locally
    environment:
      - TZ=$TZ
    labels:
      - "traefik.enable=true"
      ## HTTP Routers
      - "traefik.http.routers.portainer-rtr.entrypoints=https"
      - "traefik.http.routers.portainer-rtr.rule=HostHeader(`portainer.$DOMAINNAME_HOME_SERVER`)"
      ## Middlewares
      # - "traefik.http.routers.portainer-rtr.middlewares=chain-no-auth@file" # No Authentication
      - "traefik.http.routers.portainer-rtr.middlewares=chain-basic-auth@file" # Basic Authentication
      # - "traefik.http.routers.portainer-rtr.middlewares=chain-oauth@file" # Google OAuth 2.0
      # - "traefik.http.routers.portainer-rtr.middlewares=chain-authelia@file" # Authelia
      ## HTTP Services
      - "traefik.http.routers.portainer-rtr.service=portainer-svc"
      - "traefik.http.services.portainer-svc.loadbalancer.server.port=9000"
Here are some notes for customization:
- Make sure that the environmental variables are defined in the .env file: $TZ, $PORTAINER_PORT, and $DOCKERDIR
- The example above shows basic authentication. You can also setup Google OAuth or Authelia. If you do, ensure that you have the necessary middleware files and uncomment the appropriate labels. Review Securing Traefik section of my previous guide for details.
Now let's start the stack (dcup2) to test if Protainer fires up.
Bummer! we have an error:

May be someone has an answer for this. Unlike the Docker Traefik 2 stack on my Linux home server, I could not get the Synology Docker implementation to create the necessary folders on the host machine automatically.
$DOCKERDIR/portainer/data folder does not exist in the docker root folder and so Portainer errors out. The workaround is to manually create the missing folder and portainer should start right up.
I could not figure out why this is happening. If you have an answer, please comment below to help out me and others.
I have not tested it but another workaround may be creating named volumes in docker-compose.
5. Adding Other Apps to Synology Traefik Docker Stack
My Synology docker stack is constantly changing and evolving. I split my entire stack between Synology and Intel NUC. Refer to my GitHub Repo to find out what app runs where.
Having said that, you can copy-paste the snippets from any of the docker-compose files in my repo to your docker-compose file on Synology and you should be able to add the app to your stack. You can even run your own Docker WordPress Site on Synology.
6. Additional Reading
As I said before, this guide is to be followed in conjunction with my previous Traefik 2 guide. I do not go into a lot of detail in this guide. If you have been taking shortcuts so far (not reading my previous guide), then here are some key sections that you might find useful:
- Cloudflare Settings for Traefik Docker: DDNS, CNAMEs, & Tweaks
- Adding non-docker or external apps behind Traefik - A good example is putting Synology DSM webUI behind Traefik
- Troubleshooting - In short, make sure there are no typos (especially in middleware, yaml indendation errors (use a YAML validator such as YAMLlint), ports 80 and 443 are forwarded, all CNAMEs are defined in the DNS records, acme.json file has 600 permissions, etc.
- What about Traefik v1? If you have not moved to Traefik v2 yet, you should be able to combine information from this guide with the following two guides to complete your setup:
Known Issues
This Synology Docker Compose guide works. But there are a couple of known issues. One is already mentioned above: Synology's docker implementation does not auto-create missing folders on the host machine.
Logging Issue
The other one is: if you use docker-compose to define your docker-traefik stack on Synology, your DSM's Docker GUI app's functionality will be reduced. You will have less control over the containers and docker logs will not appear in the GUI. You can still start and stop your containers from the GUI.
My recommendation is if you use docker-compose on Synology, move to it 100%. This avoids any unexpected behaviors.
Security Improvements
Since writing this guide, I made several (optional) security improvements. These are reflected in my GitHub repo but not shown in this guide.
Docker Socket Proxy
The docker-compose of Traefik shown above gives direct access to docker socket (/var/run/docker.sock) and is different from what is shown in my GitHub repo.
It is recommended not to give Traefik (or other docker apps like Watchtower, Portainer, etc.) direct access to the docker.sock. A more secure alternative is to use a Docker Socket Proxy (Tecnativa).
I have implemented this successfully and my GitHub repo reflects this.
Briefly, this involves:
- Creating a new docker network for socket proxy (eg. socket_proxy)
- Creating a socket-proxy container/service with the socket_proxy network added to it. See my GitHub for Socket Proxy docker-compose.
- Define proper permissions for what Docker API functions to allow or deny access to. A good example list is already in my socket proxy docker-compose.
- Adding socket_proxy network to services (eg. Traefik, Portainer, etc.) that need access to the docker socket.
- Replace /var/run/docker.sock in services with tcp://socket-proxy:2375 via DOCKER_HOST environment variable or other appropriate ways.
Currently, I use socket proxy for Traefik, Portainer, Cloudflare Companion, Ouroboros, Docker Garbage Control, Dozzle, and Glances. I will cover this in detail in a separate post.
Docker Secrets
I have also implemented Docker secrets to protect some of the credentials.
This is not shown in the docker-compose examples above but can be seen in my GitHub repo files.
Briefly, implementing docker secrets requires:
- Saving confidential information (eg. API keys) as separate files inside "secrets" folder (/home/USER/docker/secrets). Here is an example secrets file for Cloudflare email.
- Adding a global secrets: block in the docker-compose as seen in my repo. This is a list of all docker secret names and the paths to files that have the secret values
- Adding secrets: block for each service with a list of secrets to make available to the service
- Appending _FILE to the variable name that will use the secret value in the environment: block, for each service
- Specifying variable values as /run/secrets/variable_name in the environment: block for each service. variable_name is the name of the file in secrets folder that contains the variable value.
I will cover this topic in detail in a separate post.
Synology DSM Docker Traefik Stack - Final Thoughts
When I started doing my research on setting up a docker media server on Synology, there wasn't enough coherent information out there. I spent several hours putting pieces together and figuring things out by trial and error.
At this point, this docker traefik Synology setup is nearly 100% compatible with the compose files on my GitHub repo. The only issue seems to be having to manually create the folders that are mapped as persistent volumes in the docker-compose files. This is a minor one-time inconvenience.
I hope this Traefik Synology guide helps you get started on your docker journey on Synology NAS.

