In my recent posts, we covered CrowdSec with the base Firewall Bouncer, then Cloudflare bouncer to stop bad traffic before it reaches the origin using your domain name, and then finally Traefik bouncer to catch all bad traffic that gets through Cloudflare.
So, my one server (i.e. the mothership) is now protected well with CrowdSec. I have other servers that I want to bring under this protection. What does this mean?
We are going to let the mothership take all the decisions on bad activities, no matter on which server the activity happens. The decision is then passed on to the respective bouncers to enforce the actions.
Let's start setting up our CrowdSec Multiserver setup using Docker.
Table of Contents
CrowdSec Multiserver Docker Setup
A CrowdSec Multi-server setup is very similar to a single-server setup. The main difference is the location of the CrowdSec API.
The key components of CrowdSec intrusion detection system were covered by me previously.
In a CrowdSec single server environment, all CrowdSec components except the central API are on the same machine.
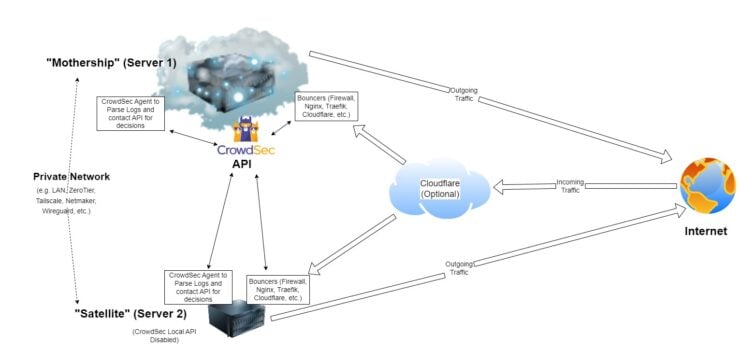
On the other hand, in a CrowdSec multiple server environment, all the servers share the same Local API from the "mothership". The satellite servers have only CrowdSec Agent and Bouncers, making the setup a bit leaner:
- CrowdSec Agent: To parse the logs and contact the local API (or in this case remote API) for a decision.
- CrowdSec Local API: This is included in the CrowdSec Docker image but we are NOT going to use it. Instead, we will use the remote API from the "mothership".
- CrowdSec CLI: It is already included with the CrowdSec Docker Agent.
- CrowdSec Bouncers: Installed locally on the satellite servers (Server 1, Server 2, etc.)
- CrowdSec Central API: Satellite servers won't interact with the CAPI. All interactions (e.g. alerts, pushing and pulling blocked IPs, etc.) are through the mothership.
Requirements for CrowdSec Multi-server Setup
1. "Mothership" Alive and Kicking
This CrowdSec multiserver guide is not intended to be exhaustive. Instead, it is intended to expand what we built previously in Parts 1, 2, and 3.
Therefore, you should at the very least have Part 1 of this series implemented: CrowdSec with Firewall Bouncer.
2. Private Network with "Satellite" Servers
In a CrowdSec multiple-server environment, the API on the "satellite" servers is disabled. Instead, they connect to the API on the "mothership".
This means the satellite servers need a way to reach the mothership. This can be done in many ways but here are two of them:
1. Open port 8080 (default CrowdSec API port) on the Router/Gateway
Once done, satellites should be able to connect using the WAN IP address of the mothership. But this is not recommended as there is a huge security risk of opening up the port to the internet. You could implement firewall rules on the mothership to only allow connections from certain IPs (satellites) to get around the security risk.
This is not a problem in a local network as no port forwarding is required and you can access the mothership using its LAN IP.
2. Create a Virtual Network
The second way, which is the way I decided to go is to create a virtual network using ZeroTier One. You could also use, Tailscale, NetMaker, etc. All of them have free plans. You could even use plain WireGuard, which is the technology behind those services. [Read: Complete Wireguard Setup in 20 min – Better Linux VPN Server]
All my key machines are connected to the ZeroTier network, and I can use their ZeroTier IP and port 8080 to connect to CrowdSec API, without forwarding any ports.
So, we are going to assume that you have both requirements satisfied before proceeding with the CrowdSec Docker Multiserver setup.
Install Bouncers
Wait! Why are you asking me to install the bouncers before the CrowdSec agent?
Very good question. In a CrowdSec multiserver setup, the bouncers are not talking to the local agent. Instead, they are communicating with the CrowdSec API in the mothership.
So all IPs that are banned based on various logs on the mothership (host logs, nginx, traefik, etc.) can be automatically added to the satellite server's firewall block. The same applies to other bouncers.
The installation process is the same as in previous guides: Firewall Bouncer, Cloudflare Bouncer, Traefik Bouncer.
The difference is we will have to register the bouncer on the CrowdSec API on the mothership. Then, we use the generated API key and the URL of the API on the mothership to connect the bouncer to the remote API.
Firewall Bouncer
Let's take the example of a Firewall Bouncer. Everything is the same as described in the previous guide, except:
- api_url: In my mothership (Server 1), I exposed port 8080 to the host machine. This host machine is part of the same virtual network as my satellite server (Server 2). So I can access the API on the mothership using http://192.168.10.250:8080, where 192.168.10.250 is the IP address of the mothership on the virtual network (e.g. ZeroTier network in my case). If both machines are on the same LAN, then you can use the LAN IP as well.
- api_key: Enter the API key generated on the mothership.
Let's check the list of bouncers connected to CrowdSec API on the mothership, using the CLI (run on the mothership):
sudo docker compose -f /home/USERNAME/docker/docker-compose-t2-web.yml exec -t crowdsec cscli bouncers list
This should show a list of all bouncers connected to the API, along with their IP as shown below.

Notice the validated Firewall Bouncer connection from the satellite server (192.158.10.211), which is on the same ZeroTier network as the mothership.
Install CrowdSec Agent
If my bouncers are already blocking bad traffic, why do I need a CrowdSec Agent on the satellite server?
You do not "need" a CrowdSec agent on the second server. But you may want to install it anyway.
Let's imagine that your second server is being attacked by bad IPs that are not on the block list.
In this situation, these logs won't be parsed and sent to the API to make a decision. So the new bad IPs that are detected on the satellite servers won't be added to the CrowdSec blacklist. This is why we need a CrowdSec Agent on the satellite servers - so all logs can be parsed.
CrowdSec Agent is part of the official CrowdSec Docker image. Therefore, we install it exactly as described in part 1 of this CrowdSec Docker series.
Follow the installation section in its entirety: adding the CrowdSec Docker compose, customizing it, starting the container, updating hubs if necessary, and finally familiarizing yourself with the CrowdSec CLI commands.
Be the 1 in 200,000. Help us sustain what we do.Join Us (starting from just $1.67/month)
Configure Agent to Use Remote API
The CrowdSec Agent on server 2 (and beyond) is configured partially in the same way as described previously.
First, customize acquis.yaml as explained in part 1 of this CrowdSec tutorial series. Similarly, follow the same guide to setup your custom whitelists.
In my case, my server 2 is on Proxmox. I even added the Proxmox collection and mounted the Proxmox logs folder into CrowdSec to parse Proxmox logs.
Restart CrowdSec and follow the container logs to ensure it starts properly and all collections, scenarios, and logs are available.
Register New LAPI on CrowdSec
Next, let us register our satellite server onto our mothership.
Run the following command on the satellite server (server 2):
sudo docker compose -f /home/USERNAME/docker/docker-compose-t2.yml exec -t crowdsec cscli lapi register -u http://192.168.10.250:8080 --machine zDoc
docker-compose-t2.yml is the Docker stack I run on my second server. 192.168.10.250 is the private network IP of the mothership.
If successfully registered, you should the following output:

Validate the Satellite Servers
At this point, our second server should be registered on the mothership. However, it has not yet been approved to connect to the mothership.
On the mothership, run the following command:
sudo docker compose -f /home/USERNAME/docker/docker-compose-t2-web.yml exec -t crowdsec cscli machines validate zDoc
This should validate the connection and now if you check the machines list on the mothership, you should see the following:

Note the status before and after the validation.
Turn On "Agent-Only" Mode on Satellite Servers
Open local_api_credentials.yaml from the CrowdSec Docker appdata folder on the second server and copy the URL, agent user, and agent password to .env file.
Use the variables CROWDSEC_LOCAL_API_URL, CROWDSEC_AGENT_USERNAME, and CROWDSEC_AGENT_PASSWORD, respectively.
Now on CrowdSec Docker-Compose, add the following four environmental variables:
      DISABLE_LOCAL_API: "true"
      AGENT_USERNAME: $CROWDSEC_AGENT_USERNAME
      AGENT_PASSWORD: $CROWDSEC_AGENT_PASSWORD
      LOCAL_API_URL: $CROWDSEC_LOCAL_API_URL
We are disabling the local API as we are now connecting to the mothership. Restart CrowdSec to start it in "Agent-Only" mode.
Follow the logs to ensure no errors are seen. Once again, check the machines list on the mothership to ensure proper connection.

As shown above, a heartbeat should be successfully seen every minute indicating a good connection to the satellite server.
In addition, within a few minutes CrowdSec Console should also update to show the satellite servers connected to the CrowdSec instance on the mothership.

That's it, you are good to go. Now all your logs on the satellite server should be parsed by the agent and sent to the mothership for decisions.
Things to Know
Once the satellite server is connected to the mothership, its behavior will start to follow the rules set by the mothership.
For Example:
- The ban time will be what is set on the mothership.
- If you have notifications turned on all servers, then only the CrowdSec API on the mothership will send notifications for both machines.
These took a little bit of trial and error to find out. But again, the CrowdSec Discord was quite helpful.
Closing Thoughts
You can continue to expand your CrowdSec Multiserver Setup by adding more servers pretty much the same way.
CrowdSec has their own version of the multiserver setup. My approach was in some ways different. Although stated as "optional", their guide describes having a non-internet-connected mothership. Mine was an internet facing VPS that runs this website, which is the most attacked server in my setup.
Plus, my mothership also is "always-on" and has the highest availability.
In addition, if you plan on adding more servers to your setup, then I strongly recommend enabling MariaDB instead of SQLite, as described in my previous guide (or PostgreSQL).
I may continue the series to publish a guide on CrowdSec for Nginx Proxy Manager and finally one more on building monitoring dashboards with Prometheus and Grafana. So stay tuned.
Otherwise, I hope this CrowdSec multiserver guide helps you make your and others' setup more secure.


![Ultimate Docker Server: Getting Started with OS Preparation [Part 1] Docker Server Tutorials 1 OS Preparation](https://www.smarthomebeginner.com/images/2024/01/Docker-Series-01-Intro-and-OS-Prep.png)
