We have previously compared Jellyfin vs Plex vs Emby in detail. While Jellyfin is not the only alternative to Plex, it is THE top competitor. [Read: 60+ Best Docker Containers for Home Server Beginners 2023]
While Jellyfin uses the same Client-Server model as Plex, what makes it unique is its customizability and the ability to extend its functionality using a few of the great Jellyfin plugins.
Combined with a capable Jellyfin Client device, you can build your own Netflix-type media server. Jellyfin client apps exist for many platforms, including Jellyfin Roku client, which is my go-to player.
Introduction to Jellyfin and other relevant topics have been covered in detail in the guides linked above. The focus of this tutorial is to present a Jellyfin Docker-Compose example that will help you setup Jellyfin using Docker in just a few minutes.
Table of Contents
Jellyfin Docker Compose Setup
Most Docker tutorials out there give you the Docker run command and ask you to copy-paste it into Portainer. [Read: Portainer Docker Compose: FREE & MUST-HAVE Container Manager]
Having used Docker for over 5 years (and being a person of non-IT background), I strongly suggest you take the time to learn Docker compose and build your stack using it.
Docker Compose gives you portability between systems. I can use the docker-compose files from my GitHub repo in my Ubuntu Server on Proxmox, my Ubuntu Server VPS on Digital Ocean, or even my Synology NAS and they will work the same.
1. Preparing to Setup Jellyfin Using Docker
Requirements
First, let us start with some requirements. I won't go into a lot of details as these have been covered in detail in my Docker Media Server guide. Here is a summary of the requirements before Proceeding.
- Install Docker on Ubuntu
- Install Docker Compose on Ubuntu
- You do not need a domain name for this tutorial, but if you are going to expose Jellyfin to the internet it may help (but still not required)
Setting Up The Docker Environment
This is also explained in detail in my Docker Guide. We are going to customize a few things with Docker before building the Jellyfin Docker Compose file.
First, is the folder structure. I like to house all of the docker-related files and folders in one location. I call it the Docker Root Folder. Our docker-compose.yml, .env files, etc. will be located in this folder, as shown below.
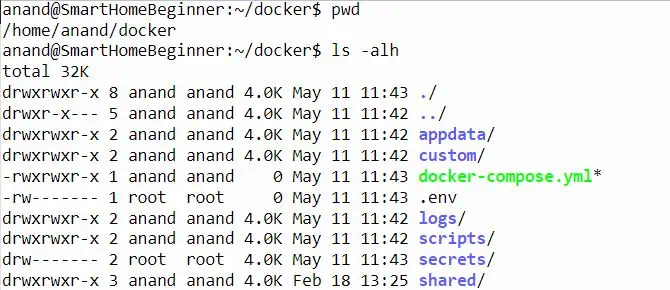
In addition, all of Jellyfin's data will go into the appdata/jellyfin folder. For this guide, you do not need to worry about the remaining folders in the above screenshot.
Create the .env file
First, the dot in front of env is not a typo.
It is a hidden file that will store some of the key information we may use (environmental variables) repeatedly. In the docker root folder (explained above), create the .env file and add the following contents to it.
PUID=1000
PGID=1000
TZ="Europe/Zurich"
DOCKERDIR="/home/anand/docker"
DATADIR="/media/storage
Customizing the above variables is explained in detail in my Docker guide, along with the right permissions to set (very important!).
In short, PUID and PGID are the user's user id and group id, obtained using the id command. TZ is the timezone, DOCKERDIR is the docker root folder mentioned above. And finally, DATADIR is the location of files, which could be media files.
In addition, replace 1000 and anand with your details.
2. Create the Base Jellyfin Docker Compose File
Before we go ahead and add the Docker Compose for Jellyfin, we will have to add a few basic elements to the compose file. Once again, this is all explained in detail in my Docker tutorial. But here is a summary of it.
In your Docker Compose file, if you do not already have it, add the following:
version: "3.9"

########################### NETWORKS
networks:
  default:
    driver: bridge

########################### SERVICES
services:
We are specifying the version of Docker Compose reference to use and the default Docker bridge network. If you do not know what these are, do not worry.
We are going to make Jellyfin accessible using the Docker Host machine's IP, using Jellyfin's default port (e.g. http://192.68.1.211:8096). For this purpose, the above network block is sufficient.
Using Docker macvlan (OPTIONAL)
If for some reason, you would like Jellyfin to have its own IP address in your network (e.g. port conflict with Docker Host), then you will have to use Docker's macvlan. Containers on macvlan will behave as if they are on a separate machine in your home network.
Add the code block below right at the end of the above network block.
  dockervlan:
    name: dockervlan
    driver: macvlan
    driver_opts:
      parent: eth1 # using ifconfig
    ipam:
      config:
        - subnet: "192.168.1.0/24"
          ip_range: "192.168.1.250/32"
          gateway: "192.168.1.1"
Since my home network is in the subnet 192.168.1.X, I wanted Jellyfin to have an IP in this range. A few things to customize. First, eth1 is the name of the network interface to use. You can find this using the ifconfig or ip address command.
Next, customize the subnet and IP. I am assigning 192.168.1.250 to Jellyfin. The /32 at the end means only one IP. If you plan to put multiple containers on the same macvlan, you can use other numbers per your requirement (e.g. 29 for 5 machines, 30 for 2, etc.)
3. Docker Compose for Jellyfin Media Server
Here is the Docker-Compose for Jellyfin that I use. Add it right under services (pay attention to indentation):
  # Jellyfin - Media Server
  jellyfin:
    image: jellyfin/jellyfin:latest
    container_name: jellyfin
    restart: unless-stopped
    networks:
      - default
    user: $PUID:$PGID
    # devices:
    #  - /dev/dri:/dev/dri # for hardware transcoding
    ports:
      - "8096:8096" # HTTP Port
      # - "8920:8920" # Requires valid certificates.
    volumes:
      - $DOCKERDIR/appdata/jellyfin:/config
      - $DATADIR/media:/data/media # Add :ro at the end to make it read-only
      - /dev/shm:/data/transcode # Offload transcoding to RAM if you have enough RAM
Customizing Jellyfin Docker Setup
Here are some notes to understand and customize the above Jellyfin docker-compose example:
- We are using latest jellyfin/jellyfin docker image.
- Jellyfin will belong to the "default" network. This is fine for now. For advanced configurations, keep reading.
- With user: $PUID:$PGID, we are specifying that Jellyfin runs as the user id and user group, which we defined previously in .env file.
- /dev/dri is usually the graphics card. You can pass your docker host's graphics card to the Jellyfin docker container for hardware transcoding. Uncomment these lines (remove the # in front) to enable graphics card. You will have to enable hardware transcoding in Jellyfin settings.
- In the ports section, we are exposing port 8096 to the host. Therefore, Jellyfin will be available on the Docker host IP at port 8096. For example, my Docker host has an IP of 192.168.1.111. So Jellyfin will be available at http://192.168.1.111:8096.
We are not enabling port 8920, which is for HTTPS access, for two reasons: 1) this requires a valid SSL certificate and 2) we can get around this by putting Jellyfin behind a reverse proxy such as Nginx Proxy Manager or Traefik (see below). - Under volumes, we are mapping a persistent volume for Jellyfin configuration, another volume that has our media. You could make it read-only by adding :ro at the end. But this would disallow Jellyfin from saving artwork and media info in the same folder as the media. Finally, we are passing RAM for faster transcoding (ensure that /data/transcode is set as the transcoding folder in Jellfin settings).
Customizing Network
In the above Jellyfin Docker Compose file, we set the network as default. This is fine. But if you wanted a macvlan for Jellyfin that was described above, then replace the networks block with the following one.
    networks:
      dockervlan:
        ipv4_address: 192.168.1.250 # IP address inside the defined range
Note that the IP address specified is the same as what we configured previously in this guide. Jellyfin should be available at http://192.168.1.250:8096.
Alternatively, you can specify the Jellyfin Docker container to use the host network. In this case, Jellyfin functions as if it were running natively on your host system. This requires all necessary ports to be free (e.g. 8096, 1900, and 7359). To enable host networking, use the following block instead of networks:
network_mode: 'host'
In addition, you will also need to remove the ports section. Jellyfin should be available at http://192.168.1.111:8096, which is the same URL as the default Jellyfin docker compose setup shown previously.
Start Jellyfin
After customizing the Jellyfin Docker Compose file, you can start Jellyfin using the following command:
sudo docker compose -f ~/docker/docker-compose.yml up -d
Be sure to refer to my Docker guide to understand how you can follow the logs to check the start-up of the Jellyfin docker container. You may use Dozzle logs viewer for real-time logs viewing.
If all goes well, in a few minutes you should be to access Jellyfin using one of the URLs listed previously.
4. Accessing Jellyfin Over The Internet
Accessing Jellyfin from within your home network should work fine (described above). But what if you want access to Jellyfin on the go from outside your home network?
Well, there are many ways to do this.
The easiest and NOT RECOMMENDED way to do this is to forward port 8096 on your router/gateway to point to your Jellyfin servers IP address.
Accessing Jellyfin with VPN
A secure way to access Jellyfin is to connect to your home network using a VPN service. Home routers and network-attached storage devices sometimes come with a built-in VPN server. Once connected, you can use the same home network IP address of your Jellyfin Docker server.
You may also use a third-party VPN mesh network such as Tailscale or Zerotier-One. I use ZeroTier to tie all my key machines together in a virtual network. My Docker host is part of this network. Therefore, while on the go, I can use my Docker host's ZeroTier network IP address with Jellyfin's port number.
Another alternative is to set up your own Wireguard network. But this is a more advanced topic.
Other Posts in the Wireguard Series:
- Wireguard VPN Intro in 15 min: Amazing new VPN Protocol
- Complete Wireguard Setup in 20 min – Better Linux VPN Server
- Wireguard Windows Setup: Powerful VPN for Windows
- Wireguard Mac OS Client Setup – The sleek new VPN
- Wireguard Android Client Setup – Simple and Secure VPN
- Ultimate WireGuard Docker Compose: with CF and Traefik Support
Exposing Jellyfin with Reverse Proxy
Another secure way to access Jellyfin is to put it behind a reverse proxy. But this requires a domain name or a DDNS.
Nginx Proxy Manager is very simple to setup but not very flexible.
I use and recommend Traefik. You can read all about setting it up in my Docker Traefik guide or refer to my GitHub repo.
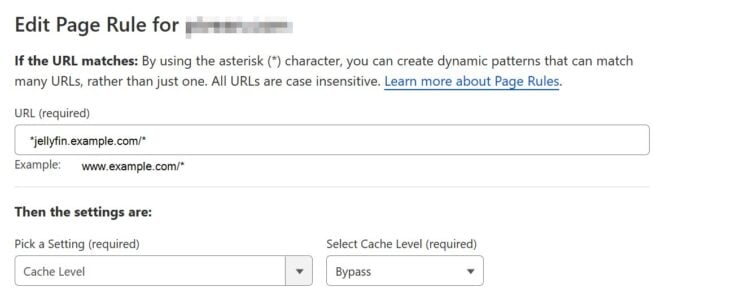
With a reverse proxy, you can access Jellyfin using a nicer URL (e.g. https://jellyfin.example.com).
Conclusions: Super Charging Jellyfin on Docker
Jellyfin is a powerful media center and the open-source community has been awesome in developing it fast. Installing it natively on operating systems is not difficult.
But Docker makes it much easier to install Jellyfin, and Docker Compose simplifies it even more. With the included Jellyfin Docker Compose and easy steps to install Jellyfin, you should be up and running in just about 5 minutes.
Be sure to check out the best plugins for Jellyfin and the Jellyfin client devices that give you the best experience.

![15 Best Jellyfin Plugins [2023] - Supercharge your Media Server Jellyfin Intros Plugin Preview Pre-Roll](https://www.smarthomebeginner.com/images/2022/08/jellyfin-intros-preroll-preview.jpg)
![10 Best Jellyfin Client Devices [2022] - 4k, Hardware Transcoding, etc. Jellyfin Roku App](https://www.smarthomebeginner.com/images/2021/02/jellyfin-roku-client-app-ft.jpg)
![10 Best Emby Client Devices [2023] - 4k, Hardware Transcoding, etc. setup emby server with raspberry pi](https://www.smarthomebeginner.com/images/2017/02/setup-emby-server-with-raspberry-pi.jpg)
![10 Best Plex Client Devices [2022] - STUTTER-free Streaming Best Plex Client Devices](https://www.smarthomebeginner.com/images/2022/02/best-nas-for-plex-server-featured-images-from-pexels-photography-maghradze-ph-3764958-e1648542743772.jpg)
