In this post, I will show you how to install Kitematic on Windows 10, 8, and 7 all editions. Kitematic is a Docker GUI that makes managing Docker containers a breeze. Previously, I have explained what is Docker and how it can make life easier for home server owners. In addition, we also showed you how to install Docker on Windows 10 64-bit Pro/Ent and other Editions, as well as on Ubuntu. Yesterday, we saw how to install SickRage in Docker from commandline. But even though it is easy, what if you had a GUI for Docker that makes install and managing containers easy? That's what Kitematic is about. Sounds exciting? Let's see how to install Kitematic on Windows 10, 8, and 7 all editions.
Must Read: Docker Media Server Ubuntu: Compose for 23 Awesome Apps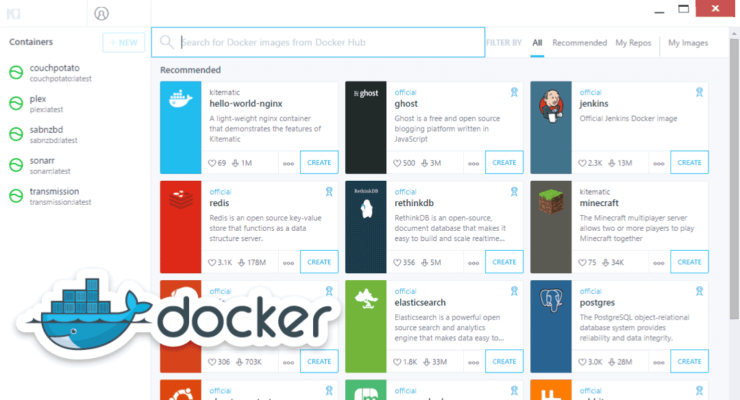
Table of Contents
Install Kitematic on Windows - GUI for Docker
In my opinion, even if you are a commandline pro, Kitematic Docker GUI can significantly speed up creating and managing docker containers. The method to setup Kitematic on Windows depends on Windows version and edition. This guide covers both scenarios A) how to Kitematic install on Windows 10 64-bit Professional, Enterprise, and Education editions and B) Windows 7 (all editions), 8 (all editions, Windows 10 32-bit, and Windows 10 64-bit non-Pro/Ent/Edu. If you use VirtualBox or VMware for other virtualization applications then method B is the way to go, irrespective of your Windows version and edition.
A. Install Kitematic on Windows 10 64-bit Pro, Ent, and Edu
On 64-bit Windows 10 Pro, Ent, and Edu, Hyper-V can be enabled. This allows Docker to be installed natively. Doing so however, does not give you an option to install Kitematic on Windows during Docker setup. Fear not, Kitematic GUI for Docker setup is quite easy.
1. Create Kitematic Folder
First create a folder to install kitematic on Windows 10. Navigate to C:\Program Files\Docker and create a new folder called Kitematic, as shown below.

You may be presented with a Windows security warning because you are modifying a protected folder. Ignore the warning and press "Continue".
2. Download Kitematic for Windows
Ensure Docker is running. If not, run it from the Windows apps menu. Wait about a minute for Docker engine to start. Then, right-click on the Docker tray icon and click on "Open Kitematic", as shown in the picture below.
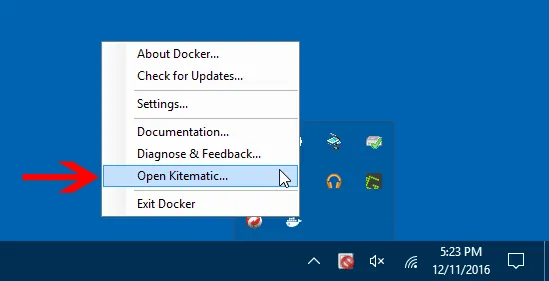
You will see a prompt to download Kitematic for Windows. Click "Download".
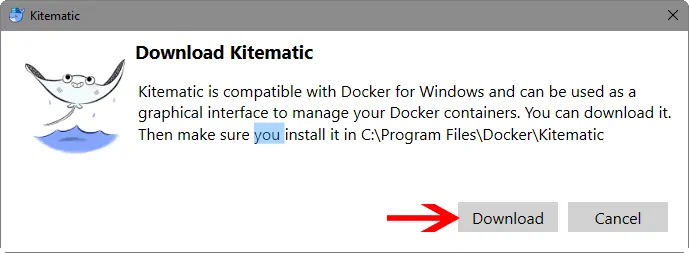
Kitematic will download as Kitematic-Windows.zip file. Save it to a known location.
2. Extract Kitematic for Windows
Next step is the key step, you will to extract the Kitematic-Windows.zip to the following location:
C:\Program Files\Docker\Kitematic
Right-click on Kitematic-windows.zip and select "Extract all". In the window that pops up ensure to specify the extraction path as shown below:
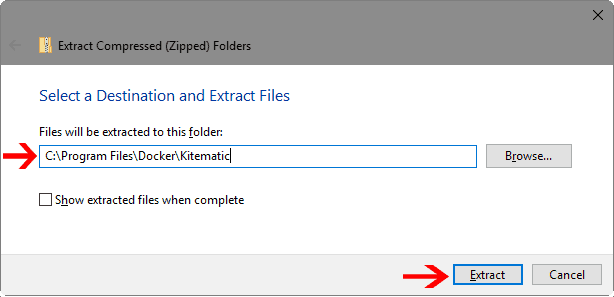
Note that the default extraction folder will appear as "Kitematic-Windows". You will have to manually change it the correct path shown above and then press "Extract". That's it. You have now setup Kitematic on Windows 10.
Recommended Guides on Docker:
B. Install Kitematic on Windows 7, 8, and 10 (32-bit, 64-bit non-Pro/Ent/Edu)
If you do not have Windows 10 64-bit Pro/Ent/Edu edition or if you have it but want to use VirtualBox or VMware virtualization for other applications then you will have to install Kitematic GUI for Docker using this method, which is much simpler than method A. On these version of Windows, Kitematic setup is done through Docker ToolBox. During Docker setup with Docker Toolbox, you will have the option to install Kitematic as well. If not, follow our Docker installation with Docker Toolbox guide, download Docker Toolbox, and run the installer. When presented with Docker Toolbox components to install, ensure "Kitematic for Windows" is checked, as shown below.
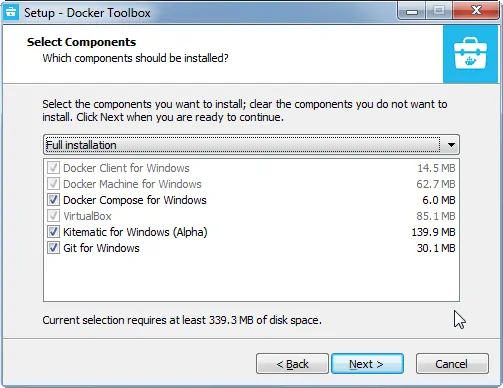
Uncheck the components you already have and complete the installation to setup Kitematic on Windows 7, 8, and 10 (some editions).
Start using Kitematic on Windows
Now that you have Kitematic on Windows, open it either from the Docker system tray icon (if method A was used) or the Apps menu (if method B was used). If you used method B, Kitematic will stop half way during start with an error. Press "Use VirtualBox" to proceed starting starting Kitematic. Upon successful start, you will presented with Docker Hub registration / login screen. Register or login as shown in the picture below. You may also choose to skip this step using the "Skip for Now" button.

Once you login, a whole new word of possibilities are your finger tips. You may install any of the official docker containers listed on Kitematic home screen or search for the containerized app (eg. Sonarr) and create a new container from it, as shown below.

Be sure to install only containers from known community members or those with high ratings/downloads. Docker completely isolates containers from the underlying OS. So you cannot harm your operating system. So you can install and destroy containers as you please without causing any damage. So go ahead, install Kitematic on Windows and enjoy managing your containers with the awesome Docker GUI.


![[Video] Install Docker and Docker Compose on Ubuntu - Don't Do It WRONG Video Thumbnail: Install Docker on Ubuntu (with Compose) – Don't Do It WRONG](https://www.smarthomebeginner.com/images/2023/03/install-docker-on-ubuntu-with-co-1.jpg)
