Floating share bars are one of the best ways to increase sharing and attract more traffic to your site. In this tutorial, I will show you 5 ways to customize AddThis floating bar to get the most out of it as well as tune it to your site theme. While there are WordPress plugins like Digg Digg and ShareBar, using AddThis is one of the easiest ways to add a floating share bar to your site without a plugin (although there is an AddThis plugin for WordPress). In this post, we will look at how to implement AddThiss and 5 ways to customize AddThis floating bar without the use of any plugin.
Table of Contents
Get AddThis floating bar
If you do not have AddThis floating bar yet head over to AddThis.com and sign up. Once you sign up, click on Get the Code and then Share Buttons. Add this offers support for several options:

If you are running WordPress, you may choose to install the plugin. However, if you are bit code savvy and would like to go the no-plugin way, we recommend choosing A Website. At this point, AddThis offers 3 different styles of floating bars:
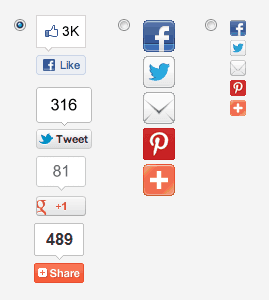
In this tutorial we will customize AddThis floating bar with the counter. Choosing to track address bar copying will add a string to the end of your URL which not only complicates your URL but may cause minor performance issues (as described in this post). Therefore, we recommend leaving it unchecked:

You should now see the code you will have to use. AddThis automatically picks the services (Facebook, Twitter, Google+, etc.) for you. The default code should look something like this:
<!-- AddThis Button BEGIN -->
<div class="addthis_toolbox addthis_floating_style addthis_counter_style" style="left:50px;top:50px;">
<a class="addthis_button_facebook_like" fb:like:layout="box_count" rel="nofollow noopener noreferrer" target="_blank"></a>
<a class="addthis_button_tweet" tw:count="vertical" rel="nofollow noopener noreferrer" target="_blank"></a>
<a class="addthis_button_google_plusone" g:plusone:size="tall" rel="nofollow noopener noreferrer" target="_blank"></a>
<a class="addthis_counter" rel="nofollow noopener noreferrer" target="_blank"></a>
</div>
<script type="text/javascript" src="//s7.addthis.com/js/300/addthis_widget.js#pubid=ra-xxxxxxxxxx"></script>
<!-- AddThis Button END -->
Next, we will look at how to implement this code and then customize AddThis floating bar.
 Implement AddThis Code
Implementing this code is very easy. Just add it anywhere before the closing body tag of the page. In WordPress you may edit footer.php and add the code block. If you are using Genesis Theme Framework, then this is easily done by adding the code to genesis_after hook. The default AddThis floating bar is shown in the picture on the right. If you are happy with it then you are good to go. But if you would like to customize AddThis floating share bar then continue reading.
Customize AddThis Floating Bar
With the implementation done, let us now customize AddThis floating share bar. Note: If you have a caching plugin, it is best to disable it until you have finished customizing AddThis.
1. Add a Background
A very basic AddThis customization you can do is adding or changing background color. You can achieve this by modifying the following line to add CSS styles for background color:
<div class="addthis_toolbox addthis_floating_style addthis_counter_style" style="left:50px;top:50px;background:#eeeeee;">
The default code adds a white background to floating share bar. Color is specified as hexadecimal codes. In our case, to match the theme's background, we added background:#eeeeee; to the above line. The quotes and punctuation are very important.
2. Add a Border
 The next easiest way to customize AddThis floating bar is by adding a border. To do so modify the following line to add border styles:
<div class="addthis_toolbox addthis_floating_style addthis_counter_style" style="left:50px;top:50px;background:#eeeeee;border:1px solid #cccccc;">
#cccccc is a light gray shade but darker than #eeeeee specified for the background. This results in an AddThis floating bar as shown in the picture on right.
You can also adjust width of the border by changing 1px to a higher number (px stands for pixels). In addition, you can change solid to dotted or dashed for dotted or dashed borders.
3. Customize the Position
The default AddThis code (left:50px;top:50px) puts the bar 50 pixels from the left and 50 pixels from the top of the browser screen. This may not be the most desirable position. Furthermore in our case, if someone reduces the size of the browser the bar would overlap on the content as shown in the picture below (right).
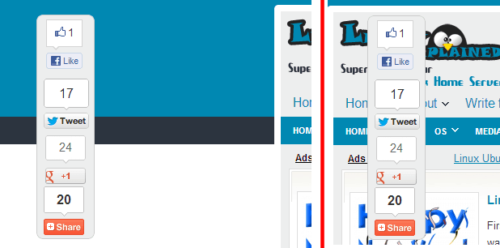
To customize AddThis floating bar's position you will again have to modify the style in the following line:
<div class="addthis_toolbox addthis_floating_style addthis_counter_style" style="top:215px;left:50%;margin-left:-560px;background:#eeeeee;border:1px solid #cccccc;">
In our case, we wanted the AddThis floating bar at 215 pixels from the top. Therefore, we changed top:50px; to top:215px;. To void the bar from overlapping the content, we always wanted it to be to the left of the content irrespective of the size of the browser window. To achieve this, we first specified left:50%;, which will put the left border of the bar at half way from the left edge of the browser window. Now to avoid it from overlapping on the content we offset the margin by adding margin-left:-560px;. You will have to determine the exact number to apply in your case. Now no matter what the size of the window is, the AddThis floating bar will always be to the left of the content without overlapping as shown in the picture below:
4. Add Custom Services
 AddThis by default picks the social networks for you. If you would like to manually make a social sharing service visible all the time, you can manually add the code. Refer to AddThis Customization Overview and Third-Party Buttons for more information on how to add services. For example, if you would like to add Pinterest as service then you can add the following line to the above code:
<a class="addthis_button_pinterest_pinit" pi:pinit:url="https://www.smarthomebeginner.com" pi:pinit:media="https://www.smarthomebeginner.com/images/2013/01/addthis_floating_bar_featured.png" pi:pinit:layout="vertical" rel="nofollow noopener noreferrer" target="_blank"></a>
You will have to edit pi:pinit:url and pi:pinit:media.
5. Add Branding and/or Follow Buttons
Some may consider the default bar as bland. You can customize AddThis floating share bar by adding custom images. It may even be the most logical place to put Follow buttons for visitors to subscribe to your content. We added some text on the top inviting visitors to share the content if they like it. At the bottom we added links to FeedBurner RSS page and Email subscription. An image of the customized AddThis floating bar is shown in the picture on the right. The final code is available using the download button below:
There you go. Five ways to customize AddThis floating share bar. Customize it is and improve social sharing on your website.



![15 Best Jellyfin Plugins [2023] - Supercharge your Media Server Jellyfin Intros Plugin Preview Pre-Roll](https://www.smarthomebeginner.com/images/2022/08/jellyfin-intros-preroll-preview.jpg)

