This LVM HowTo is a continuation of my earlier post on setting up a basic LVM pool. So if you are reading this we will assume you already have a LVM setup. The most common function we will preform is LVM resize. This is useful when you want to add a hard drive for more storage space. You can do this at any time. You can add as many drives as you want/need. After that we will talk about moving a LVM to a new system. There are some options but for most home users this is accomplished with one simple command. Finally we will talk about LVM snapshot and if they are really worth the time and space.
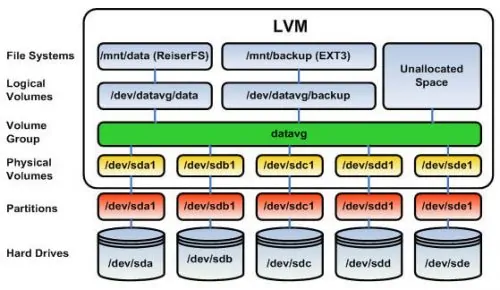
Table of Contents
LVM Resize
Resizing is easy, like everything with LVM it just works. We start by connecting our new Hard Drive. Again, almost any storage can be used and combined. SATA, IDE, USB, etc. You could even pool several hardware RAIDs together. Connect your drive and find its drive assignment. You can get a list of disks with the fdisk -l command.
We need to format the disk for LVM using:
fdisk -cu /dev/sdX
BE EXTREMELY CAREFUL, THIS WILL ERASE ALL DATA FROM YOUR DRIVE AND CAN BREAK YOUR EXISTING LVM.
If you are unsure use the LVM command PVS to list the drives already in your LVM.
- To Create new partition Press n.
- Choose primary partition use p.
- Choose which number of partition to be selected to create the primary partition. (usually #1)
- Press 1 if any other disk available.
- Change the type using t.
- Type 8e to change the partition type to Linux LVM.
- Use p to print the create partition
- Press w to write the changes.
Now we will add the drive to our LVM system
Run the command pvcreate /dev/sdX1. This will add our LVM ready hard drive for use. Use pvs to make sure it was added to the LVM.
Next we will grow the LVM VG. We need the VG name which we can find with the command vgs. Once we have that we will use it in this command:
vgextend VG_NAME /dev/dsX1
If we run vgs again the LVM VG should now be larger.
Next we need to grow the LVM LV. Get the name of your LV with lvs. Use the name in this command:
lvextend -l +100%FREE /dev/VG_NAME/LV_NAME
If we run lvs again the LVM LV should be larger.
Lastly we need to grow the LVM filesystem. We will assume you are using EXT3 or EXT4 as your filesystem and use the command:
resize2fs /dev/VG_NAME/LV_NAME
This may take awhile depending on how much the LVM is growing. That's it. Below is a recap of the LVM commands,
pvcreate /dev/sdX1
vgextend VG_NAME /dev/dsX1
lvextend -l +100%FREE /dev/VG_NAME/LV_NAME
resize2fs /dev/VG_NAME/LV_NAME
You should now have plenty of LVM storage to keep you busy.
Recommended HTPC / Home Server Builds:
- Best Home Theater PC Build 2017 to do it all (Plex, Kodi, NAS, Gaming)
- Best Emby Server builds 2018 – Pre-built and DIY options
- Medium Budget 4K HTPC Build 2017 for Kodi, Plex and Gaming
- Cheap 4K HTPC Build for Kodi, OpenELEC, and LibreELEC 2017
- Low Power Home Server Build 2017 for Network File and Media Storage
- Best HTPC for Kodi with 4K on a Medium Budget 2017 (~$400)
- Energy efficient budget HTPC-NAS combo build 2016
Moving your LVM or reattaching it after re-installing your OS
There are some guides that tell you to export, deactivate, and a bunch of other things before moving your LVM. This is great if you are sending your LVM across the country and are worried about it being accidentally activated or edited. But for us home users its really very simple.
You do not need to do anything when removing the LVM besides unmounting it. If you have a hot swap case I suggest turning the server off before removing the drives. If you are just re-installing your OS you may still want to physically disconnect the drives to prevent overwriting the LVM partitions. If you wipe one drive you can loose all the data on the LVM volume.
When you are ready to add your LVM to your new computer you need to run just one command:
vgchange -ay VG_NAME
If you do not know your VG_NAME you can use the command vgs.
We need to mount the LV automatically. To do this we first need to find the UUID of our filesystem.
blkid
You should see:
/dev/sda1: UUID="46f835ce-93ff-4fc4-8fe7-f85fbb25029b" TYPE="ext4"
/dev/sda5: UUID="ba89837d-8d9b-4883-a931-e5d7d784ee20" TYPE="swap"
/dev/sdb1: UUID="9OHDGJ-nkGc-wpAu-bMFx-Nw1l-Y7dn-QcFUwl" TYPE="LVM2_member"
/dev/sdc1: UUID="AHo3HA-ik2D-9B0M-XtJl-5ckH-QbXN-VYQNOY" TYPE="LVM2_member"
/dev/sdd1: UUID="8Vlamx-LeoA-QpW3-21p2-6v20-SypQ-81B6Rq" TYPE="LVM2_member"
/dev/mapper/storage-storage1: UUID="eed6fe66-40ed-431d-a9af-58ced879d7l2" TYPE="ext4"
Grab the UUID of your storage space, it will be after the /dev/mapper/{VG_NAME}-{LV_NAME} ,and open your fstab file.
nano /etc/fstab
You will see this:
UUID=46f835ce-93ff-4f4g-8fe7-f8ed7b25029b / ext4 errors=remount-ro 0 1
# swap was on /dev/sdd5 during installation
UUID=ba89837d-8d9b-4883-a931-e5d7d784a3d7 none swap sw 0 0
none /tmp tmpfs defaults 0 0
We will add the line below to the bottom of the file. Replace the {UUID_FOUND_ABOVE} with the UUID you found above and {MOUNT_LOCATION} with the location you want to have your LV mounted. This location needs to exist. You can use the mkdir command to make a location to mount to. You can put this anywhere. /home/{username}/storage is a good choice if your not sure. I personally mount mine at /home/USER/data.
UUID={UUID_FOUND_ABOVE} {MOUNT_LOCATION} ext4 defaults 0 0Now we will mount the device manually for the first time. Your LV should mount after a restart automatically.
mount -a
That's it for moving.
LVM Snapshot
I wanted to talk about LVM snapshot since there is some misconceptions about its function. When you take a LVM snapshot, what you are actually doing is telling LVM2 to start recording all changes. This is great for constantly edited files like databases and documents. It gives you the ability to undo changes. Snapshots will not help you recover a damaged LVM or missing data. When we use LVM for media storage a snapshot is basically a waste of space. Movies and TV Shows are easily replaced if your LVM fails. But if you enable SMART monitoring and take care of your drives your LVM will last you a very long time. When your looking at hard drives find NAS or SERVER versions rather than desktop. Like the WD red or black series.
That is all there is to setup LVM, resize LVM, move LVM, and LVM snapshot. Hopefully this advanced but short LVM how to gave you a good primer to manage your LVM.

![5 Best NAS with SSD Cache for Home and Office [2023] A feature image that shows all 5 of the best NAS that supports SSD caching for home and office](https://www.smarthomebeginner.com/images/2023/10/best-nas-with-ssd-cache-feature-image.png)
![Ultimate Docker Server: Getting Started with OS Preparation [Part 1] Docker Server Tutorials 1 OS Preparation](https://www.smarthomebeginner.com/images/2024/01/Docker-Series-01-Intro-and-OS-Prep.png)

![8 Best NAS with Plex Server Support [2022] - 4k, Transcoding, etc. Best NAS Server for Plex](https://www.smarthomebeginner.com/images/2020/02/best-media-server-for-plex-ft.jpg)