Cloudflare offers free security and performance improvements for your Traefik 2 Docker setup. In this post, let us look at some Cloudflare settings for Traefik Docker setup to get the best out of your server.
Our Traefik Docker guide is written around Cloudflare. In that guide, I recommended using a wildcard CNAME record to forward all subdomains for apps to your home server. However, proxying wildcard CNAMEs is not allowed in the Cloudflare free plan (Proxying wildcard CNAMEs is now allowed in the free plan).
Because of this, all services were "gray-clouded" in Cloudflare DNS. This means they were not proxied by Cloudflare and were not benefitting from the security and performance improvements offered by Cloudflare. In addition, these DNS records would also expose the WAN IP of your home server.
The alternative was to, manually create CNAMEs for all the apps in your Docker Traefik stack, which is laborious. Recently, I enabled Cloudflare proxy for all my services (orange-cloud) to take advantage of Cloudflare's enhancements.
In this guide, I will show you the Cloudflare settings to use to get the best out of your Docker and Traefik based home server. [Read: My Smart Home setup – All gadgets and apps I use in my automated home]
In addition, I will also show you some of the Docker Cloudflare tweaks to simplify or automate the Cloudflare account management, including automatic DNS updates and CNAME creation.
Table of Contents
Traefik Configuration for Cloudflare
This has already been covered in detail in my Traefik Docker guide. Please follow the linked guide for the initial setup.
One specific CLI argument that I recommend enabling is forwarding headers for trusted IPs.
- --entrypoints.https.forwardedHeaders.trustedIPs=173.245.48.0/20,103.21.244.0/22,103.22.200.0/22,103.31.4.0/22,141.101.64.0/18,108.162.192.0/18,190.93.240.0/20,188.114.96.0/20,197.234.240.0/22,198.41.128.0/17,162.158.0.0/15,104.16.0.0/12,172.64.0.0/13,131.0.72.0/22
Check the docker-compose file on my GitHub Repo to see how exactly this is added to your docker compose.
This CLI argument ensures that the IP addresses of the clients are forwarded to your server. When you check the logs, you will see the client's IP. Without this setting, all requests will appear as if they are originating from Cloudflare's servers.
Cloudflare Settings for Traefik and Docker
Assuming that your Docker Traefik setup follows my guide, let us look at the Cloudflare settings to use.
Note that available Cloudflare features vary based on your plan. For typical home use, I do not see a need for a paid plan and so this article focusses on the free features only.
Any setting that is not listed below means either use the Cloudflare-offered default or ignore the Cloudflare setting for Traefik/Docker setup.
1. Development and Maintenance
Two of the main things to know when using Cloudflare proxy are Development Mode and Pausing.
Development Mode, as the name suggests is for use during development. It disables Cloudflare caching for 3 hours and turns it back on. During this time all requests are directly sent your server.

The result is that you see the changes immediately, instead of the cached version from Cloudflare servers.
The second option is, pausing Cloudflare. This completely bypasses all Cloudflare features, including security, and uses Cloudflare for only DNS. This is equivalent to "gray-clouding" the DNS records.
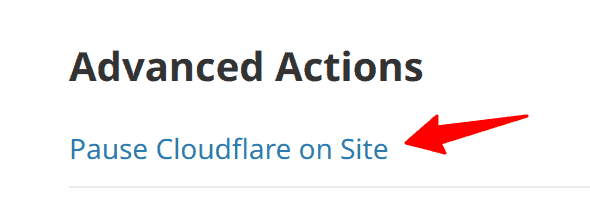
Pausing Cloudflare is rarely needed, except one main instance.
Pausing Cloudflare during Initial Setup
When Cloudflare is enabled, it serves its own free SSL certificate to the client, which is great.
However, if you are just setting up Traefik and pulling your certificates from LetsEncrypt, then you want to be able to see the LetsEncrypt Certificate and verify that everything works as it should.
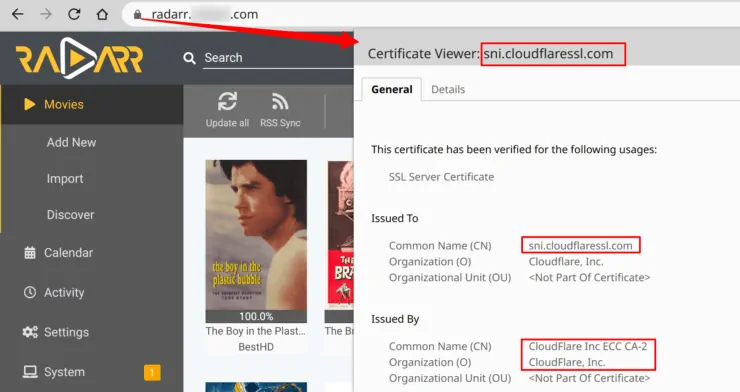
During my initial Traefik setup and LetsEncrypt certificate pull, I typically pause Cloudflare. This also removes most of the Cloudflare related entries in the Traefik logs, so I can see what is going without Cloudflare's influence.
Once Traefik and its dashboard are working and I am ready to add more services behind Traefik, I re-enable Cloudflare Proxy (orange-cloud).
2. DNS Entries
Next, the DNS entries/records. In my Docker Traefik 2 guide, I recommended adding he following two DNS entries.
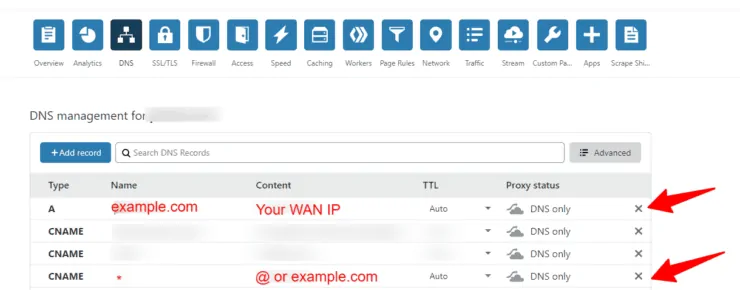
Notice that both entries are "gray-clouded", meaning we are using Cloudflare for DNS only and not for security and performance. In addition, gray-clouding also exposes your server's IP address.
So for security and performance, it makes sense to proxy your services ("orange-cloud") behind Cloudflare. Unfortunately, Cloudflare does not allow proxying wildcard (*) CNAMEs.
Therefore, you will have to manually add CNAMEs for all of your services and orange-cloud (proxy) them as shown in the screenshot below.

If you have been following my GitHub repo, I run over 60 services on docker. Imagine manually adding a CNAME for each service? What about when I create and destroy services at will during testing? Managing CNAMEs manually could easily become a pain.
Fear not, there is an easier way. But for now, let us continue to configure Cloudflare for Traefik and come back to this topic later in this guide.
3. SSL/TLS Options
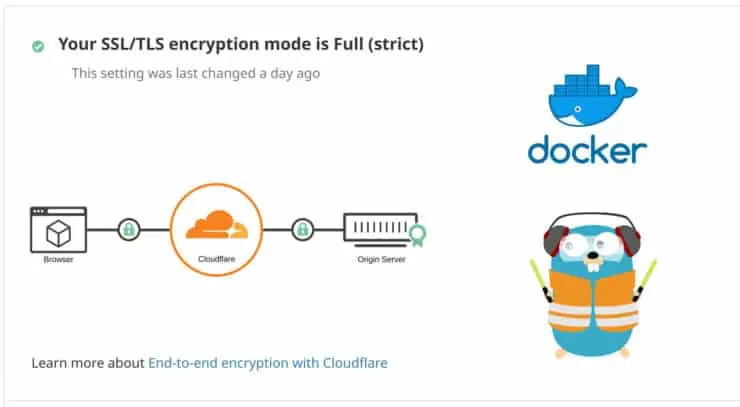
The next Cloudflare option for Traefik reverse proxy is SSL/TLS. Cloudflare offers 4 different modes for SSL.
Flexible, Full, and Strict, all three models offer pretty much the same level of security. The difference is the trust level.
For home applications (and even beyond). You should be fine with Full or even Flexible SSL mode. Here is a quick summary of how to pick the right mode (Origin Server = Your Home Server):
- No SSL Certificate on Origin server: All your services are available on HTTP and not HTTPS. Use Flexible SSL mode. The connection from your server to Cloudflare can be insecure but the connection between the client and Cloudflare will be secure.
- Self-Signed Certificate on Origin Server: This is when browsers display a "Your connection is not secure/private" warning (when not using Cloudflare proxy). Use Full SSL mode. The connection from your server to Cloudflare is secured using your self-signed certificate and the connection from Cloudflare to your client uses trusted Cloudflare's certificate.
- Certificate Authority Issued Certificate on Origin Server: This is the situation that will apply if your server uses a) LetsEncrypt certificate that Traefik pulls automatically, b) Cloudflare's free origin certificates or c) your own certificate purchased from a CA. Use Strict SSL mode. The connection from your server to Cloudflare is secured using LetsEncrypt certificate and the connection from Cloudflare to your client uses trusted Cloudflare's certificate.
If you have been following my Traefik Docker guides then, you can use Strict or Full) SSL mode. Using Full SSL mode will ensure that your services are still accessible in case LetsEncrypt renewal fails. The downside is you will not know that a failure happened.
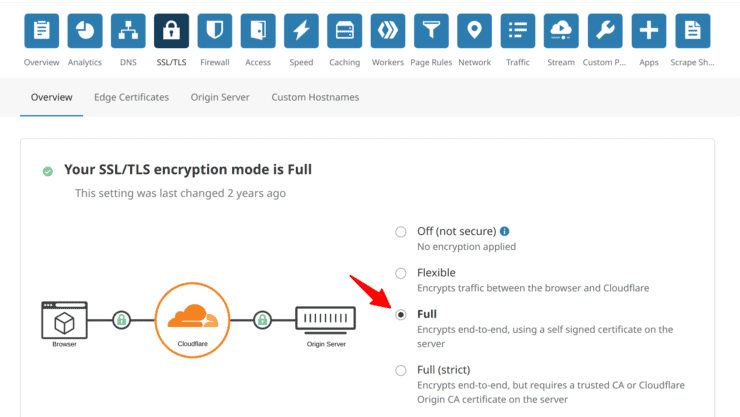
I use Strict mode and conditionally downgrade it to Full mode for certain situations as explained later.
Edge Certificates
Next, configure the Edge Certificates section as described below.
- Always Use HTTPS: ON. Automatically redirects all requests with scheme “http” to “https”.
- HTTP Strict Transport Security (HSTS): Enable (Be Cautious). HSTS improves the security/trust level. However, enable this option with caution. Any certificate issues/change (eg. pausing Cloudflare) can lock you out of accessing your services (you can still access them locally with IP:port). So I recommend enabling this only after everything is working as expected.
- Minimum TLS Version: 1.2. Only connections from visitors with TLS versions 1.2 or newer will be allowed for improved security.
- Opportunistic Encryption: ON. Opportunistic Encryption allows browsers to benefit from the improved performance of HTTP/2 by letting them know that your site is available over an encrypted connection.
- TLS 1.3: ON. TLS 1.3 is the newest, fastest, and most secure version of the TLS protocol. Enable it.
- Automatic HTTPS Rewrites: ON. This option fixes the mixed content warning from browsers by automatically rewriting HTTP requests to HTTPS.
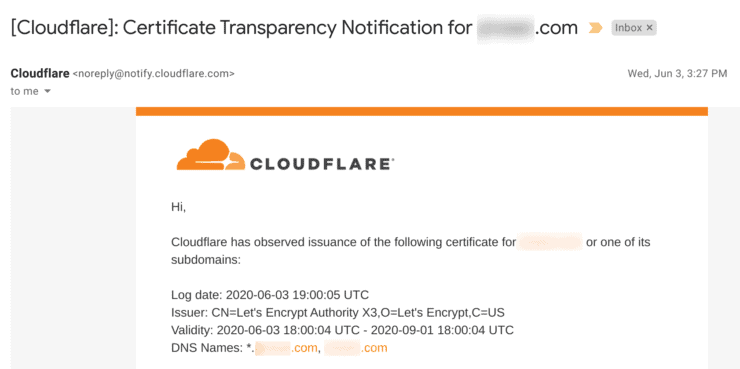
- Certificate Transparency Monitoring: ON. Cloudflare sends an email when a Certificate Authority issues a certificate for your domain. So when your LetsEncrypt certificate is renewed, you will receive an email.

Cloudlfare Certificate Transparency Notification Shows Letsencrypt Renewal
Origin Server
You can safely ignore the Origin Server section unless you want to install Cloudflare's free origin certificate (instead of LetsEncrypt) that will allow you to use Strict SSL mode.
4. Firewall
Ignore the Overview and Managed Rules sections.
Firewall Rules
Under Firewall Rules, the free plan allows you to create up to 5 rules.
Using this feature, you may block certain kinds of traffic. For example, I am blocking all requests coming from China. Alternatively, you may choose to allow access only from countries that you know you will access your apps from and block the rest.
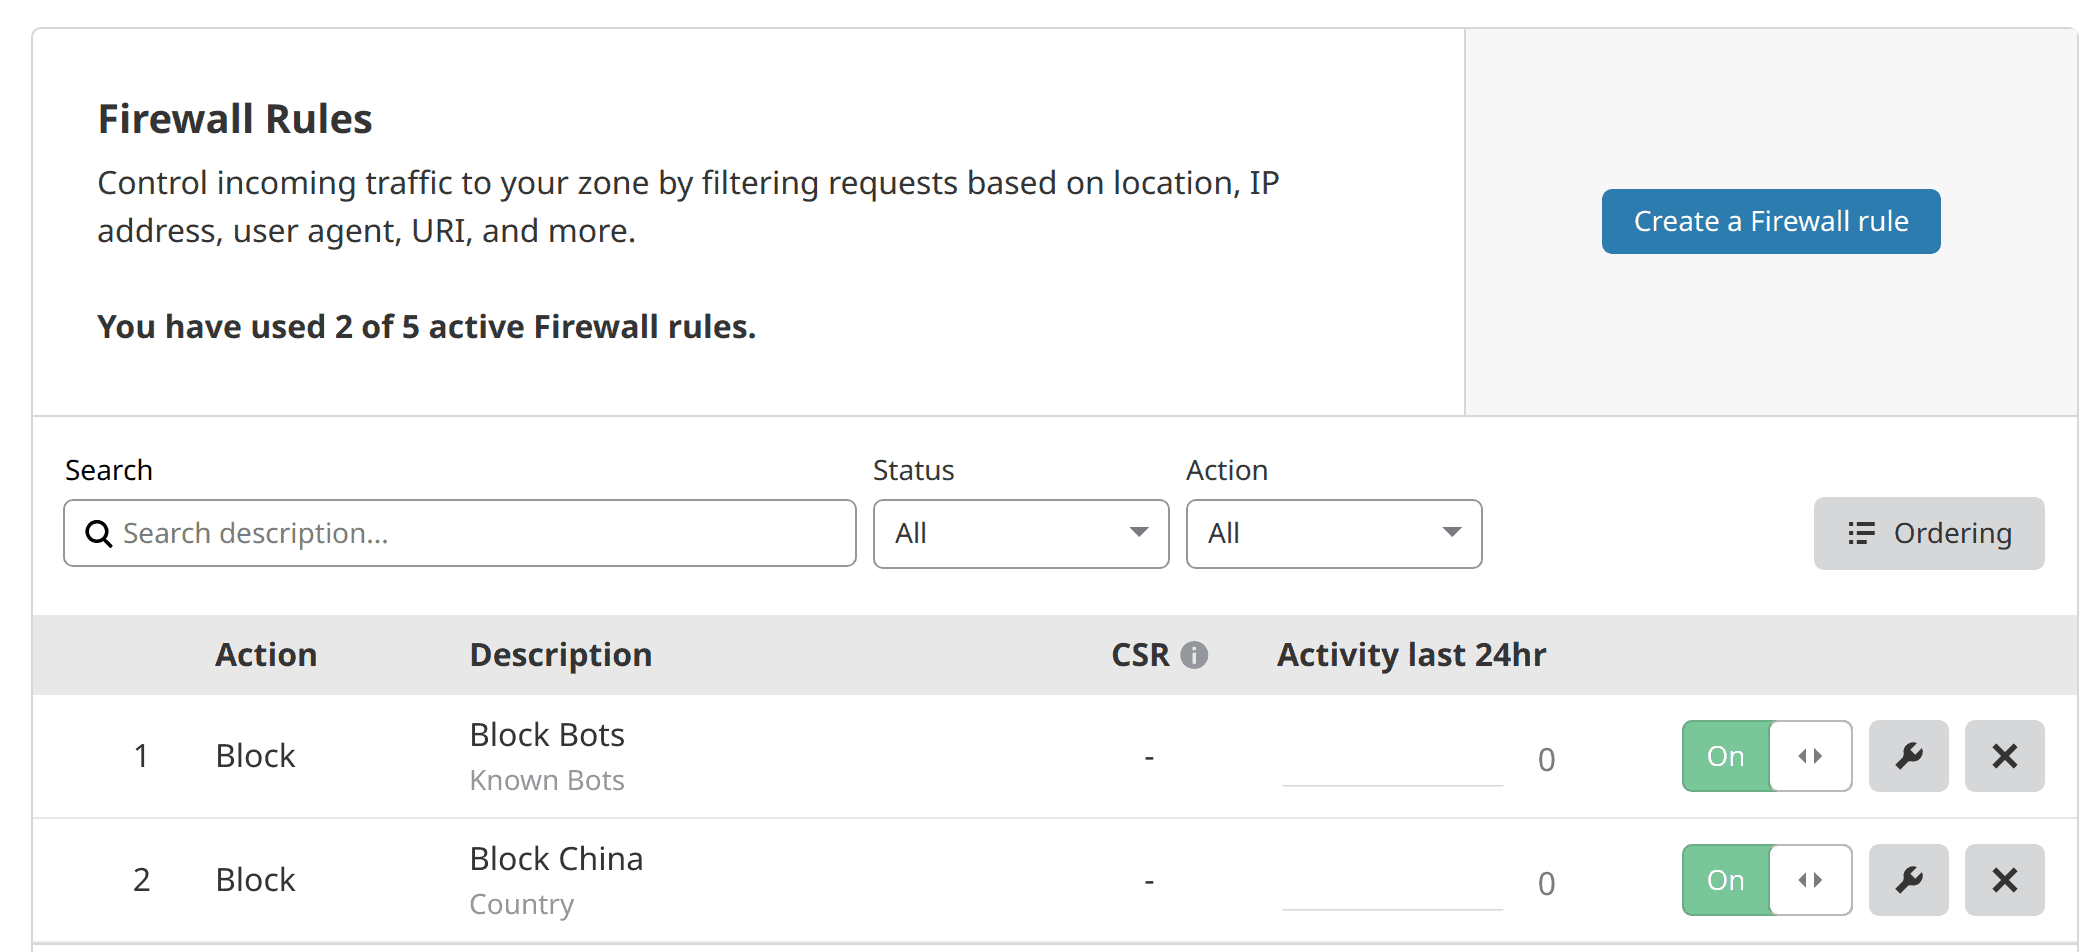
In addition, this is a personal/private site. So there is no need for any bots (eg. search engine bots) to crawl my site. So, as shown above, I am blocking those as well. Here is a firewall report screenshot showing, Yandex bot was blocked.
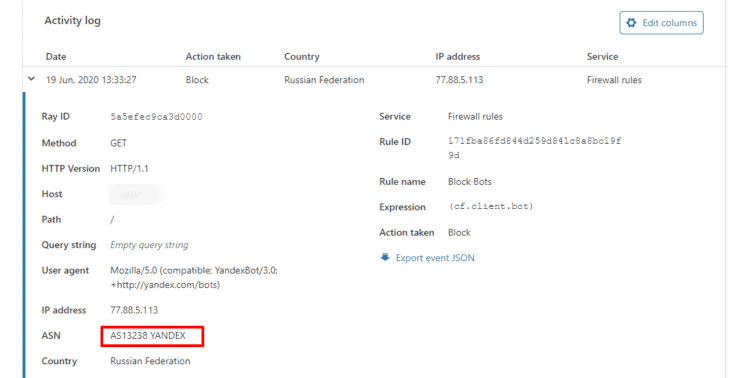
Firewall rules have been very beneficial to this site, which runs on WordPress on Docker.
Firewall Tools
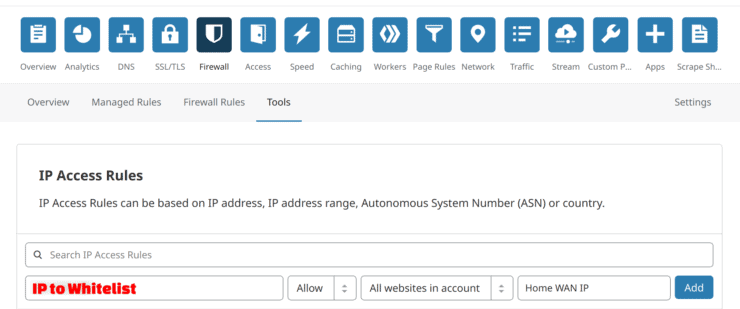
You can also use the Tools section to put certain blocks or allows in place. You can even present a challenge to the incoming traffic.
In the example below, I am whitelisting traffic from my home's WAN IP so all requests coming from my home IP are allowed and not blocked or challenged.
Firewall Settings
Next, under the Firewall Settings section (easy to miss - see on the right side), set the following options.
- Security Level: High. Challenges all visitors that have exhibited threatening behavior within the last 14 days.
- Bot Fight Mode: ON. Challenge requests matching patterns of known bots before they can access your site.
- Challenge Passage: 30 Minutes. Specify the length of time that a visitor, who has successfully completed a Captcha or JavaScript Challenge, can access your website.
- Browser Integrity Check: ON. Evaluate HTTP headers from your visitor's browser for threats. If a threat is found a block page will be delivered.
Combined with a good multifactor authentication system (Google OAuth or Authelia), High security level offers a great level of protection.
I use Guacamole and VNC to remotely connect to my apps. In the wrong hands, these apps can enable complete take over of your system and data. Knowing that certain traffic, known bots, and threats are mitigated with Cloudflare, gives me a certain level of peace.
Be the 1 in 200,000. Help us sustain what we do.Join Us (starting from just $1.67/month)
5. Speed
The next section in configuring Cloudflare for Traefik and Docker is Speed. This is beneficial for high traffic websites and has minimal impact on a private server.
Optimization
Under optimization, choose the following settings:
- Auto Minify: OFF. Reduce the file size of the source code on your website. But if not done properly, it can mess up Javascript and CSS, causing unexpected behavior.
- Brotli: ON. Speeds up page load times for HTTPS traffic by applying Brotli compression.
- Rocket Loader: OFF. Rocket Loader improves paint times by asynchronously loading your Javascripts, including third-party scripts so that they do not block rendering the content of your pages. But again, this is one of the main culprits that can cause your home server apps to behave unexpectedly. [Read: 9 Best Home Server Apps to Automate Media Management].

You can ignore the remaining settings (most of them are paid features anyways).
6. Caching
Caching stores copies of your web app resources on Cloudflare's servers and present the cached version when requested. This increases speed, especially when you are accessing your Docker apps from outside your home.
If you made significant changes to your app's UI and you do not see it in your browser, then the cache purge buttons on this page are worth trying.
Configuration
Under Cache configuration, choose the following settings:
- Caching Level: Standard. Determine how much of your website’s static content you want Cloudflare to cache.
- Browser Cache TTL: 1 hour. During this period, the browser loads the files from its local cache, speeding up page loads. Keeping it too long can force you to clear your browser cache to see the changes.
- Always Online: OFF. If your server goes down, Cloudflare will serve your web app's "static" pages from the cache. Most of the docker apps from my previous guides are dynamic.
7. Page Rules
Next, we move to one of the more important Cloudflare settings for Docker and Traefik. This is critical, especially, if you run media servers (eg. Plex, Emby, Jellyfin, etc.).
Page Rules give finer, URL-based control of Cloudflare's settings. There are certain pages in our setup that need to bypass Cloudflare's resources. In my case, I wanted to bypass the following apps from using Cloudflare cache:
- Plex - available at https://nucplex.example.com
- Emby - available at https://nucemby.example.com
- Jellyfin - available at https://nucjelly.example.com
- Airsonic - available at https://nucair.example.com
Notice, that all of the above subdomains start with nuc. This makes it easy to define Cloudflare rules and helps us be within the limit of 3 rules for the free account. My Cloudflare rule is defined as shown below to bypass Cloudflare's cache for these media server apps.
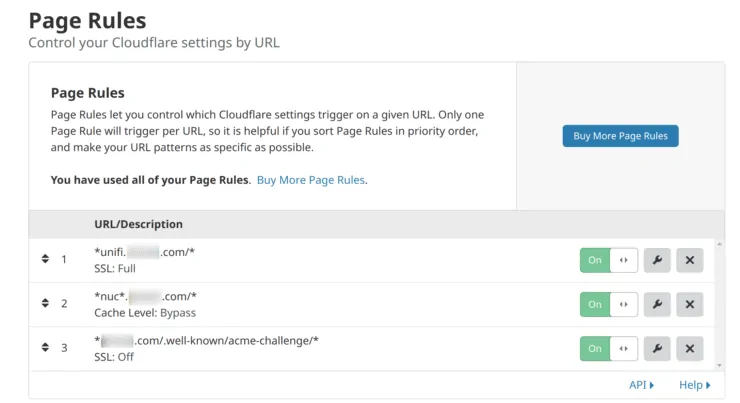
Any page that starts with "nuc" (NUC for my Intel NUC home server), bypasses the Cloudflare cache. Doing so is important to comply with Cloudflare's terms of rule for the free plan.
In addition, I also have two other rules (#1 and #3 in the screenshot above):
#1. Switch SSL Mode from Strict to Full when accessing Unifi Controller. Unifi controller has had issues while accessing it via Traefik 2 because it uses a self-signed certificate. There are other workarounds for this. But using Cloudflare proxy in Full SSL mode also solved the problem for me.
#3. Turn Cloudflare's SSL off when Traefik tries to fetch LetsEncrypt SSL certificates. If this rule is not presented, then Cloudflare's free SSL certificate with interfere with LetsEncrypt. In other words, the LetsEncrypt server must be able to see your origin server and the private key directly without any intermediate (Cloudflare proxy).
8. Network
There is nothing much to customize or configure in Network section. HTTP/2 is enabled by default. The rest of the settings can be left as-is.
Docker Images for Cloudflare
Now that all the Cloudflare settings for Traefik have been set, let us look at a couple of Cloudflare specific docker images that can enhance our Docker server. As always check my GitHub Repo for current versions.
1. Cloudflare DNS Updater
The first docker image is for Cloudflare DNS updater. This is useful if you are using a dynamic WAN IP issued by your ISP (typically the case for most home users). Any time your WAN IP changes, you will need to update IP address on your DNS records.
This dynamic DNS updater image will make sure that the host IP address for your root domain set in your DNS records is always current. When your WAN IP changes, it will automatically update your DNS records.
Here is the docker-componse snippet to your Docker stack:
  # Cloudflare DDNS - Dynamic DNS Updater
  cf-ddns:
    container_name: cf-ddns
    image: oznu/cloudflare-ddns:latest
    restart: always
    environment:
      - API_KEY=$CLOUDFLARE_API_TOKEN
      - ZONE=$DOMAINNAME_HOME_SERVER
      - PROXIED=true
      - RRTYPE=A
      - DELETE_ON_STOP=false
      - DNS_SERVER=1.1.1.1
Change/Configure:
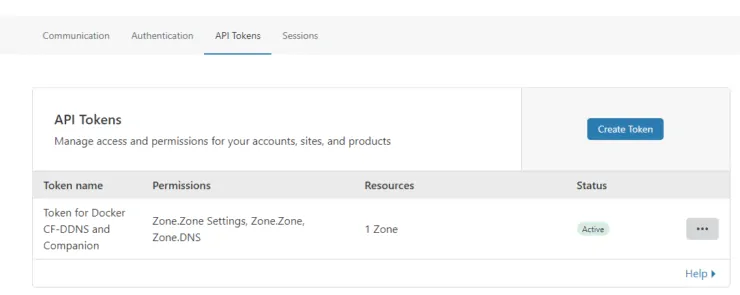
- $CLOUDFLARE_API_TOKEN: This is a scoped API token created on your Cloudflare profile. Here is a screenshot of mine:

Scoped Api Token For Cloudflare Management
Once created, add it to CLOUDFLARE_API_TOKEN environmental variable defined in your .env file. - $DOMAINNAME_HOME_SERVER - Your root domain name as defined in .env file. If you followed my Docker Traefik guide, you should already have this.
- PROXIED - Set this to true if you want your domain proxied (orange-cloud) via Cloudflare.
- RRTYPE - A, for A record.
- DELETE_ON_STOP - Set this to false as we do not want the record deleted when the container is stopped.
- DNS_SERVER - Leave this as 1.1.1.1, which is Cloudflare's DNS resolver.
Save your docker-compose, start the container, and check the logs for cf-ddns container. You should see something like this:

In the above case, no IP change was needed in the DNS records.
2. Cloudflare Companion
The second container that I recently discovered automatically creates CNAME records for your services. Manually adding CNAMEs for all your services can be cumbersome. This was stopping me from enabling proxy (orange-cloud) and using all the awesome security and performance features that Cloudflare offers.
This image was the main reason I decided to turn on Cloudflare proxy for my services.
To add Cloudflare Companion, add the following snippet to your docker-compose.
  # Cloudflare-Companion - Automatic CNAME DNS Creation
  cf-companion:
    container_name: cf-companion
    image: tiredofit/traefik-cloudflare-companion:latest
    restart: always
    volumes:
      - /var/run/docker.sock:/var/run/docker.sock:ro
    environment:
      - TIMEZONE=$TZ
      - TRAEFIK_VERSION=2
      - CF_EMAIL=$CLOUDFLARE_EMAIL # Same as traefik
      # - CF_TOKEN=$CLOUDFLARE_API_TOKEN # Scoped api token not working. Error 10000.
      - CF_TOKEN=$CLOUDFLARE_API_KEY # Same as traefik
      - TARGET_DOMAIN=$DOMAINNAME_HOME_SERVER
      - DOMAIN1=$DOMAINNAME_HOME_SERVER
      - DOMAIN1_ZONE_ID=$CLOUDFLARE_ZONEID # Copy from Cloudflare Overview page
      - DOMAIN1_PROXIED=TRUE
    labels:
      # Add hosts specified in rules here to force cf-companion to create the CNAMEs
      # Since cf-companion creates CNAMEs based on host rules, this a workaround for non-docker/external apps
      - "traefik.http.routers.cf-companion-rtr.rule=HostHeader(`pihole.$DOMAINNAME_HOME_SERVER`) || HostHeader(`hassio.$DOMAINNAME_HOME_SERVER`)"
Change/Configure:
- TRAEFIK_VERSION: Set this to 2 for Traefik v2. Cloudflare Companion also works with Traefik version 1.
- $CLOUDFLARE_EMAIL: Your Cloudflare account email. This must already be in your .env file if you followed my previous guides.
- $CLOUDFLARE_API_TOKEN: Scoped API Token as described for the Cloudflare DDNS service described above. Unfortunately this did not work for me. A solution was to use $CLOUDFLARE_API_KEY instead.
- $CLOUDFLARE_API_KEY: This is the Cloudflare global API key. It should already be in your .env file if you followed my previous guides.
- $DOMAINNAME_HOME_SERVER: Your root domain name as defined in .env file.
- $CLOUDFLARE_ZONEID: This is the Zone ID for the domain from your Cloudflare account and defined in the .env file.
- DOMAIN1_PROXIED: Set this to true to enable Cloudflare proxy for the CNAME record.
This container will automatically pick up the CNAMEs to create for your services from the Host rule defined for each service.
But what about the external services that are behind Traefik using the rules folder? You can add these using labels. Examples for PiHole and Home Assistant (hass) are shown in the compose snippet above. [Read: Complete Pi Hole setup guide: Ad-free better internet in 15 minutes]
Once added and configured, save your docker-compose file, start the container, and check the logs for cf-companion container. You should see something like what is shown in the screenshot below.

The example screenshot shows CF companion checking CNAMEs for Bazarr (bazarr) and Airsonic (nucair). The CNAMEs for these services already exist and so no DNS record update was needed.
Cloudflare Tweaks for Traefik and Docker - Final Thoughts
I have been using Cloudflare for nearly 10 years. I started out with the free plan and now use their paid plans to enhance this website. So the Cloudflare free plan to my private/home domain was a no brainer.
When Cloudflare came up with their own privacy focussed DNS servers (1.1.1.1 and 1.0.0.1) I switched to them immediately. When they opened up domain registrations, I moved mine to Cloudflare (~$7.25 for private domain registration is one of the best). So you can say, I am a Cloudflare fanboy.
For my Docker Traefik setup, I use Cloudflare mainly for its security features. In addition, I have implemented several best practices for Docker security. I highly recommend that you review those.
Performance effects are quite minimal as most times I access my docker services from my home environment. I had issues with Traefik 2 working properly with Unifi Controller (which uses a self-signed certificate). With Cloudflare's Full SSL, this problem went away.
For anybody that uses a Docker Traefik setup with their own domain name, I strongly recommend using Cloudflare. Configuring Cloudflare to work properly could be a bit overwhelming for beginners. I hope that this post helps you set the optimal Cloudflare settings for Traefik Docker setup. If you have any thoughts or different ideas, please feel free to comment below.

