The battle between ad blockers and advertisers has been ongoing, but has taken a turn towards more invasive methods of tracking and "personalization". Fortunately, we have a couple of self-hosted tools that can block trackers, malvertisements, and ads network-wide. That means that every device on your network can benefit from this and stop those pesky ads even on your smart TV.
Pi-Hole and AdGuard Home are both free network-wide ad blockers. In our recent comparison of Pi-Hole and AdGuard Home, we gave slight edge to AdGuard.
In separate guides, we have shown how to install AdGuard Home using Docker or run AdGuard Home on Raspberry Pi.
In this tutorial we are going to install AdGuard Home on Ubuntu/Debian linux. Installation is a breeze, and we will walk you through, step-by-step, how to install AdGuard Home on Ubuntu Server 22.04 LTS.
If you've never used a network-wide ad blocker before, your world is about to change forever. You'll never want to browse the internet without one again!
Table of Contents
- AdGuard Home Install Considerations for Ubuntu or Debian
- AdGuard Home Installation on Ubuntu
- Bonus Tweaks
- Concluding Remarks: Enhancing AdGuard Experience
AdGuard Home Install Considerations for Ubuntu or Debian
This tutorial will be using Ubuntu 22.04 Jammy Jellyfish LTS release. However, AdGuard Home Debian install (e.g. Debian 11 Bullseye) will follow nearly identically.
Be the 1 in 200,000. Help us sustain what we do.Join Us (starting from just $1.67/month)
Methods to Install AdGuard Home on Ubuntu
The AdGuard team gives us many possible methods for installing their AdGuard Home software. These include Snap, Containerized (docker, podman), or a direct install. As a tinkerer, I definitely prefer the direct install method. Let me explain why:
- Containerized: While I'm normally a HUGE fan of containerization, I don't see it's usefulness in this scenario. Containerization solves many problems like conflicting dependencies. AdGuard Home is a single, self-contained binary. Containerizing it only adds a layer of abstraction and more complexity for networking.
- Snap: Normally I'm not a fan of snaps, especially when it comes to more complex apps like Nextcloud. The snap install of AdGuardHome is actually fast, painless, and uses very little additional resources. My main criticism is for snaps in general. It's true: they are fast to setup, and generally require little maintenance. However, as soon as you want to customize something you will need to learn a lot more about Linux anyways.
- Direct Automated: The absolute easiest installation method for Linux and Mac. Simply copy and paste their one-line automated install into your terminal. This works by downloading a small script and running it directly on your machine. While easy, it's generally not recommended to download and DIRECTLY run scripts from the internet. The script is currently ~600 lines and pretty basic. But considering the ease of doing it ourselves, and what you'll learn along the way, I highly recommend the method below as it is also much safer.
- Direct Custom: Platform agnostic, simple, and the docs are catered to this installation method. This means that any troubleshooting or customization is much easier for you in the long run. I invite and encourage you to consider this method which we use in this tutorial.
Requirements for AdGuard Home Setup
- Ubuntu 22.04 or Debian 11 Server
- >256 Mb RAM
These requirements make it an ideal candidate to be run on Guest Machines on Hypervisors (e.g. Ubuntu LXC on Proxmox) or cheap Virtual Private Servers like the $4 per month offering from Digital Ocean (get $100 credit by signing up using this link).
AdGuard Home Installation on Ubuntu
A direct installation for AdGuard Home is done by downloading their packaged binary (program) file and running it. Simple as that.
While AdGuard Home can be run as a non-root user, I found it to be more complicated than it looks, especially if you want to install it as a systemd service that runs in the background. For now I will be focusing on running AdGuard Home as the root user.
Below, I have outlined 8 steps to install Adguard Home on Ubuntu server 22.04. It might sound like a lot, but you'll see some are quite trivial. With the basics out of the way, let's begin with AdGuard Home setup.
Step 1. Determine Your System and CPU
If you already know what type of machine you are running, you can skip this step. But if you are unsure or just as a quick reminder we can check in the terminal with:
uname -s
uname -m

The first command will give us the type of system (which should undoubtedly return "Linux" since you are supposedly attempting to install AdGuard Home on Ubuntu or Debian!).
The second command will return the processor type. In my case it is "x86_64".
Step 2. Download the Package
The package which we will install can be found in two different places (the second of which is shown below). Both will deliver the same software.
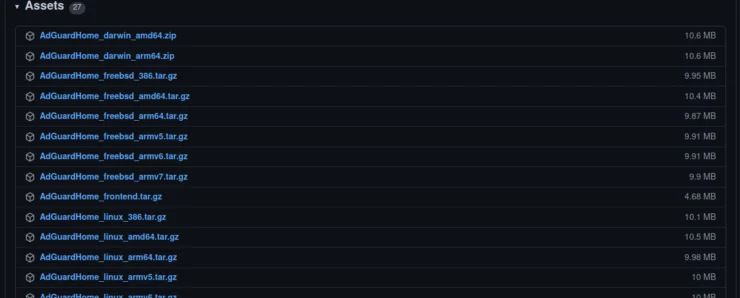
If you are unsure of the exact package name, head to the AdGuard Home GitHub page and scroll down to the "Assets" section (pictured above). Here you can find all of the packages available.
Since I am on the x86_64 chipset, running Linux, I'll be downloading the AdGuardHome_linux_amd64.tar.gz package. Make sure to choose the one matching your CPU chipset!
Feel free to download directly from the website, or better yet, we can download it with curl in our terminal!
curl -LO https://github.com/AdguardTeam/AdGuardHome/releases/latest/download/AdGuardHome_linux_amd64.tar.gz

Here we are using curl with the switches -L and -O (combined to form -LO).
- -L is used to have curl follow any redirects (for example redirecting from an http to https connection).
- -O is used to save the file. Without the option, you will see a warning but won't save the file. Since I am lazy, I use -O to tell it to save as the same file name. If you want to rename it, you can use -o some_filename_here.tar.gz instead.
The same package can also be downloaded directly from AdGuard's webpage at: https://static.adguard.com/adguardhome/release/AdGuardHome_linux_amd64.tar.gz
Note that with the above URL, you must know the package name ahead of time, you won't be able to browse through graphically like you can on GitHub.
Step 3. Verify the Package
Anytime we download a program from anywhere on the internet, it's always a good idea to ensure the package is identical to the one the creator produced. This might sound tedious and unnecessary, but it's quick and reduces the risk of any problems.
For example, when you download and install a package using your package manager (like apt), it does this verification for you. We will simply do it "by hand".
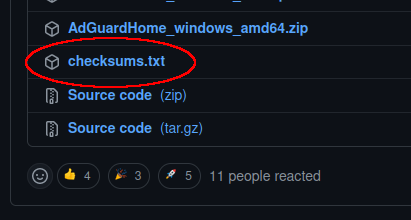
On the same page as you used above, we want to look for a file called checksums.txt. Download that file and save it to the same location as the package.
This file contains a calculated "hash" that acts like a fingerprint for our file. If the hash (fingerprint) from our downloaded file matches that stored in the checksums.txt file, then we know the package isn't damaged or tampered with.
If using curl, we just have to swap out the package name with the checksums.txt file name:
curl -LO https://github.com/AdguardTeam/AdGuardHome/releases/latest/download/checksums.txt
Once downloaded, we should have both files in the same directory.
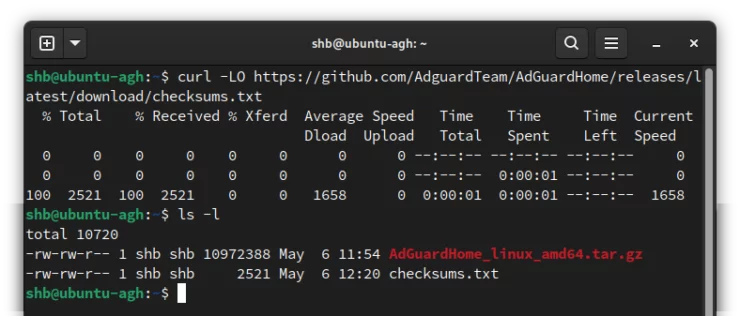
sha256sum and md5sum are probably two of the most common algorithms used for creating file hashes used for file verification. We can figure out which algorithm is being used by the length of the hash. Another strategy is to try using the same command with the different tools. If you chose the wrong one, you will be warned that it doesn't match. No worries, try another.
To verify our file, we use a simple command to compare the file to the checksums.txt entries:
sha256sum -c checksums.txt --ignore-missing

Above we use:
- -c to indicate we want to run a "check" from a file using the checksums.txt file.
- --ignore-missing because the checksums.txt file contains hashes for every downloadable package. We don't care about checking for the others since we only downloaded one.
The resulting line ./AdGuardHome_linux_amd64.tar.gz: OK tells us that the file is OK to use!
Step 4. Decompress the Package
As the package has a .tar.gz file extension, we can extract it with the tar tool:
tar -vxf AdGuardHome_linux_amd64.tar.gz
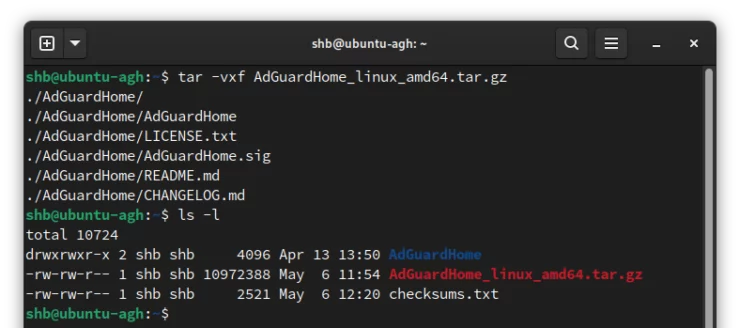
For those of you familiar with .zip files, tar works very much the same way, but with slightly better compression.
Above we use:
- -v to give us more verbose output, otherwise the terminal will give no feedback of the process.
- -x to indicate that we want to extract (decompress) a file.
- -f to indicate the file name.
Now that we have the program, let's get it ready to run!
Step 5. Move the Program
Currently, I have the AdGuardHome program sitting in my user's home folder. While I could run it from here, it will be better to put it in a location that won't accidentally get deleted and is easily accessible by the root user.
There are lots of options and it's ultimately up to you. For the sake of sticking with the same options as AdGuard Home's one-line-install script, I will place it in the /opt/AdGuardHome directory.
sudo mkdir /opt/AdGuardHome
sudo mv ~/AdGuardHome/AdGuardHome /opt/AdGuardHome/

With these two commands, we are simply creating a directory, and moving the program into it.
Step 6. Permissions and Ownership
Considering the power of DNS, I recommend creating relatively strict permissions for your AdGuard Home setup. Let's start with the basics:
sudo chown -R root:root /opt/AdGuardHome
sudo chmod -R o-rwx /opt/AdGuardHome

These are standard permissions for a program like this.
- In the first command we transfer ownership to the root user and group.
- The second command ensures that anyone else besides the root user will not have access to the directory or anything beneath.
- -R is used in both to make the commands act Recursively - they will affect the directory and everything below it.
Step 6.5. Use ACL's (Optional)
To take it one step further, we can ensure that any files created in the AdGuardHome directory also follow the permissions we set above. To do that we will use file access control lists (ACL's). Note that this part isn't strictly necessary, but I like to recommend it. If not already installed, we will need the acl package.
sudo apt install acl
Next, we will set our AdGuard Home installation directory to automatically remove access for "other" users.
sudo setfacl -d -m o::--- /opt/AdGuardHome
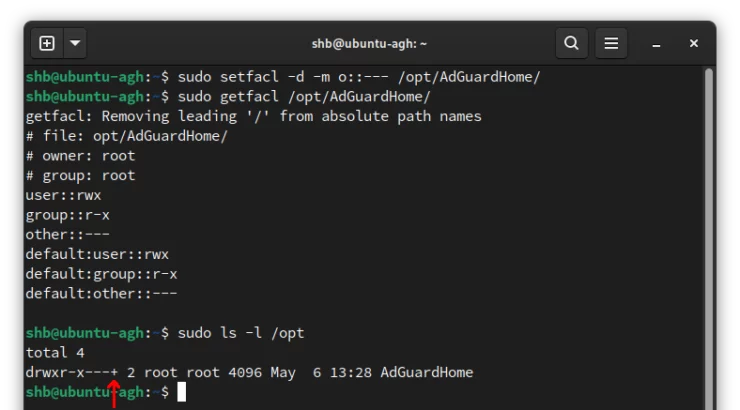
In the setfacl command above we use:
- -d to apply the coming upcoming change to the default ACL.
- -m to indicate that we want to modify the ACL.
- o::--- to indicate the permissions we want applied to the other users (none in this case).
After the setfacl command, I used getfacl to show a detailed view of the default folder permissions. Here we can see the "other" users will have no permissions. Another way to know that file or directory is under an ACL: notice the + sign at the end of the permissions when we use ls -l.
At this point, we are at the same point of the process as if you were to have used a traditional installation method of software from apt. AdGuard Home is now installed on your Ubuntu/Debian server! Let's finish the process by running and configuring it.
Step 7. Run!
Now that all of the boring stuff is out of the way, let's run the dang thing!
sudo /opt/AdGuardHome/AdGuardHome -s install
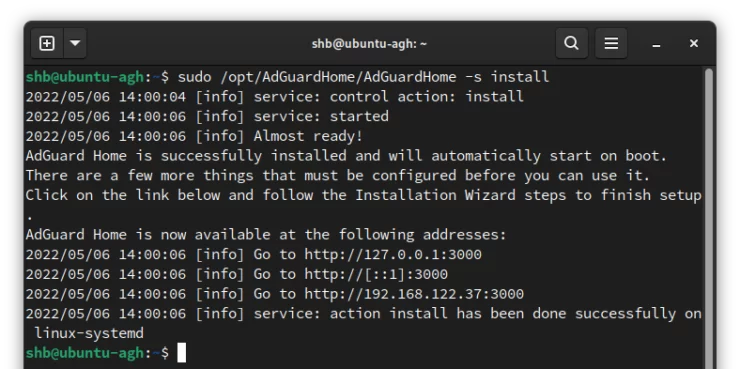
Above we use:
- sudo to be able to install the service. Currently, we can't run AdGuard Home as a service unless we run it as root.
- -s to give AdGuard Home a command as a service.
- install, we will create a systemd service that will start on boot, and run in the background.
Note that we aren't done with AdGuard Home install on Ubuntu! We need to finish the last configuration from the web browser. If you have a desktop environment on the server, you can open a browser and go to http://127.0.0.1:3000.
If you are installing AdGuard Home from a different machine, we will need to access it from the outside. In the screenshot above, I can access mine via http://192.168.122.37:3000.
sudo ufw allow 3000/tcp
Step 8. Go Through the Setup Wizard
Once in the browser we are greeted with a welcome screen and 5 (very quick) steps to get running.
Welcome (1/5)
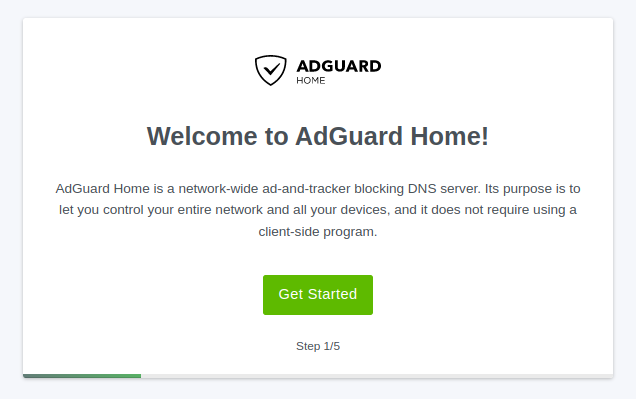
Click Get Started to begin
Interfaces (2/5)
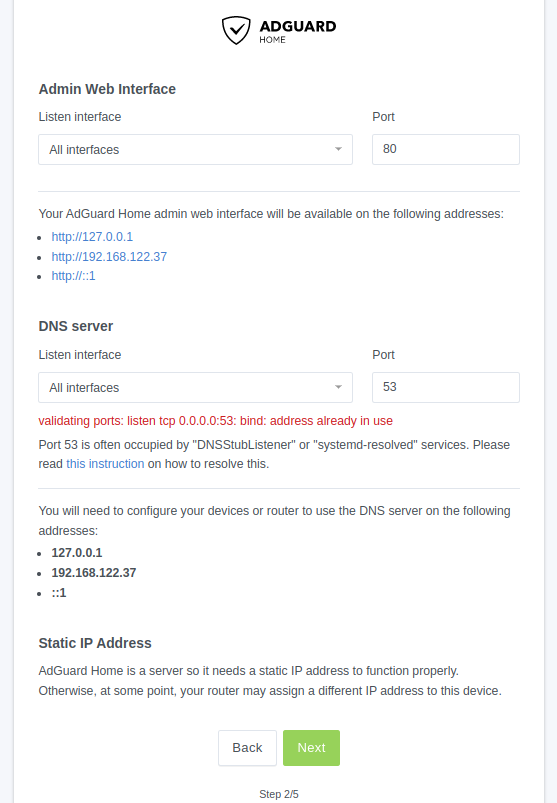
By default, the Admin Website will be available on port 80 (http) on all interfaces. If you have another service using that port, you might need to change to a different port.
To make sure you are using it in an encrypted manner, I recommend placing it behind a reverse proxy like Traefik or Nginx Proxy Manager.
Because I plan on using a reverse proxy and hosting more services on this machine, I need to leave port 80 open. So instead, I'll be changing the port to something higher like 8080.
If you have a bare Ubuntu server like I do, you might get a warning in red (pictured above). We are being warned that there's already a DNS service using port 53. While it is tempting to just change the port, that will likely cause more headaches later.
Instead, to ensure any clients connecting can use AdGuard Home as the DNS resolver, simply select the listen interface corresponding to the local network. In my case it's the enp1s0 - 192.168.122.37 interface (shown below).
After making the changes above, I have a warning under Static IP Address. Make sure that you have a static IP set for your machine running AdGuard Home. This can be accomplished in Ubuntu directly, but I think it's generally better to create a DCHP reservation in your router's settings. I can't really give specific instructions as we will all have slightly different routers. However, with a bit of searching, you should be able to find the setting in your router.
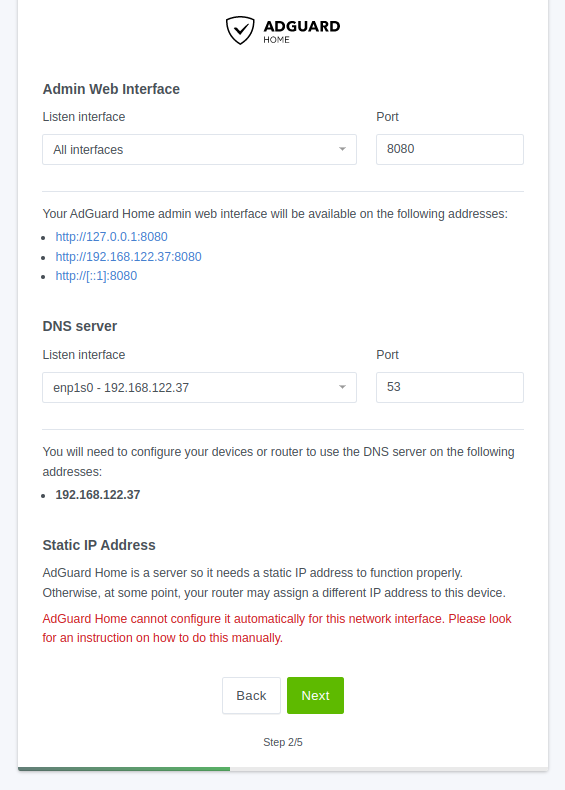
Click Next to continue.
Admin Account (3/5)
Create an admin account with a strong password. I highly recommend using a password manager if you aren't already!
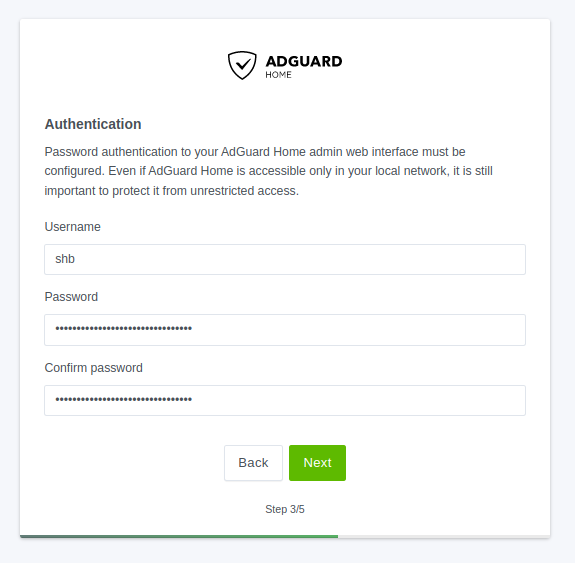
Click Next to continue.
Configure Devices (4/5)

Follow the directions to setup devices to use AdGuard Home as their DNS resolver. Don't worry if you don't do it now, you'll be able to find this exact same screen later.
Click Next to continue.
Congratulations! (5/5)
I think the title says it all.
Click Open Dashboard to continue.
sudo ufw delete allow 3000/tcp
sudo ufw allow 8080/tcp
sudo ufw allow 53
Notice that we allowed 8080/tcp and 53. The reason we don't specify the protocol on port 53 is that we want it to listen for requests on both tcp and udp.
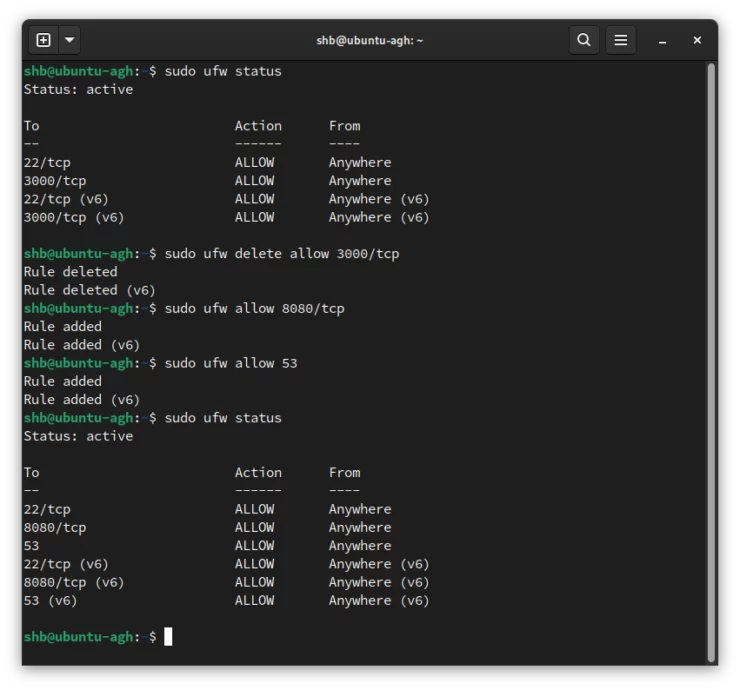
Warning: We are opening our firewall. If this device is acting as a router and directly facing the internet, you want to be sure that we aren't opening our server to attacks. These two ports should only be available on our local network! (meaning, no portforwarding for these ports.
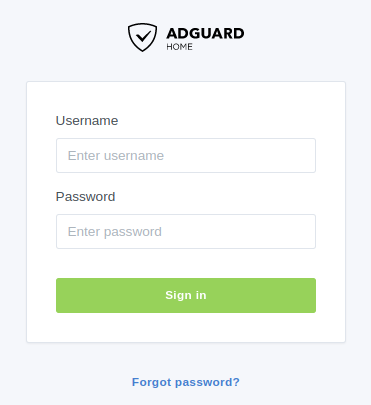
You will be taken to your login screen. Use the credentials you just created to login to your shiny new AdGuard Home!

Bonus Tweaks
Now that you have your AdGuard Home up and running, you might be a bit overwhelmed by the interface. Or, conversely, maybe you know what you want to do but can't find it. Below are some examples from my Top 5 Tips after installing AdGuard Home.
- Add Blocklists: By default, AdGuard Home comes with 1 enabled block list. There are lots more of great lists that can be added in just a few clicks.
- Set Upstream DNS: Upstream DNS servers are the servers where your AdGuard Home sends your queries. Some servers are faster, more interested in your privacy, and more secure than others.
- Block specific sites or services: While blocklists are great, they can't cover every scenario for everyone. Fortunately, AdGuard Home provides multiple ways of defining which sites we want to whitelist or blacklist.
For more details and more tweaks, head to the Top 5 Tips after installing AdGuard Home post.
Concluding Remarks: Enhancing AdGuard Experience
Installing AdGuard Home on Ubuntu is quite a few steps, but none are all that challenging. I also hope you learned a few things along the way! Note that this is just the beginning of using AdGuard Home. It is truly a powerful piece of software with lots of customization and the ability to fit into your technology stack in many fashions.
Where you can go with it from here? Put AdGuard Home behind a reverse proxy to secure your admin dashboard (and enable DoT, DoH, or DoQ), use it anywhere you go via a secure VPN connection, and use AdGuard Home as your DHCP server.
Connect your devices, ensure your AdGuard Home installation is being used as the DNS resolver, and you're all set! Enjoy a better internet.




![8 Amazing Raspberry Pi Ideas [2022]: Beginners and Enthusiasts Raspberry Pi ideas](https://www.smarthomebeginner.com/images/2021/09/raspberry-pi-4-dev-board.jpg)