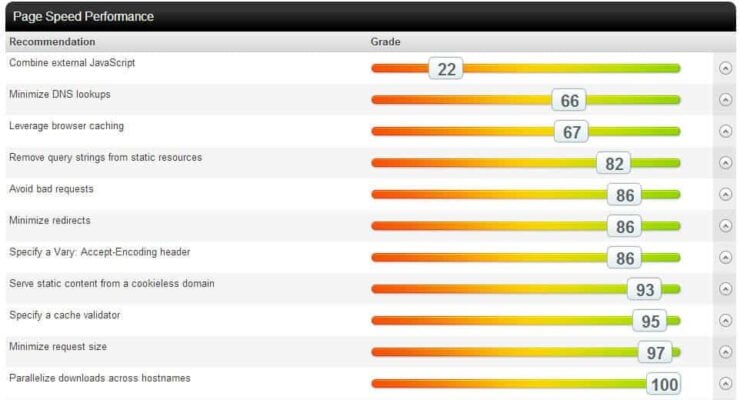
Setting up a self-hosted CDN can speedup WordPress by parallelizing downloads. Recently, I explained why I moved to the $5 VPS offering from Digital Ocean. I can tell you that I have been more than happy with the performance of my VPS server and my WordPress site. Until about a week back, I was using Amazon CloudFront for my CDN needs. And then due to a plugin bug, I received 20 million HTTP requests and consequently a huge CloudFront bill. For me CloudFront was only offering a marginal increase in speed. So I decided to setup self-hosted CDN on my Digital Ocean VPS with LEMP stack. While this may not be a true Content Delivery Network (it's not edge caching), it would speedup WordPress by serving static resources from cookieless domains and parallelizing downloads across multiple virtual hosts. [Read: Remove query strings from static resources to improve page speed]
Table of Contents
Requirements to Setup Self-Hosted CDN
- Access to DNS records
- Admin privileges on your server
- Access to W3 Total Cache on your WordPress install
- www prefix to the domain name enforced
- Some patience
CDN Subdomains and Their Advantages
A browser has limits on the number of connections it can make to a specific domain or a subdomain. Since css.htpcbeginner.com is different from cdn.htpcbeginner.com, a browser can make more connections to the server and download files in parallel thus speeding up your site. Setting up a self-hosted CDN will also allow downloading from a cookieless subdomain there by reducing overhead data and request size. To accomplish this, it is essential that you server your WordPress site with the "www" prefix instead of without it.
Typically, W3 Total cache requires at least 5 separate subdomains for CDN. In this example, I am going to choose the following CDN subdomains to serve JS, CSS, and Image files:
- jsh.htpcbeginner.com
- jsb1.htpcbeginner.com
- jsb2.htpcbeginner.com
- css.htpcbeginner.com
- cdn.htpcbeginner.com
1. Setup CNAME Records
Since DNS changes can take several hours to propagate, the first step is to setup CNAME records on your DNS. Your hosting or domain provider should give you access to edit the DNS records. In this example, I am going with GoDaddy. Login to your domain control panel and the edit DNS Zone file screen. Create CNAME alias records for the 3 CDN subdomains, as shown below.

Save and exit. It can take several hours for the subdomains to become active. [Read: Alternative PHP Cache (APC) with W3 Total Cache for WordPress]
2. Setup NGINX Virtual Hosts
To setup self hosted CDN, on the server-side you will have to create virtual hosts for each of the subdomains. Right now, I am going to show you how to create virtual hosts in NGINX, but at some point, I will update the post to include instruction for Apache webserver as well. Navigate to /etc/nginx/sites-available and create a file called "cdn":
$ cd /etc/nginx/sites-available
$ sudo nano cdn
Enter the following content into the file:
server {
# Comment: Server Basic Information
listen 80;
server_name cdn.htpcbeginner.com jsh.htpcbeginner.com jsb1.htpcbeginner.com jsb2.htpcbeginner.com css.htpcbeginner.com;
root /var/www/html/public/;

# Comment: The section below allows only images, JS, and CSS files to be available to self-hosted CDN subdomains. Avoids duplicate availability of other content through subdomains.
if ($request_uri !~* "\.(jpe?g|gif|png|ico|js|css)$") {
    rewrite ^(.*) https://www.smarthomebeginner.com$1 permanent;
    break;
}

# Comment: The section below sets expires header to static resources and unsets cookies.
location / {
    expires max;
    add_header Pragma public;
    add_header Cache-Control "public, must-revalidate, proxy-revalidate";
    access_log off;
    log_not_found off;
    fastcgi_hide_header Set-Cookie;
    tcp_nodelay off;
    break;
}
}
Replace the subdomain names under server_name setting and the root path (should be same as WordPress site root) to the ones that apply to you. Save and exit by pressing Ctrl X. The above virtual host file can be broken down to three sections and each part has a comment explaining its purpose. It is key to allow serving of only images, JS, and CSS files through the self-hosted CDN subdomains because if your post content can also be accessed through subdomains then Google may treat it as duplicate content and penalize your site.
Recommended Guides on WordPress:
Enable the CDN virtual host and restart NGINX:
$ sudo ln -s /etc/nginx/sites-available/cdn /etc/nginx/sites-enabled/cdn
$ sudo nginx -t && sudo service nginx reload
If there are any errors, NGINX will not reload. Fix the errors and rerun the above command. Now you can test if the CDN works by accessing one of your images through your self-hosted CDN. Notice the URL in the image below. If you try to access anything other than images, JS, and CSS files the page should automatically redirect to the non-cdn subdomain (typically www).

3. Setup W3 Total Cache
The final setup in configuring self-hosted content delivery network is setting up the CDN section of W3 Total Cache plugin. First on the "General Settings" page, enable CDN and select "Generic Mirror" for CDN type. Then head over the CDN page and setup CNAME aliases for the CDN subdomains as shown below. Again use the subdomain names that apply to your situation. Test the mirror to ensure it works.
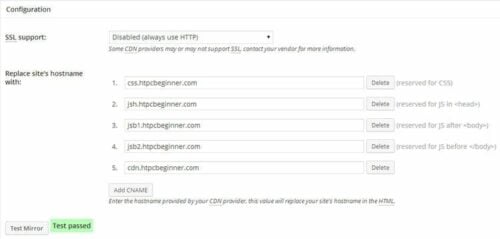
And finally, check "Set cookie domain to www.smarthomebeginner.com" option at the end of page. The rest of the CDN settings can be configured to your taste. Save all settings and empty your cache. Now open a post on your blog and view its source. You should see that images, JS, and CSS files are being loaded from your CDN.

With Amazon CloudFront, the above page loaded in about 1.5 seconds. With my self-hosted CDN the page loaded in about the same time. The effect was the same when tested from other server locations as well. So at this point, having Amazon CloudFront CDN did not provide me any major benefit. [Read: Remove duplicate meta descriptions and titles on multi-page WordPress posts]
Fixes for Side Effects
There are at least two additional changes you might have to do counter the side effects of serving static files through your own CDN. First is explicitly specifying the cookie domain (www.smarthomebeginner.com in this case) through W3 Total Cache as explained above. The second is specifying _setDomainName for Google Analytics. If you are using Yoast's Google Analytics plugin then you may specify www.smarthomebeginner.com under Subdomain Tracking option or by manually setting the value.
Conclusions
Understand that I am not recommending setting up Self-Hosted CDN as an alternative to a normal CDN. But in my case the pagespeed gain was marginal and the additional burden on my Digital Ocean VPS was negligible. Also note that, setting up your CDN on a different server is better than serving static files from the same server. But explaining that is beyond the scope of this post. In any case, for small to medium traffic blogs setting up your own self-hosted CDN with subdomains can reduce some CDN costs and speedup your self-hosted WordPress site by removing cookies and parallelizing downloads.


![Traefik Forward Auth Guide - Simple, Secure Google SSO [2022] OAuth Featured Image_final](https://www.smarthomebeginner.com/images/2019/10/OAuth-Featured-Image_final.jpg)
