Docker makes running several apps easy. But how (and why) do you run PiHole in Docker on an Ubuntu system with Traefik reverse proxy in front? There are several benefits to doing this and there is not much information out there on how to accomplish this. Therefore, in this tutorial, I will share PiHole Docker setup instructions and we will do this using docker-compose for simplicity. If you do not use Docker Compose, you check this page for docker commands.
Recently, I published my complete PiHole Tutorial that provides all information necessary to setup a PiHole instance on Raspberry Pi for whole home ad blocking. AdGuard Home is a similar new entrant but a worthy competitor to Pi-Hole.
While working on this guide, I also tried to setup PiHole on Docker, which will be a great addition to my Docker media server. The problem was my docker media server was behind Traefik Reverse proxy with Let's Encrypt SSL certificates.
I could not find any information on how to setup PiHole with Traefik Reverse proxy. Yesterday, I figured out how to do this. So here is my PiHole Docker guide for Ubuntu / Debian systems with Traefik Reverse Proxy. Note that we are proxying the WebUI (port 80) and not PiHole itself, which uses port 53.
Changelog:
- November 27, 2018 - Initial publication.
- June 6, 2019 - Added Step 0.
I am leaving out a lot of basic information that were covered in my previous guide. Therefore, I strongly recommend reading it, even if everything there does not apply to you, prior to following this guide.
Table of Contents
Advantages of Running PiHole on Docker
Pi-Hole is a network-wide ad blocking app. If you do not know what PiHole is, be sure to read my previous PiHole guide. Docker makes setting up several apps extremely easy. I moved all my home server apps, including Home Assistant, to Docker with Traefik Reverse Proxy earlier this year and everything has been running smoothly with automatic Let's Encrypt SSL certificates. Here are some basic advantages of running PiHole in Docker:
- Easy, hassle-free setup and maintenance. Docker Compose makes things even easier.
- Durability - I say this because, if you have Query Logging enabled, you can burn out your SD card on Raspberry Pi. This means you will have to setup everything again. The chances for something like this is less on a Server.
- Extend your existing home server and eliminate the need for a separate device (eg. Raspberry Pi).
But there is one more big advantage. PiHole requires ports 80 and 443 to be free for use. However, these ports may be required by other apps (eg. webserver). And if you followed my Traefik Reverse Proxy guide to setup your docker media server, then ports 80 and 443 are required for Traefik. So it is not possible to setup PiHole directly on Ubuntu or Linux systems. Reverse proxy is the way to go in these situations and Docker makes this so much more easier. So let's see how to run PiHole in Docker on Ubuntu server with Traefik Reverse Proxy in front.
Requirements
Here is what you will need to follow this Pi Hole Docker tutorial successfully:
- Ubuntu Server - These instructions should work on Debian or most Linux systems (with some modifications). These guide was developed using Ubuntu Server 18.04 LTS.
- Docker setup and running on Ubuntu
- Traefik Reverse Proxy setup and configured properly
In addition, you will need access to your ubuntu server either directly or through SSH. [Read: 10 best SSH Clients for Windows: free alternatives to PuTTY]
PiHole Docker Setup Guide
Before we proceed, the PiHole page on Docker Hub is a great resource to read. Several of the variables and settings used in this guide are explained on that page in detail.
Step 0: Pull PiHole Image
In the next step (Step 1), you will kill your servers DNS resolver. When that is done, docker-compose cannot reach the docker servers to pull the latest image for PiHole. Therefore, first pull the lates PiHole image using the following command:
docker pull pihole/pihole:latest
The output should look something like this:
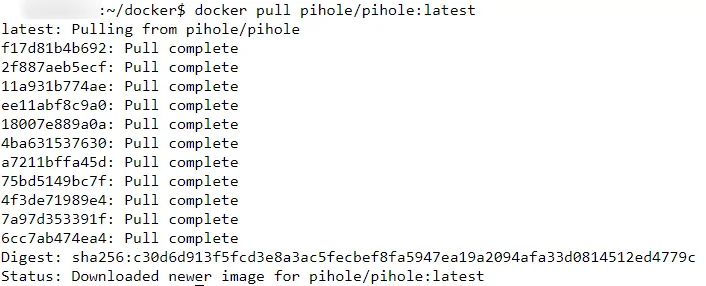
Once pulled, you can proceed to step 1.
Step 1: Modify Ubuntu Network Configuration
Since PiHole makes itself the DNS server and uses port 53, there will be conflicts with Ubuntu Server's (docker host) network. In fact, this was the biggest issue that caused me to not run PiHole in Docker. PiHole ran successfully but my Ubuntu server was not able to access internet resources. So here are the network configuration changes you need to make on your Ubuntu Server before proceeding with PiHole docker setup.
First, disable and stop Ubuntu's DNS resolver using the following two commands:
sudo systemctl disable systemd-resolved.service
sudo systemctl stop systemd-resolved.service
Next, open network manager configuration using the following command for editing:
sudo nano /etc/NetworkManager/NetworkManager.conf
Add dns=default under [main] so that the file contents look like what is shown below:
[main]
plugins=ifupdown,keyfile
dns=default
...
...
...
Then remove or even better rename /etc/resolv.conf file (it is a symbolic link) using the the following command:
sudo mv /etc/resolv.conf /etc/resolv.conf.bak
In case there is a problem, you can rename the file back to /etc/resolv.conf. Finally, restart your network manager using the following command.
sudo service network-manager restart
Now that your sytem is prepped, let us move forward to setting up PiHole on Docker with Traefik Reverse Proxy in front.
Recommended Guides Secure Shell/SSH:
Step 2a: Run PiHole in Docker with Reverse Proxy
If you are not familiar with Docker and Docker compose, please review my primer before proceeding. At this point, I am assuming that you already have a working docker compose file.
In the PiHole docker compose example code block below, ${$USERDIR}, ${SERVER_IP}, ${TZ}, ${DOMAINNAME}, etc. will be automatically filled by the compose file from the environment file (/etc/environment). If you do not have it yet, check this guide to create an environment file. Alternatively, you can replace the environmental variables in the docker-compose block below with actual values.
Here is the code to add (copy-paste) in the docker-compose file (pay attention to blank spaces at the beginning of each line). Note that some of the lines are commented out with a # in front. These lines may be enabled by removing the # in front to customize the PiHole docker compose. If you uncomment, pay attention to the alignment of the lins, which is very import for YAML to work.
  pihole:
    container_name: pihole
    domainname: docker
    hostname: pihole
    image: pihole/pihole:latest
    ports:
      - '53:53/tcp'
      - '53:53/udp'
      # - '67:67/udp'
      - 'XXXX:80'
      - 'YYYY:443'
    restart: unless-stopped
    volumes:
      - ${USERDIR}/docker/pihole/pihole:/etc/pihole
      # - ${USERDIR}/docker/pihole/pihole.log:/var/log/pihole.log
      - ${USERDIR}/docker/pihole/dnsmasq.d:/etc/dnsmasq.d
    cap_add:
      - NET_ADMIN
    environment:
      - ServerIP=${SERVER_IP}
      - PROXY_LOCATION=pihole
      - VIRTUAL_HOST=pihole.${DOMAINNAME}
      - VIRTUAL_PORT=80
      - TZ=${TZ}
      - WEBPASSWORD=PIHOLEWEBPASSWORD
      - DNS1=127.0.0.1
      - DNS2=1.1.1.1
    labels:
      - "traefik.enable=true"
      - "traefik.backend=pihole"
      - "traefik.port=80"
      - "traefik.frontend.rule=HostRegexp:pihole.${DOMAINNAME},{catchall:.*}"
      - "traefik.frontend.priority=1"
      - traefik.frontend.headers.SSLRedirect=true
      - traefik.frontend.headers.STSSeconds=315360000
      - traefik.frontend.headers.browserXSSFilter=true
      - traefik.frontend.headers.contentTypeNosniff=true
      - traefik.frontend.headers.forceSTSHeader=true
      - traefik.frontend.headers.SSLHost=${DOMAINNAME}
      - traefik.frontend.headers.STSIncludeSubdomains=true
      - traefik.frontend.headers.STSPreload=true
      - traefik.frontend.headers.frameDeny=true
Replace/Configure:
XXXX- port number on host machine that is free and will talk to port 80 of the PiHole container. For example, I use 8182.YYYY- port number on host machine that is free and will talk to port 443 of the PiHole container. Port 443 is to provide a sinkhole for ads that use SSL. For example, I use 8183.67:67/udp- I have commented this out. If you want PiHole to act as your DHCP server you will need to uncomment this. I let my router handle DHCP. There are some minor inconveniences in letting your router be the DHCP server instead of PiHole. However, this does not affect a typical home user.pihole.log- I have commented this out. But if you want your PiHole logs to persist (not get lost when docker containers are recreated / updated) then you should uncomment this. In addition, you will have to runtouch pihole.loginside${USERDIR}/docker/pihole/. This create an empty log file for PiHole use.cap_add- I have commented this and the following line out. For PiHole to act as DHCP server these two lines must be uncommented.PIHOLEWEBPASSWORD- Password for PiHole WebUI.DNS1 and DNS2- I am listed Cloudflare DNS IPs 1.1.1.1 and 1.0.0.1 (I recommend this for privacy). You may use anything that works for you.
Save and run the docker-compose.yml and check the logs for any errors:
docker-compose -f ${USERDIR}/docker/docker-compose.yml up -d ; docker-compose logs -tf --tail="50" pihole
If you see no error messages, press Ctrl C to exit. PiHole admin WebUI should be available at https://pihole.example.com/admin/.
Step 2b: PiHole on Docker without Reverse Proxy
So what if you do not have a reverse proxy and ports 80 and 443 are free (no webserver). You can still use Docker to setup PiHole. In this case, the biggest advantage is simplicity and isolating PiHole from the host machine.
Some of the preliminary information provided in Step 2a apply here as well.
Here is the docker compose snippet to get PiHole running without a reverse proxy in front.
  pihole:
    container_name: pihole
    domainname: docker
    hostname: pihole
    image: pihole/pihole:latest
    ports:
      - '53:53/tcp'
      - '53:53/udp'
      # - '67:67/udp'
      - '80:80'
      - '443:443'
    restart: unless-stopped
    volumes:
      - ${USERDIR}/docker/pihole/pihole:/etc/pihole
      # - ${USERDIR}/docker/pihole/pihole.log:/var/log/pihole.log
      - ${USERDIR}/docker/pihole/dnsmasq.d:/etc/dnsmasq.d
    cap_add:
      - NET_ADMIN
    environment:
      - ServerIP=${SERVER_IP}
      - TZ=${TZ}
      - WEBPASSWORD=PIHOLEWEBPASSWORD
      - DNS1=127.0.0.1
      - DNS2=1.1.1.1
Replace/Configure:
67:67/udp- I have commented this out. If you want PiHole to act as your DHCP server you will need to uncomment this. I let my router handle DHCP. There are some minor inconveniences in letting your router be the DHCP server instead of PiHole. However, this does not affect a typical home user.pihole.log- I have commented this out. But if you want your PiHole logs to persist (not get lost when docker containers are recreated / updated) then you should uncomment this. In addition, you will have to runtouch pihole.loginside${USERDIR}/docker/pihole/. This create an empty log file for PiHole use.cap_add- I have commented this and the following line out. For PiHole to act as DHCP server these two lines must be uncommented.PIHOLEWEBPASSWORD- Password for PiHole WebUI.DNS1 and DNS2- I am listed Cloudflare DNS IPs 1.1.1.1 and 1.0.0.1 (I recommend this for privacy). You may use anything that works for you.
Save and run the docker-compose.yml and check the logs for any errors:
docker-compose -f ${USERDIR}/docker/docker-compose.yml up -d ; docker-compose logs -tf --tail="50" pihole
If you see no error messages, press Ctrl C to exit. In this case, unless you setup port forwarding on a router, you will not be able to access PiHole admin web interface from outside your home network. From within your home network, PiHole admin WebUI should be available at https://SERVER-IP-ADDRESS/admin/.
Step 3: PiHole Configuration and Tweaks
I have already covered PiHole Configuration and Tweaks:
Step 4: Accessing PiHole by Commandline (When Required)
It is quite easy to access PiHole running on a separate system using SSH. How do you access PiHole by commandline when it runs in docker? You can do that using the following command:
docker exec -ti pihole /bin/bash
You should be on terminal inside the docker container. From here you should be able to run all of the PiHole commands listed in my previous PiHole guide.
Final Thoughts on Running PiHole in Docker
In this PiHole Docker tutorial, I am assuming that you have your own domain name. You may also accomplish the same thing using a free Dynamic DNS. This was coverered in my previous Traefik Tutorial in detail.
I was using only one PiHole instance on my network and that was on Raspberry Pi. Now, I have setup a second PiHole instance on Docker. On my router, I have specified the IP addresses of my Raspberry Pi and Ubuntu server as the IP addresses for DNS nameservers. Normally, at least 2 DNS servers are recommended. With my Docker PiHole setup acting as the second PiHole server, I am now able to provide two DNS servers to share the load.
If you would like to run PiHole in docker, go a head and do it. You would be surprised at how easy it is once you do it. And you decide to jump in, I hope this PiHole Docker setup guide is helpful.



![[Video] Install Docker and Docker Compose on Ubuntu - Don't Do It WRONG Video Thumbnail: Install Docker on Ubuntu (with Compose) – Don't Do It WRONG](https://www.smarthomebeginner.com/images/2023/03/install-docker-on-ubuntu-with-co-1.jpg)

