Traefik Reverse Proxy is one of my best finds of 2018 that has taken my home server to the next level in some ways. Few weeks back, I published my Docker media server guide using Docker compose and how it can simplify setup and porting of home server apps. In fact, after I set up my apps on Ubuntu 16.04, moving to 18.04 only took me about an hour for everything - Ubuntu 18.04 clean installation, Docker and Docker compose installation and recreating my home server apps from my compose file. All app settings transitioned over and I was back in business in no time on a fresh server. [Read: My Smart Home setup – All gadgets and apps I use in my automated home]
One of the most frequently asked questions, after I published my Docker media server guide, was: how to setup reverse proxy? If you do not know what reverse proxy is then I strongly recommend that you read this Traefik tutorial and consider putting in place a reverse proxy for your Docker-based home server.
In short, Traefik reverse proxy will significantly simplify SSL implementation using automatic Let's Encrypt certificates.
It will make your docker apps available through an easily accessible URL. You won't have to expose your app ports to the internet (security risk) or remember the port numbers. Traefik can even proxy non-Docker apps on host system. With Traefik you can even put your apps behind Google OAuth for convenience, instead of basic HTTP authentication.
April 19, 2020: The wait is over. Here is the Traefik 2 Docker guide. This Traefik 1 guide and GitHub files for Traefik v1 will receive minimal updates moving forward. If you are starting new, start with Traefik v2. If not, we strongly recommend migrating to Traefik v2.
November 19, 2019: I have updated my setup significantly after publishing this post. I now use Docker with Traefik v2. Please check my Docker-Traefik GitHub Repo for latest Docker Compose files.
Changelog:
- April 2, 2020 - Changed network from traefik_proxy to t1_proxy for clear distinction from Traefik 2, for which I will be using t2_proxy as network.
- December 16, 2019 - Added first draft of Traefik 2.1 compose files to the GitHub Repo. Added draft of Docker Swarm compose file to repo. Replaced frameDeny with customFrameOptionsValue.
- September 17, 2019 - Added Traefik 2.0 warning. Modified docker compose to work with Traefik v1.7.16. Added Traefik label for iframe support (eg. for Organizr). Other minor improvements and clarifications. Updated to Hydra 2. Changed Organizr image.
- March 6, 2019 - Updated deprecated traefik labels. Updated cloudflare configurations and screenshots. Few more bugs and clarifications.
- Feburary 19, 2019 - Edited Cloudflare DNS challenge variables to match current Traefik (1.7.9 and greater) requirements.
- August 31, 2018 - Added
rules.tomlexample for non-dockerized apps. Addedrules.tomlandtraefik.tomlto GitHub. Added security header labels for containers.
Sounds excitingly complicated? Don't worry, in this I will walk you through all the steps needed to setup Traefik for Docker media server.
Table of Contents
- Requirements
- Reverse Proxy Primer
- What is Traefik Reverse Proxy?
- URL Structure for Docker Reverse Proxy
- Setup and Configure Traefik on Docker
- Traefik Reverse Proxy with LE for Docker Media Server
- Traefik Docker Compose Examples
- Traefik Docker Compose Guide - Final Thoughts
Requirements
There are some requirements that must be met before proceeding:
- Home Server - While guide is based on Ubuntu, setting up Traefik reverse proxy for Docker should work any Linux OS
- Docker Media Server - You should already have a Docker media server setup. If you are a newbie, I strongly recommend reading my basic guide as we will be pulling certain parts from there.
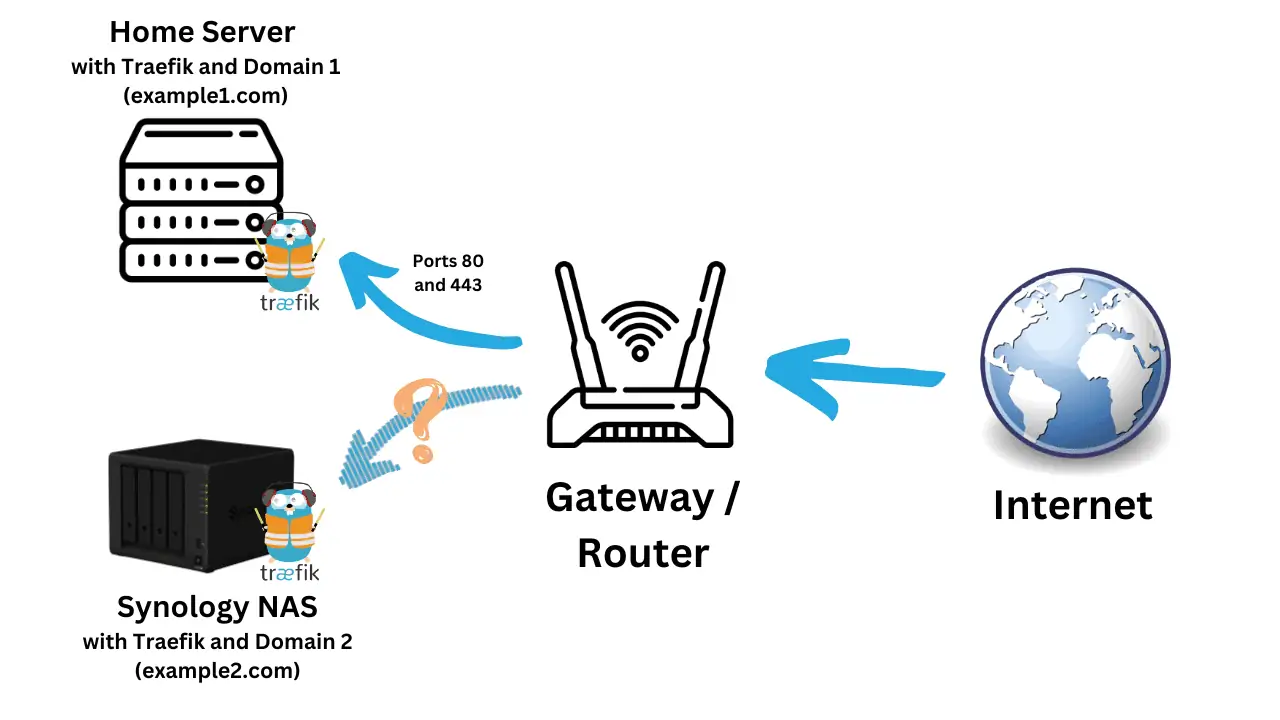
- Port Forwarding - Traefik Reverse Proxy uses ports 80 and 443. These ports must be forwarded on your router to the server with Traefik docker instance.
Reverse Proxy Primer
Before we get started with this Traefik Docker Compose tutorial, I will give a brief overview of reverse proxy for beginners.
What is Reverse Proxy?
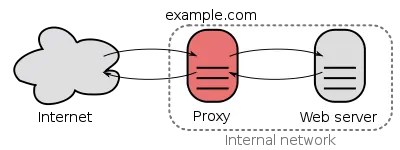
A reverse proxy is an intermediate server that sits between backend servers/apps (Radarr, Sonarr, SABnzbd, etc.) and clients (you and other services that try to access your apps from the internet). A client interacts only with the reverse proxy and the reverse proxy communicates with the backend apps to provide/retrieve information. A reverse proxy server typically sits behind a firewall (router or internet gateway) and directs clients to appropriate apps without the clients having to know the apps' IP address or port.
Recommended Guides on Docker:
Benefits of Reverse Proxy
For enterprises and big websites reverse proxies can offer load balancing and web acceleration among several other benefits. But for home use, the biggest benefits are security, privacy, and convenience. Let's examine this with the use of an example. Let's say you have Radarr that is accessible at the following address:
http://example.com:7868
A reverse proxy server can make Radarr be available at:
https://radarr.example.com

OR

https://example.com/radarr
- Setting up HTTPS / SSL for some apps (eg. Radarr / Sonarr) are extremely difficult. Reverse proxy simplifies this significantly and improves your privacy and security. In fact, reverse proxy is the recommended way to add HTTPS access for Radarr and Sonar among others.
- Reverse proxies can automate the setup of free SSL certificates from Let's Encrypt. They can even automatically renew them when they become due.
- You do not have to expose or forward ports on your router. Exposing ports to the internet can be security risk if the app is not sufficiently protected or has a security flaw.
- Reverse proxies also can make implementing HTTP access authentication easy, thereby adding a layer of security.
- Combining Docker with a reverse proxy, you can run multiple apps that require the same port number (eg. PiHole and a web server - both require port 80)
- For smart home applications, if you want to add Google Assistant support to Home Assistant you need your server to be externally accessible with SSL and hostname. Reverse proxy can help here as well.
Options for Reverse Proxy
Now that we know the benefits of implementing a good reverse proxy for your home server, let's look at what options are available for your docker server. We are going to take a brief look at 3 different reverse proxies: Nginx Proxy, HAProxy, and Traefik.
Traefik vs Nginx Proxy
Nginx reverse proxy is one of the oldest available options for this purpose. However, setting up and maintaining a Nginx server is not a task that is comfortable for most people. I use Nginx and in fact this site is powered by Nginx. But for docker applications, in my option, there is no Traefik vs Nginx comparison. Traefik just makes things so easy.
JWilder's Nginx Proxy simplifies Nginx proxy for Docker containers. Combined with Nginx Proxy Companion, implementing a docker reverse proxy with Let's Encrypt SSL becomes much easier. I have tried it but Traefik is much simpler in my opinion.
Traefik vs HAProxy
HAProxy is also getting very popular recently. Many big websites use HAproxy. Here again, I think HAProxy is a lot more complex for home use compared to Traefik. HAProxy is definitely not a bad product. In fact, there are several people who swear by it. I am just saying that if your aim is to put in place a reverse proxy for Docker then Traefik, in my experience, is a better option.
What is Traefik Reverse Proxy?
Let's begin this Docker Traefik tutorial by giving you a quick intro to Traefik. Traefik (pronounced like "traffic") is a tiny and fast reverse proxy application but with several advanced features. It is developed by Containous. For Docker applications, Traefik has an official docker image that integrates very easily with Docker Compose to create apps with HTTPS, load balancing, metrics, and other benefits, in minutes.
Traefik is amazing, but one of its biggest drawbacks is that it is relatively new. This means there are not many Traefik tutorials out there. Traefik documentation is available to help. However, it can be difficult for newbies and does not provide enough explanation on some topics. The objective of this post is to provide all the necessary information for you to implement traefik reverse proxy for your docker media server and also show you a working Traefik Docker Compose example.
URL Structure for Docker Reverse Proxy
There are couple of ways to implement Traefik proxy for Docker. The way I am going to do this is using Traefik Docker Compose and Labels. With labels, Docker compose can automatically configure all the containers to use Traefik HTTPS reverse proxy. But before we get started with configuring Traefik proxy, we have an important decision to make.
One of the most common ways to make your home server apps accessible over the internet is through a Dynamic DNS service. DuckDNS and Afraid are two commonly used free services for this purpose. They offer a hostname such as myhome.duckdns.org that can point to your home's WAN IP address. This way, you won't have to remember your home IP. Plus, if your IPs change, dynamic DNS services can automatically update and point to the new IP. Dynamic DNS is great but your only option with Traefik becomes putting all your apps as a subdirectory (example.duckdns.org/app/) instead of a separate subdomain/host (app.example.duckdns.org).
Your own domain name, however, will allow you to put your apps as either subdirectory or separate host. You can even mix and match where some are available as example.com/app1 and others are available as app2.example.com.
Traefik v1.6 and Wildcard Certificates
The benefit of running apps as a subdirectory/path instead of a separate subdomain is that one let's encrypt certificate will work for all your apps since there is only one domain and every app is just a subdirectory path. This means fewer SSL Certificates for Traefik to fetch and maintain. This problem became inconsequential when Traefik 1.6 was introduced in May 2018 with Let's Encrypt Wildcard Certificate support. With this, all you need is one certificate *.example.com and all your apps proxying to separate hostnames can use the same certificate.
The only disadvantage of Wildcard Certificates is that Let's Encrypt ACME verification is done through DNS challenge. A key requirement is that your DNS be managed by a supported DNS provider. DNS Challenge requires that a TXT record be added to your DNS records.
Dynamic DNS or Your Own Domain Name?
I strongly recommend getting your own domain name that points to your home's WAN IP. It would costs $12 a year for a private domain name through Google Domains. There are couple of reasons why I recommend this:
- In my testing, I could never get some docker containers (eg. Home Assistant, UniFi Controller, NextCloud, and Plex) to work as a subdirectory (even on my own private domain name) behind Traefik reverse proxy. In such situations, you will be left with creating multiple dynamic DNS subdomains to fit all your services in. Most free dynamic DNS services limit the number of subdomains you can create.
- Afraid DNS is not one of the supported providers for wildcard certificates. Although DuckDNS is listed as supported, it has not yet been tested. In my tests, I could get neither HTTP challenge nor DNS challenge to work on DuckDNS. In addition, DuckDNS appears to add query string at the end of URL, which interfered with the operation of Radarr and Sonarr. The only free Dynamic DNS service that worked for me was HTTP challenge through Afraid.org (subdirectories only).
My setup uses my own domain name, all my apps as separate hosts, and Traefik >1.6 with Wildcard certificates. My DNS provider is Cloudflare, which is tested and verified to work with Traefik Let's Encrypt wildcard certificates. If you have your own domain name and your DNS provider is not listed as supported, then I recommend moving your DNS is to Cloudflare, which is amazingly fast, and free.
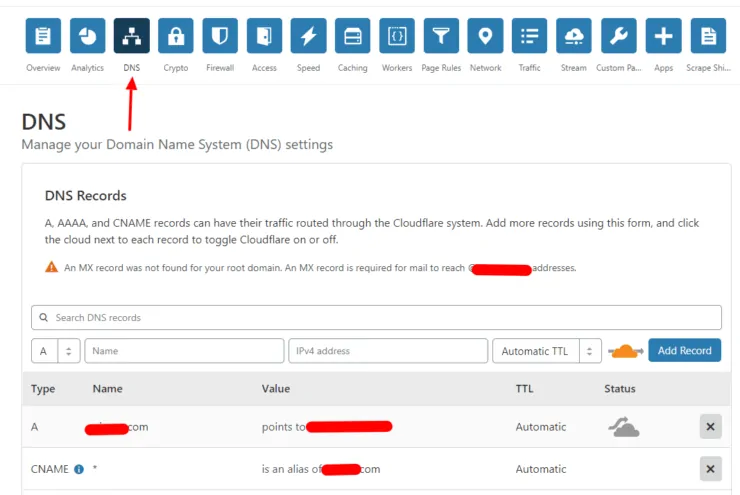
On Cloudflare, you have to point your root domain (example.com) to your WAN IP. Then, add either a wildcard CNAME (*.example.com) or individual subdomains, all pointing to your root domain (@ for host), as shown below (this does not require a paid account).
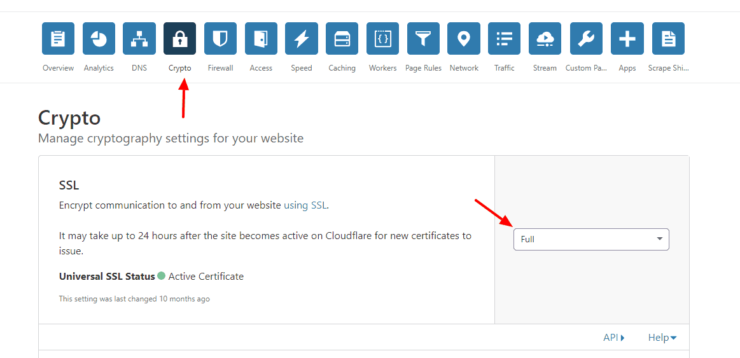
In addition to creating the DNS records, you will have to adjust Cloudflares SSL settings to avoid indefinite redirects. Go to Crypto settings for the domain and change SSL to Full as shown below.
Setup and Configure Traefik on Docker
This Docker Traefik tutorial is primarily based on a private domain with DNS in Cloudflare. But I am also going to provide instructions if you want to go with a Dyanmic DNS through Afraid.org (keep in mind that you can only use subdirectories for you apps). I will share my Traefik Docker Compose example for both applications. So let's get rolling.
Prepare for Traefik Setup
First, let's do some prep work to get the Traefik Docker container up and running. We are going to use the same folder structure as in my Docker media server guide. All apps will be located under ${USERDIR}/docker/ folder in their own folder.
Create Username and Password for HTTP Authentication
We will have to use HTTP authentication for some apps (eg. Traefik monitoring UI). For this, we need to create a .htpasswd file with the login credentials. Again if you followed my docker media server guide, we are going to put this file in ${USERDIR}/docker/shared folder. Use this HTPASSWD Generator, to create a username and password and add them to the ${USERDIR}/docker/shared/.htpasswd file as shown below:
username:mystrongpassword
Replace/Configure:
username: with your HTTP username.mystrongpassword: with your hashed HTTP password generated using the link above.
username:$apr1$TVV6vSeo$nau4LtVqNj3SDV/BDxtFr1

Should be:

username:$$apr1$$TVV6vSeo$$nau4LtVqNj3SDV/BDxtFr1

In the environment file, $ signs do not need to be escaped.
Alternatively, you can use the following command to generate a username and password that is already escaped:
echo $(htpasswd -nb username mystrongpassword) | sed -e s/\$/\$\$/g
Save the file and exit.
Update Environmental Variables
If you followed my docker basic guide, you should already have the following environmental variables:
PUID=1000
PGID=140
TZ="America/New_York"
USERDIR="/home/USER"
MYSQL_ROOT_PASSWORD="passsword"
We are going to add some new ones. Edit /etc/environment and add the following new ones to the existing list:
HTTP_USERNAME=username
HTTP_PASSWORD=mystrongpassword
DOMAINNAME=example.com
[email protected]
CLOUDFLARE_API_KEY=XXXXXXXXXXXX
Replace/Configure:
username: with your HTTP username generated in the previous step.mystrongpassword: with your hashed HTTP password generated in the previous step.example.com: Your private or dynamic DNS domain name.[email protected]: Email from your cloudflare account. This is only required only if you are doing DNS Challenge for Wildcard Traefik Letsencrypt certificates.XXXXXXXXXXXX: API key from your cloudflare account (Global API key from Profile page. Not the Zone ID or Account ID). Again, this only required for DNS Challenge for running apps under subdomains.
Cloudflare Global Api Key For Let's Encrypt Dns Challenge
If you use one of the other DNS providers instead of Cloudflare, make sure to include the required configuration parameters in the environmental variables file.

After adding new environmental variables, either logout and login to load them or use the following command:
exec bash
Prepare Traefik Folders and Files
Next, we need to create new folders for Traefik and ACME. With the ${USERDIR} environmental variable set above, run the following commands:
mkdir ${USERDIR}/docker/traefik
mkdir ${USERDIR}/docker/traefik/acme
Docker cannot create missing files (only directories). So we will need to create an empty file for Traefik docker container to use. So, create acme.json file using the following command:
touch ${USERDIR}/docker/traefik/acme/acme.json
Next, set proper persmission for acme.json file using the following command:
chmod 600 ${USERDIR}/docker/traefik/acme/acme.json
Finally, we move on to create Traefik configuration file (traefik.toml), which will vary based on whether you want subdirectories or subdomains for your apps.
Traefik with Apps as Subdomains
If you have your own domain name and you want to go with subdomains for each app and use Let's Encrypt Wildcard certificate, then create ${USERDIR}/docker/traefik/traefik.toml with the following content in it.
#debug = true

logLevel = "ERROR" #DEBUG, INFO, WARN, ERROR, FATAL, PANIC
InsecureSkipVerify = true
defaultEntryPoints = ["https", "http"]

# WEB interface of Traefik - it will show web page with overview of frontend and backend configurations
[api]
  entryPoint = "traefik"
  dashboard = true
  address = ":8080"

# Force HTTPS
[entryPoints]
  [entryPoints.http]
  address = ":80"
    [entryPoints.http.redirect]
    entryPoint = "https"
  [entryPoints.https]
  address = ":443"
    [entryPoints.https.tls]

[file]
  watch = true
  filename = "/etc/traefik/rules.toml"

# Let's encrypt configuration
[acme]
email = "[email protected]" #any email id will work
storage="/etc/traefik/acme/acme.json"
entryPoint = "https"
acmeLogging=true
onDemand = false #create certificate when container is created
[acme.dnsChallenge]
  provider = "cloudflare"
  delayBeforeCheck = 300
[[acme.domains]]
   main = "EXAMPLE.COM"
[[acme.domains]]
   main = "*.EXAMPLE.COM"

# Connection to docker host system (docker.sock)
[docker]
endpoint = "unix:///var/run/docker.sock"
domain = "EXAMPLE.COM"
watch = true
# This will hide all docker containers that don't have explicitly
# set label to "enable"
exposedbydefault = false
Replace/Configure:
[email protected]: with your email.EXAMPLE.COM: with your private domain name.InsecureSkipVerify = true: I had to add at the beginning to allow some apps (eg. UniFi controller) be accessible through Traefik. It ignores SSL issues, for example, due to self-signed certificates.provider = "cloudflare": Change to your DNS provider for DNS challenge.exposedbydefault = false: This will force you to usetraefik.enable=truelabel in docker compose to put apps behind traefik.
Save and exit.
Traefik with Apps as Subdirectories
If you are using Afraid DDNS (subdirectories is your only option) or if you want to subdirectories for your apps on your own private domain then create ~/docker/traefik/traefik.toml with the following content in it. In my tests DDNS from Afraid's crabdance.com worked perfectly.
logLevel = "WARN" #DEBUG, INFO, WARN, ERROR, FATAL, PANIC
defaultEntryPoints = ["http", "https"]

# WEB interface of Traefik - it will show web page with overview of frontend and backend configurations
[api]
  entryPoint = "traefik"
  dashboard = true
  address = ":8080"

# Force HTTPS
[entryPoints]
  [entryPoints.http]
  address = ":80"
    [entryPoints.http.redirect]
    entryPoint = "https"
  [entryPoints.https]
  address = ":443"
    [entryPoints.https.tls]

[file]
  watch = true
  filename = "/etc/traefik/rules.toml"

# Let's encrypt configuration
[acme]
email = "[email protected]" #any email id will work
storage="/etc/traefik/acme/acme.json"
entryPoint = "https"
acmeLogging=true
onDemand = false #create certificate when container is created
onHostRule = true
  # Use a HTTP-01 acme challenge rather than TLS-SNI-01 challenge
  [acme.httpChallenge]
  entryPoint = "http"

# Connection to docker host system (docker.sock)
[docker]
endpoint = "unix:///var/run/docker.sock"
domain = "EXAMPLE.COM"
watch = true
# This will hide all docker containers that don't have explicitly
# set label to "enable"
exposedbydefault = false
Replace/Configure:
[email protected]: with your email.EXAMPLE.COM: with your private domain name.InsecureSkipVerify = true: I had to add at the beginning to allow some apps (eg. UniFi controller) be accessible through Traefik.exposedbydefault = false: This will force you to usetraefik.enable=truelabel in docker compose to put apps behind traefik.
Save and exit.
Traefik Reverse Proxy with LE for Docker Media Server
Since all of the apps listed below have already been introduced in my docker media server guide, I am not going to describe what they do here. I will just focus on providing you the Traefik docker compose examples that you need to use to make your apps available through reverse proxy.
Create Proxy Networks
In the Docker basic guide, we did not have to create any additional networks. However, to make Docker containers available through Traefik reverse proxy, we will need to create couple of networks. One will be internal docker network (we will call this default) and the other will be an external network for use by Traefik proxy (we will call this t1_proxy).
First, create a Traefik docker network called t1_proxy using the following command:
docker network create t1_proxy
Next, add the following code block to the end of your docker-compose.yml file. As we keep adding various services/containers to the docker-compose.yml file, make sure that you add them under services, leaving network block above or below.
networks:
  t1_proxy:
    external:
      name: t1_proxy
  default:
    driver: bridge
In the Traefik docker compose example code blocks below, ${$USERDIR}, ${PUID}, ${PGID}, ${TZ}, ${DOMAINNAME}, ${CLOUDFLARE_EMAIL}, ${CLOUDFLARE_API_KEY}, ${HTTP_USERNAME}, ${HTTP_PASSWORD}, etc. will be automatically filled by the compose file from the environment file we created / edited previously. If you did not set environmental variables, you can replace them with actual values in the code blocks below.
Setup Traefik using Docker Compose
First, we need to create the Traefik docker container. Traefik offers official images from which you can build your containers. Note that if you are going with private domain and wildcard domain certificates then you need version 1.6 or above. We will pull the v1.7.16 image (1.6.2 at this point). This guide will not work with Traefik 2.0 and I do not recommend Traefik 2.0 as it is very new and significantly different.
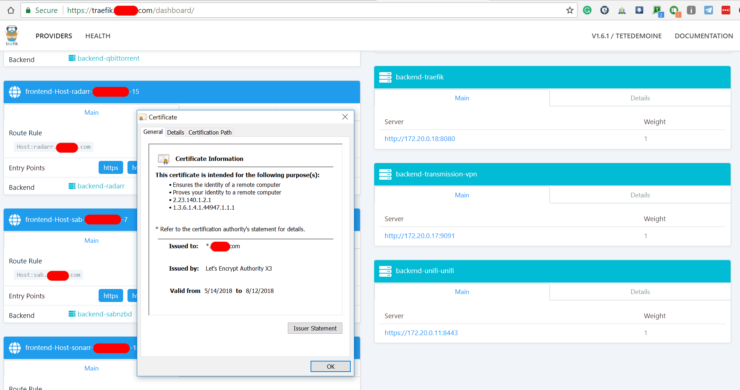
Traefik also has a monitoring Web UI (shown above) which allows you to check the health of the containers and the backend/frontend information. Here is the code to add (copy-paste) in the docker-compose file (pay attention to blank spaces at the beginning of each line):
  traefik:
    hostname: traefik
    image: traefik:v1.7.16
    container_name: traefik
    restart: always
    domainname: ${DOMAINNAME}
    networks:
      - default
      - t1_proxy
    ports:
      - "80:80"
      - "443:443"
#      - "XXXX:8080"
    environment:
      - CF_API_EMAIL=${CLOUDFLARE_EMAIL}
      - CF_API_KEY=${CLOUDFLARE_API_KEY}
    labels:
      - "traefik.enable=true"
      - "traefik.backend=traefik"
      - "traefik.frontend.rule=Host:traefik.${DOMAINNAME}"
#      - "traefik.frontend.rule=Host:${DOMAINNAME}; PathPrefixStrip: /traefik"
      - "traefik.port=8080"
      - "traefik.docker.network=t1_proxy"
      - "traefik.frontend.headers.SSLRedirect=true"
      - "traefik.frontend.headers.STSSeconds=315360000"
      - "traefik.frontend.headers.browserXSSFilter=true"
      - "traefik.frontend.headers.contentTypeNosniff=true"
      - "traefik.frontend.headers.forceSTSHeader=true"
      - "traefik.frontend.headers.SSLHost=example.com"
      - "traefik.frontend.headers.STSIncludeSubdomains=true"
      - "traefik.frontend.headers.STSPreload=true"
#      - "traefik.frontend.headers.frameDeny: true" #customFrameOptionsValue overrides this
      - "traefik.frontend.headers.customFrameOptionsValue: allow-from https:${DOMAINNAME}"
      - "traefik.frontend.auth.basic.users=${HTTP_USERNAME}:${HTTP_PASSWORD}"
    volumes:
      - /var/run/docker.sock:/var/run/docker.sock:ro
      - ${USERDIR}/docker/traefik:/etc/traefik
      - ${USERDIR}/docker/shared:/shared
Replace/Configure:
XXXX- port number on which you want the Traefik monitoring Webui to be available at. It could be the same port as the container: 8080 (must be free). This setting is optional, say only if you want to be able to access the web interface using hostname:XXXX from within internal network. Port forwarding for access from internet is a security risk and redundant. If you still want to use this, uncomment by removing the#at the beginning of the line.traefik.frontend.rule- There are two frontend rules. The first one (uncommented one) is for subdomain access. The second one (commented with a#in front) is for subdirectory access on private domain or dynamic dns. You only need one of them depending on your situation.
After saving the docker-compose.yml file, run the following command to start the container and check if the app is accessible:
docker-compose -f ${USERDIR}/docker/docker-compose.yml up -d
Traefik should immediately try to fetch new SSL certificates from Let's Encrypt. You can follow progress by entering this command immediately after issuing the one above:
docker-compose logs -tf --tail="50" traefik
Press Ctrl + C to exit. If you configured your Traefik configuration files properly then you should see an output like the one below. It shows that an SSL certificate was successfully fetched and implemented for mydomain.crabdance.com, which is a dynamic DNS from Afraid.org.

- Are ports 80 and 443 forwarded to the IP address of your Traefik docker host?
- Did you copy the correct Cloudflare "Global" API key?
- Did you give sufficient time for the DNS entries (CNAME) to propagate?
- Did Let's Encrypt temporarily ban you for too many tries in a short amount of time?
Traefik WebUI should be available at https://traefik.example.com or https://example.com/traefik/ (forward slash at the end is needed) depending on what option you chose. The web interface will be protected using the HTTP authentication details you provided in the Traefik configuration file (traefik.toml).
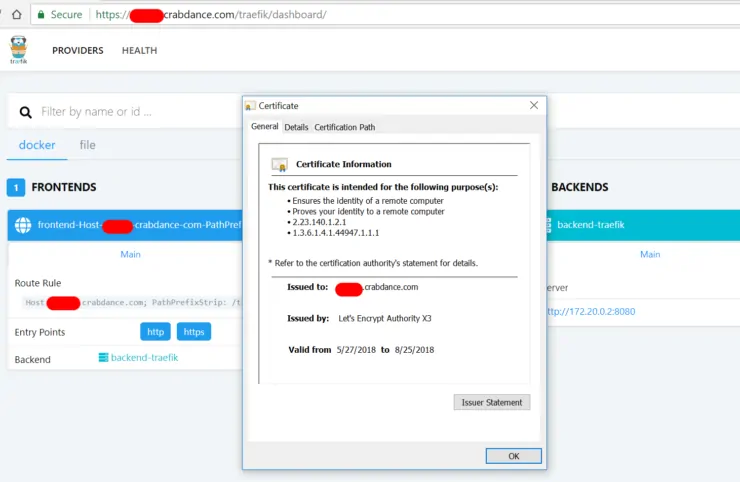
All proxied traefik will be routed through this container.
Traefik Docker Compose Examples
As said before, Traefik is one of the easiest ways to implement a reverse proxy. For docker containers, it is even more easier by specifying the Traefik docker labels in the compose file. So, let us modify the docker compose code blocks for apps to use Traefik proxy. Descriptions of the apps below were provided in my previous docker media server guide. So I am not including them here. I am also not including the docker compose snippets for WatchTower and MariaDB containers. These two containers are not going to be behind a proxy. So you can copy-paste them 'as is' from the basic guide.
In addition, I am also leaving out some apps: nzbget, couchpotato, and sickrage. If you need Traefik docker compose snippets for those please let me know in the comments.
Few Key Points:
- Most apps have a
XXXXin the docker compose snippets below. This is the port number on which you want the WebUI to be available at. It could be the same port as the port inside the container as long as it is free on the host machine. This setting is optional, say only if you want to be able to access the web interface using hostname:XXXX from within the internal network. Port forwarding for access from the internet is a security risk and redundant. If you still want to use this, uncomment by removing the#at the beginning of the 2 ports lines. traefik.frontend.rule– The snippets below may have two frontend rules. The first one (uncommented one) is for subdomain access. The second one (commented with a # in front) is for subdirectory access on the private domain or dynamic dns. You only need one of them depending on your situation.
Frontend Apps
Portainer – Web UI for Containers
Portainer is a web interface for managing docker containers. To proxy Portainer behind Traefik, here is the code to add (copy-paste) in the docker-compose file (pay attention to blank spaces at the beginning of each line):
  portainer:
    image: portainer/portainer
    container_name: portainer
    restart: always
    command: -H unix:///var/run/docker.sock
#    ports:
#      - "XXXX:9000"
    volumes:
      - /var/run/docker.sock:/var/run/docker.sock
      - ${USERDIR}/docker/portainer/data:/data
      - ${USERDIR}/docker/shared:/shared
    environment:
      - TZ=${TZ}
    networks:
      - t1_proxy
    labels:
      - "traefik.enable=true"
      - "traefik.backend=portainer"
      - "traefik.frontend.rule=Host:portainer.${DOMAINNAME}"
#      - "traefik.frontend.rule=Host:${DOMAINNAME}; PathPrefixStrip: /portainer"
      - "traefik.port=9000"
      - "traefik.docker.network=t1_proxy"
      - "traefik.frontend.headers.SSLRedirect=true"
      - "traefik.frontend.headers.STSSeconds=315360000"
      - "traefik.frontend.headers.browserXSSFilter=true"
      - "traefik.frontend.headers.contentTypeNosniff=true"
      - "traefik.frontend.headers.forceSTSHeader=true"
      - "traefik.frontend.headers.SSLHost=example.com"
      - "traefik.frontend.headers.STSIncludeSubdomains=true"
      - "traefik.frontend.headers.STSPreload=true"
#      - "traefik.frontend.headers.frameDeny: true" #customFrameOptionsValue overrides this
      - "traefik.frontend.headers.customFrameOptionsValue: allow-from https:${DOMAINNAME}"
Replace/Configure:
XXXX- It could be the same port as the container: 9000 (must be free). This setting is optional. Review other key points listed above.
Save and run the docker-compose.yml and check the logs for any errors:
docker-compose -f ${USERDIR}/docker/docker-compose.yml up -d ; docker-compose logs -tf --tail="50" portainer
If you see no error messages, press Ctrl C to exit. Portainer WebUI should be available at https://portainer.example.com or https://example.com/portainer/ (forward slash at the end is needed) depending on what option you chose.
Organizr – Unified HTPC/Home Server Web Interface
Organizr is a web interface to bring all your HTPC / Home Server apps together. To proxy Organizr behind Traefik, here is the code to add (copy-paste) in the docker-compose file (pay attention to blank spaces at the beginning of each line):
  organizr:
    container_name: organizr
    restart: always
    image: lsiocommunity/organizr
    volumes:
      - ${USERDIR}/docker/organizr:/config
      - ${USERDIR}/docker/shared:/shared
#    ports:
#      - "XXXX:80"
    environment:
      - PUID=${PUID}
      - PGID=${PGID}
      - TZ=${TZ}
    networks:
      - t1_proxy
    labels:
      - "traefik.enable=true"
      - "traefik.backend=organizr"
      - "traefik.frontend.rule=Host:organizr.${DOMAINNAME}"
#      - "traefik.frontend.rule=Host:${DOMAINNAME}; PathPrefixStrip: /organizr"
      - "traefik.port=80"
      - "traefik.docker.network=t1_proxy"
      - "traefik.frontend.headers.SSLRedirect=true"
      - "traefik.frontend.headers.STSSeconds=315360000"
      - "traefik.frontend.headers.browserXSSFilter=true"
      - "traefik.frontend.headers.contentTypeNosniff=true"
      - "traefik.frontend.headers.forceSTSHeader=true"
      - "traefik.frontend.headers.SSLHost=example.com"
      - "traefik.frontend.headers.STSIncludeSubdomains=true"
      - "traefik.frontend.headers.STSPreload=true"
#      - "traefik.frontend.headers.frameDeny: true" #customFrameOptionsValue overrides this
      - "traefik.frontend.headers.customFrameOptionsValue: allow-from https:${DOMAINNAME}"
Replace/Configure:
XXXX- You cannot use port 80 since Traefik is using that. This setting is optional. Review other key points listed above.
Save and run the docker-compose.yml and check the logs for any errors:
docker-compose -f ${USERDIR}/docker/docker-compose.yml up -d ; docker-compose logs -tf --tail="50" organizr
If you see no error messages, press Ctrl C to exit. Organizr WebUI should be available at https://organizr.example.com or https://example.com/organizr/ (forward slash at the end is needed) depending on what option you chose.
phpMyAdmin – WebUI for Managing MariaDB
phpMyAdmin is a web interface for managing MySQL / MariaDB databases. To proxy phpMyAdmin behind Traefik, here is the code to add (copy-paste) in the docker-compose file (pay attention to blank spaces at the beginning of each line):
  phpmyadmin:
    hostname: phpmyadmin
    container_name: phpmyadmin
    image: phpmyadmin/phpmyadmin
    restart: always
    links:
      - mariadb:db
#    ports:
#      - XXXX:80
    environment:
      - PMA_HOST=mariadb
      - MYSQL_ROOT_PASSWORD=${MYSQL_ROOT_PASSWORD}
    networks:
      - t1_proxy
      - default
    labels:
      - "traefik.enable=true"
      - "traefik.backend=pma"
      - "traefik.frontend.rule=Host:pma.${DOMAINNAME}"
      - "traefik.port=80"
      - "traefik.docker.network=t1_proxy"
      - "traefik.frontend.headers.SSLRedirect=true"
      - "traefik.frontend.headers.STSSeconds=315360000"
      - "traefik.frontend.headers.browserXSSFilter=true"
      - "traefik.frontend.headers.contentTypeNosniff=true"
      - "traefik.frontend.headers.forceSTSHeader=true"
      - "traefik.frontend.headers.SSLHost=example.com"
      - "traefik.frontend.headers.STSIncludeSubdomains=true"
      - "traefik.frontend.headers.STSPreload=true"
#      - "traefik.frontend.headers.frameDeny: true" #customFrameOptionsValue overrides this
      - "traefik.frontend.headers.customFrameOptionsValue: allow-from https:${DOMAINNAME}"
Replace/Configure:
MYSQL_ROOT_PASSWORD- Filled in automatically from the environment file we created previously.XXXX- You cannot use port 80 since Traefik is using that. This setting is optional. Review other key points listed above.
Save and run the docker-compose.yml and check the logs for any errors:
docker-compose -f ${USERDIR}/docker/docker-compose.yml up -d ; docker-compose logs -tf --tail="50" phpmyadmin
If you see no error messages, press Ctrl C to exit. phpMyAdmin WebUI should be available at https://pma.example.com or https://example.com/pma/ (forward slash at the end is needed) depending on what option you chose.
Smart Home Apps
Home Assistant – Smart Home Hub
Home Assistant (HASS) is an awesome open source python-based home automation software with integration for over 1000 platforms. HASS is one of the apps that I could not get to work as a subdirectory. So you will need to use a subdomain. In the case of dynamic DNS, you will need to create a separate subdomain. [Read: What is a smart home and what can smart home automation do for you?]
To proxy Home Assistant behind Traefik, here is the code to add (copy-paste) in the docker-compose file (pay attention to blank spaces at the beginning of each line):
  homeassistant:
    container_name: homeassistant
    restart: always
    image: homeassistant/home-assistant
    devices:
      - /dev/ttyUSB0:/dev/ttyUSB0
      - /dev/ttyUSB1:/dev/ttyUSB1
      - /dev/ttyACM0:/dev/ttyACM0
    volumes:
      - ${USERDIR}/docker/homeassistant:/config
      - /etc/localtime:/etc/localtime:ro
      - ${USERDIR}/docker/shared:/shared
#    ports:
#      - "XXXX:8123"
    privileged: true
    environment:
      - PUID=${PUID}
      - PGID=${PGID}
      - TZ=${TZ}
    networks:
      - t1_proxy
      - default
    labels:
      - "traefik.enable=true"
      - "traefik.backend=homeassistant"
      - "traefik.frontend.rule=Host:hass.${DOMAINNAME}"
      - "traefik.port=8123"
      - "traefik.docker.network=t1_proxy"
      - "traefik.frontend.headers.SSLRedirect=true"
      - "traefik.frontend.headers.STSSeconds=315360000"
      - "traefik.frontend.headers.browserXSSFilter=true"
      - "traefik.frontend.headers.contentTypeNosniff=true"
      - "traefik.frontend.headers.forceSTSHeader=true"
      - "traefik.frontend.headers.SSLHost=example.com"
      - "traefik.frontend.headers.STSIncludeSubdomains=true"
      - "traefik.frontend.headers.STSPreload=true"
#      - "traefik.frontend.headers.frameDeny: true" #customFrameOptionsValue overrides this
      - "traefik.frontend.headers.customFrameOptionsValue: allow-from https:${DOMAINNAME}"
Replace/Configure:
XXXX- It could be the same port as the container: 8123 (must be free). This setting is optional. Review other key points listed above.- Devices List - This list will make USB devices available to home assistant inside the docker container. If you have a USB Z-wave stick then you will need to find out its device address. Typically, it should be
/dev/ttyACM0but you can find out the correct address using one of the following commands:ls -ltr /dev/tty*|tail -n 1 ls /dev
Save and run the docker-compose.yml and check the logs for any errors:
docker-compose -f ${USERDIR}/docker/docker-compose.yml up -d ; docker-compose logs -tf --tail="50" homeassistant
If you see no error messages, press Ctrl C to exit. HASS WebUI should be available at https://hass.example.com. The first time you start Home Assistant, it can take several minutes to an hour to boot up as it compiles and creates several files during the process. Alternatively, you may follow the real-time logs for homeassistant container to see when the first startup completes. Subsequent startups should be faster.
Downloaders
I left out NZBget under downloaders. If you need the Traefik Docker Compose example for that, please let me know in the comments section.
Surfshark VPN Exclusive Offer - 82% off ($2.39/month):
♦ Hide your browsing (no logs), Anonymize Streaming and Downloads
♦ Wireguard Protocol support for VPN.
♦ Circumvent Geo/Country Restrictions and access worldwide content
♦ Works on Windows, Mac, Linux, Android, iOS, Router, and more
♦ 1 TB Encrypted Storage
♦ Money back guarantee - Sign Up Now
Transmission with VPN – Bittorrent Downloader
This container is a Transmission bittorrent client with VPN autokill switch. So download only happens when VPN is active. The example below shows an example for IPVanish VPN, which works great. To proxy Transmission behind Traefik, here is the code to add (copy-paste) in the docker-compose file (pay attention to blank spaces at the beginning of each line):
  transmission-vpn:
    container_name: transmission-vpn
    image: haugene/transmission-openvpn
    cap_add:
      - NET_ADMIN
    devices:
      - /dev/net/tun
    restart: always
#    ports:
#    - "XXXX:9091"
    dns:
      - 1.1.1.1
      - 1.0.0.1
    volumes:
      - /etc/localtime:/etc/localtime:ro
      - ${USERDIR}/docker/transmission-vpn:/data
      - ${USERDIR}/docker/shared:/shared
      - ${USERDIR}/Downloads:/data/watch
      - ${USERDIR}/Downloads/completed:/data/completed
      - ${USERDIR}/Downloads/incomplete:/data/incomplete
    environment:
      - OPENVPN_PROVIDER=IPVANISH
      - OPENVPN_USERNAME=ipvanish_username
      - OPENVPN_PASSWORD=ipvanish_password
      - OPENVPN_CONFIG="YYYYYYYYYYY"
      - OPENVPN_OPTS=--inactive 3600 --ping 10 --ping-exit 60
      - LOCAL_NETWORK=192.168.1.0/24
      - PUID=${PUID}
      - PGID=${PGID}
      - TZ=${TZ}
      - TRANSMISSION_RPC_AUTHENTICATION_REQUIRED=true
      - TRANSMISSION_RPC_HOST_WHITELIST="127.0.0.1,192.168.*.*"
      - TRANSMISSION_RPC_PASSWORD=webui_password
      - TRANSMISSION_RPC_USERNAME=webui_username
      - TRANSMISSION_UMASK=002
      - TRANSMISSION_RATIO_LIMIT=1.00
      - TRANSMISSION_RATIO_LIMIT_ENABLED=true
    networks:
      - t1_proxy
    labels:
      - "traefik.enable=true"
      - "traefik.backend=transmission-vpn"
#      - "traefik.frontend.rule=Host:${DOMAINNAME}; PathPrefix: /transmission"
      - "traefik.frontend.rule=Host:transmission.${DOMAINNAME}"
      - "traefik.port=9091"
      - "traefik.docker.network=t1_proxy"
      - "traefik.frontend.headers.SSLRedirect=true"
      - "traefik.frontend.headers.STSSeconds=315360000"
      - "traefik.frontend.headers.browserXSSFilter=true"
      - "traefik.frontend.headers.contentTypeNosniff=true"
      - "traefik.frontend.headers.forceSTSHeader=true"
      - "traefik.frontend.headers.SSLHost=example.com"
      - "traefik.frontend.headers.STSIncludeSubdomains=true"
      - "traefik.frontend.headers.STSPreload=true"
#      - "traefik.frontend.headers.frameDeny: true" #customFrameOptionsValue overrides this
      - "traefik.frontend.headers.customFrameOptionsValue: allow-from https:${DOMAINNAME}"
Any settings changes you will make through the web interface will not stick. Therefore, you will have to pass transmission settings as environmental variables. Whole list of variables is available here. I have added a few important ones already in the docker compose code above.
Replace/Configure:
XXXX- It could be the same port as the container: 9091 (must be free). This setting is optional. Review other key points listed above.OPENVPN_PROVIDER- Desired VPN Provider. I have shown IPVanish. Check here for other provider names.OPENVPN_USERNAME- VPN provider username.OPENVPN_PASSWORD- VPN provider password.OPENVPN_CONFIG- Optional (you may remove this line). If you like a specific VPN server you may add it here. For example,ipvanish-CA-Montreal-yul-c04in place ofYYYYYYYYYYY.LOCAL_NETWORK- This is important. Since Transmission traffic goes through VPN, you won't be able to access the web UI unless local network is specified correctly. Typically, it is 192.168.1.0/24 or 192.168.0.0/24. With your network listed here you should be able to access WebUI from your home network.TRANSMISSION_RPC_HOST_WHITELIST- Specify the hosts from which you can connect to Transmission WebUI. This typically includes server on which Transmission is running (127.0.0.1) and your local network IPs (192.168.*.*).TRANSMISSION_RPC_PASSWORD- Desired Transmission WebUI password.TRANSMISSION_RPC_USERNAME- Desired Transmission WebUI username.TRANSMISSION_UMASK- Recommended is 022. But for home use I prefer 002 to avoid permission issues.
Save and run the docker-compose.yml and check the logs for any errors:
docker-compose -f ${USERDIR}/docker/docker-compose.yml up -d ; docker-compose logs -tf --tail="50" transmission-vpn
If you see no error messages, press Ctrl C to exit. Transmission WebUI should be available at https://transmission.example.com or https://example.com/transmission/web/ (forward slash at the end is needed) depending on what option you chose. You can check the real-time logs using docker-compose logs transmission-vpn for errors.
One additional advantage of putting Transmission VPN behind Traefik proxy is that Traefik makes the WebUI accessible outside your home network.
Surfshark VPN Exclusive Offer - 82% off ($2.39/month):
♦ Hide your browsing (no logs), Anonymize Streaming and Downloads
♦ Wireguard Protocol support for VPN.
♦ Circumvent Geo/Country Restrictions and access worldwide content
♦ Works on Windows, Mac, Linux, Android, iOS, Router, and more
♦ 1 TB Encrypted Storage
♦ Money back guarantee - Sign Up Now
qBittorrent without VPN – Bittorrent Downloader (Alternative)
This container is a qBittorrent client. Note that this does not have a VPN built in. You can skip it if you went with Transmission VPN option above. To proxy qBittorrent behind Traefik, here is the code to add (copy-paste) in the docker-compose file (pay attention to blank spaces at the beginning of each line):
  qbittorrent:
    image: "linuxserver/qbittorrent"
    container_name: "qbittorrent"
    volumes:
      - ${USERDIR}/docker/qbittorrent:/config
      - ${USERDIR}/Downloads/completed:/downloads
      - ${USERDIR}/docker/shared:/shared
    ports:
#      - "XXXX:8080"
      - "6881:6881"
      - "6881:6881/udp"
    restart: always
    environment:
      - PUID=${PUID}
      - PGID=${PGID}
      - TZ=${TZ}
      - UMASK_SET=002
    networks:
      - t1_proxy
    labels:
      - "traefik.enable=true"
      - "traefik.backend=qbittorrent"
#      - "traefik.frontend.rule=Host:${DOMAINNAME}; PathPrefixStrip: /qbittorrent"
      - "traefik.frontend.rule=Host:qbit.${DOMAINNAME}"
      - "traefik.port=XXXX"
      - "traefik.docker.network=t1_proxy"
      - "traefik.frontend.headers.SSLRedirect=true"
      - "traefik.frontend.headers.STSSeconds=315360000"
      - "traefik.frontend.headers.browserXSSFilter=true"
      - "traefik.frontend.headers.contentTypeNosniff=true"
      - "traefik.frontend.headers.forceSTSHeader=true"
      - "traefik.frontend.headers.SSLHost=example.com"
      - "traefik.frontend.headers.STSIncludeSubdomains=true"
      - "traefik.frontend.headers.STSPreload=true"
#      - "traefik.frontend.headers.frameDeny: true" #customFrameOptionsValue overrides this
      - "traefik.frontend.headers.customFrameOptionsValue: allow-from https:${DOMAINNAME}"
Replace/Configure:
${USERDIR}/Downloads/completed- Path where to save downloaded files.${USERDIR}is filled automatically from the environment file we created previously.XXXX- It could be the same port as the container: 8080 (must be free). This setting is optional. Review other key points listed above.UMASK_SET- 022 is recommended. But I prefer 002 to avoid permission issues.
Save and run the docker-compose.yml and check the logs for any errors:
docker-compose -f ${USERDIR}/docker/docker-compose.yml up -d ; docker-compose logs -tf --tail="50" qbittorrent
If you see no error messages, press Ctrl C to exit. qBittorrent WebUI should be available at https://qbittorrent.example.com or https://example.com/qbittorrent/ (forward slash at the end is needed) depending on what option you chose.
SABnzbd – Usenet (NZB) Downloader
SABnzbd is a Usenet downloader. To proxy SABnzbd behind Traefik, here is the code to add (copy-paste) in the docker-compose file (pay attention to blank spaces at the beginning of each line):
  sabnzbd:
    image: "linuxserver/sabnzbd"
    container_name: "sabnzbd"
    volumes:
      - ${USERDIR}/docker/sabnzbd:/config
      - ${USERDIR}/Downloads/completed:/downloads
      - ${USERDIR}/Downloads/incomplete:/incomplete-downloads
      - ${USERDIR}/docker/shared:/shared
#    ports:
#        - "XXXX:8080"
    restart: always
    environment:
      - PUID=${PUID}
      - PGID=${PGID}
      - TZ=${TZ}
    networks:
      - t1_proxy
    labels:
      - "traefik.enable=true"
      - "traefik.backend=sabnzbd"
      - "traefik.frontend.rule=Host:sabnzbd.${DOMAINNAME}"
#      - "traefik.frontend.rule=Host:${DOMAINNAME}; PathPrefix: /sabnzbd"
      - "traefik.port=8080"
      - "traefik.docker.network=t1_proxy"
      - "traefik.frontend.headers.SSLRedirect=true"
      - "traefik.frontend.headers.STSSeconds=315360000"
      - "traefik.frontend.headers.browserXSSFilter=true"
      - "traefik.frontend.headers.contentTypeNosniff=true"
      - "traefik.frontend.headers.forceSTSHeader=true"
      - "traefik.frontend.headers.SSLHost=example.com"
      - "traefik.frontend.headers.STSIncludeSubdomains=true"
      - "traefik.frontend.headers.STSPreload=true"
#      - "traefik.frontend.headers.frameDeny: true" #customFrameOptionsValue overrides this
      - "traefik.frontend.headers.customFrameOptionsValue: allow-from https:${DOMAINNAME}"
Replace/Configure:
${USERDIR}/Downloads/completed- Path where to save downloaded files.${USERDIR}is filled automatically from the environment file we created previously.${USERDIR}/Downloads/incomplete- Path where to save currently downloading files.${USERDIR}is filled automatically from the environment file we created previously.XXXX- It could be the same port as the container: 8080 (must be free). This setting is optional. Review other key points listed above.- Additional Configuration - If you had SABnzbd's internal HTTPS enabled in your previous setup and are reusing the config file, then disable SABnzbd's internal HTTPS option from SABnzbd settings page . To do this you may have to edit SABnzbd's configuration
${USERDIR}/docker/sabnzbd/sabnzbd.iniand setenable_httpsto 0 instead of 1.
Save and run the docker-compose.yml and check the logs for any errors:
docker-compose -f ${USERDIR}/docker/docker-compose.yml up -d ; docker-compose logs -tf --tail="50" sabnzbd
If you see no error messages, press Ctrl C to exit. SABnzbd WebUI should be available at https://sabnzbd.example.com or https://example.com/sabnzbd/ (forward slash at the end is needed) depending on what option you chose.
Usenet is Better Than Torrents:
For apps like Sonarr, Radarr, SickRage, and CouchPotato, Usenet is better than Torrents. Unlimited plans from Newshosting (US Servers), Eweka (EU Servers), or UsenetServer, which offer >3000 days retention, SSL for privacy, and VPN for anonymity, are better for HD content.
Personal Video Recorders
I left out CouchPotato and Sickrage for PVRs. I switched to Radarr and Sonarr and I like them better. If you need the Traefik Docker Compose example for CouchPotato and SickRage, please let me know in the comments section.
Radarr – Movie Download and Management
Radarr is an automated movie downloader. To proxy Radarr behind Traefik, here is the code to add (copy-paste) in the docker-compose file (pay attention to blank spaces at the beginning of each line):
  radarr:
    image: "linuxserver/radarr"
    container_name: "radarr"
    volumes:
      - ${USERDIR}/docker/radarr:/config
      - ${USERDIR}/Downloads/completed:/downloads
      - ${USERDIR}/media/movies:/movies
      - "/etc/localtime:/etc/localtime:ro"
      - ${USERDIR}/docker/shared:/shared
#    ports:
#      - "XXXX:7878"
    restart: always
    environment:
      - PUID=${PUID}
      - PGID=${PGID}
      - TZ=${TZ}
    networks:
      - t1_proxy
    labels:
      - "traefik.enable=true"
      - "traefik.backend=radarr"
#      - "traefik.frontend.rule=Host:${DOMAINNAME}; PathPrefix: /radarr"
      - "traefik.frontend.rule=Host:radarr.${DOMAINNAME}"
      - "traefik.port=7878"
      - "traefik.docker.network=t1_proxy"
      - "traefik.frontend.headers.SSLRedirect=true"
      - "traefik.frontend.headers.STSSeconds=315360000"
      - "traefik.frontend.headers.browserXSSFilter=true"
      - "traefik.frontend.headers.contentTypeNosniff=true"
      - "traefik.frontend.headers.forceSTSHeader=true"
      - "traefik.frontend.headers.SSLHost=example.com"
      - "traefik.frontend.headers.STSIncludeSubdomains=true"
      - "traefik.frontend.headers.STSPreload=true"
#      - "traefik.frontend.headers.frameDeny: true" #customFrameOptionsValue overrides this
      - "traefik.frontend.headers.customFrameOptionsValue: allow-from https:${DOMAINNAME}"
Replace/Configure:
${USERDIR}/Downloads/completed- Path where to save downloaded files.${USERDIR}is filled automatically from the environment file we created previously.${USERDIR}/media/movies- Path where to your movie library.${USERDIR}is filled automatically from the environment file we created previously.XXXX- It could be the same port as the container: 7878 (must be free). This setting is optional. Review other key points listed above.- Additional Configuration - If you are using the subdirectory option then set
url_baseto radarr in Radarr's settings General tab after starting the container.
Save and run the docker-compose.yml and check the logs for any errors:
docker-compose -f ${USERDIR}/docker/docker-compose.yml up -d ; docker-compose logs -tf --tail="50" radarr
If you see no error messages, press Ctrl C to exit. Radarr WebUI should be available at https://radarr.example.com or https://example.com/radarr/ (forward slash at the end is needed) depending on what option you chose.
Sonarr – TV Show Download and Management
Sonarr is an automated TV Show episode downloader. To proxy Sonarr behind Traefik, here is the code to add (copy-paste) in the docker-compose file (pay attention to blank spaces at the beginning of each line):
Usenet is Better Than Torrents:
For apps like Sonarr, Radarr, SickRage, and CouchPotato, Usenet is better than Torrents. Unlimited plans from Newshosting (US Servers), Eweka (EU Servers), or UsenetServer, which offer >3000 days retention, SSL for privacy, and VPN for anonymity, are better for HD content.
  sonarr:
    image: "linuxserver/sonarr"
    container_name: "sonarr"
    volumes:
      - ${USERDIR}/docker/sonarr:/config
      - ${USERDIR}/Downloads/completed:/downloads
      - ${USERDIR}/media/tvshows:/tv
      - "/etc/localtime:/etc/localtime:ro"
      - ${USERDIR}/docker/shared:/shared
#    ports:
#        - "XXXX:8989"
    restart: always
    environment:
      - PUID=${PUID}
      - PGID=${PGID}
      - TZ=${TZ}
    networks:
      - t1_proxy
    labels:
      - "traefik.enable=true"
      - "traefik.backend=sonarr"
#      - "traefik.frontend.rule=Host:${DOMAINNAME}; PathPrefix: /sonarr"
      - "traefik.frontend.rule=Host:sonarr.${DOMAINNAME}"
      - "traefik.port=8989"
      - "traefik.docker.network=t1_proxy"
      - "traefik.frontend.headers.SSLRedirect=true"
      - "traefik.frontend.headers.STSSeconds=315360000"
      - "traefik.frontend.headers.browserXSSFilter=true"
      - "traefik.frontend.headers.contentTypeNosniff=true"
      - "traefik.frontend.headers.forceSTSHeader=true"
      - "traefik.frontend.headers.SSLHost=example.com"
      - "traefik.frontend.headers.STSIncludeSubdomains=true"
      - "traefik.frontend.headers.STSPreload=true"
#      - "traefik.frontend.headers.frameDeny: true" #customFrameOptionsValue overrides this
      - "traefik.frontend.headers.customFrameOptionsValue: allow-from https:${DOMAINNAME}"
Replace/Configure:
${USERDIR}/Downloads/completed- Path where to save downloaded files.${USERDIR}is filled automatically from the environment file we created previously.${USERDIR}/media/tvshows- Path where to your movie library.${USERDIR}is filled automatically from the environment file we created previously.XXXX- It could be the same port as the container: 8989 (must be free). This setting is optional. Review other key points listed above.- Additional Configuration - If you are using the subdirectory option then set
url_baseto sonarr in Sonarr's settings General tab after starting the container.
Save and run the docker-compose.yml and check the logs for any errors:
docker-compose -f ${USERDIR}/docker/docker-compose.yml up -d ; docker-compose logs -tf --tail="50" sonarr
If you see no error messages, press Ctrl C to exit. Sonarr WebUI should be available at https://sonarr.example.com or https://example.com/sonarr/ (forward slash at the end is needed) depending on what option you chose.
Usenet is Better Than Torrents:
For apps like Sonarr, Radarr, SickRage, and CouchPotato, Usenet is better than Torrents. Unlimited plans from Newshosting (US Servers), Eweka (EU Servers), or UsenetServer, which offer >3000 days retention, SSL for privacy, and VPN for anonymity, are better for HD content.
Media Server Apps
Plex Media Server
Plex Media Server is the most commonly used option for streaming your media to various devices inside and outside your home. This page has an example Traefik Docker compose example that, according to the author of the post, works for Plex as a subdirectory. However, I could not get it to work as a subdirectory. So I am providing the subdomain example. In the case of dynamic DNS, you will need to create separate subdomain (eg. myplexserver.crabdance.com). To proxy Plex behind Traefik, here is the code to add (copy-paste) in the docker-compose file (pay attention to blank spaces at the beginning of each line):
  plexms:
    container_name: plexms
    restart: always
    image: plexinc/pms-docker
    volumes:
      - ${USERDIR}/docker/plexms:/config
      - ${USERDIR}/Downloads/plex_tmp:/transcode
      - /media/media:/media
      - ${USERDIR}/docker/shared:/shared
    ports:
      - "32400:32400/tcp"
      - "3005:3005/tcp"
      - "8324:8324/tcp"
      - "32469:32469/tcp"
      - "1900:1900/udp"
      - "32410:32410/udp"
      - "32412:32412/udp"
      - "32413:32413/udp"
      - "32414:32414/udp"
    environment:
      - TZ=${TZ}
      - HOSTNAME="Docker Plex"
      - PLEX_CLAIM="claim-YYYYYYYYY"
      - PLEX_UID=${PUID}
      - PLEX_GID=${PGID}
      - ADVERTISE_IP="http://SERVER-IP:32400/"
    networks:
      - t1_proxy
    labels:
      - "traefik.enable=true"
      - "traefik.backend=plexms"
      - "traefik.frontend.rule=Host:plex.${DOMAINNAME}"
      - "traefik.port=32400"
      - "traefik.protocol=http"
      - "traefik.docker.network=t1_proxy"
      - "traefik.frontend.headers.SSLRedirect=true"
      - "traefik.frontend.headers.STSSeconds=315360000"
      - "traefik.frontend.headers.browserXSSFilter=true"
      - "traefik.frontend.headers.contentTypeNosniff=true"
      - "traefik.frontend.headers.forceSTSHeader=true"
      - "traefik.frontend.headers.SSLHost=example.com"
      - "traefik.frontend.headers.STSIncludeSubdomains=true"
      - "traefik.frontend.headers.STSPreload=true"
#      - "traefik.frontend.headers.frameDeny: true" #customFrameOptionsValue overrides this
      - "traefik.frontend.headers.customFrameOptionsValue: allow-from https:${DOMAINNAME}"
Replace/Configure:
${USERDIR}/Downloads/plex_tmp- Path temporary dolder for transcoding.${USERDIR}is filled automatically from the environment file we created previously./media/media- Path where to your media library.HOSTNAME- Name your plex server.PLEX_CLAIM- Your Plex access claim code from here. The word "claim" in front of the code must be in lower case.ADVERTISE_IP- IP Address of your server (eg. 192.168.1.100) - you can get this from your router admin page or runifconfigin terminal.32400- port number on which you Plex media server will be available. I suggest leaving this as is. Port forwarding for access from internet is a security risk and redundant since you can access Plex using the URL below.
Save and run the docker-compose.yml and check the logs for any errors:
docker-compose -f ${USERDIR}/docker/docker-compose.yml up -d ; docker-compose logs -tf --tail="50" plexms
If you see no error messages, press Ctrl C to exit. Plex WebUI should be available at https://plex.example.com. First time you access Plex media server, ensure that you are connected to your home network. If you have streaming issues then take a look at our solutions for Plex buffering issues.
Best Plex Client Devices:
- NVIDIA SHIELD TV Pro Home Media Server - $199.99
- Amazon Fire TV Streaming Media Player - $89.99
- Roku Premiere+ 4K UHD - $83.99
- CanaKit Raspberry Pi 3 Complete Starter Kit - $69.99
- Xbox One 500 GB Console - $264.99
Tautulli (aka PlexPy) – Monitoring Plex Usage
Tautulli (previously known as PlexPy) is a Plex usage monitoring app. To proxy Tautulli behind Traefik, here is the code to add (copy-paste) in the docker-compose file (pay attention to blank spaces at the beginning of each line):
  tautulli:
    container_name: tautulli
    restart: always
    image: linuxserver/tautulli
    volumes:
      - ${USERDIR}/docker/tautulli/config:/config
      - ${USERDIR}/docker/tautulli/logs:/logs:ro
      - ${USERDIR}/docker/shared:/shared
#    ports:
#      - "XXXX:8181"
    environment:
      - PUID=${PUID}
      - PGID=${PGID}
      - TZ=${TZ}
    networks:
      - t1_proxy
    labels:
      - "traefik.enable=true"
      - "traefik.backend=tautulli"
      - "traefik.frontend.rule=Host:tautulli.${DOMAINNAME}"
#      - "traefik.frontend.rule=Host:${DOMAINNAME}; PathPrefix: /tautulli"
      - "traefik.port=8181"
      - "traefik.docker.network=t1_proxy"
      - "traefik.frontend.headers.SSLRedirect=true"
      - "traefik.frontend.headers.STSSeconds=315360000"
      - "traefik.frontend.headers.browserXSSFilter=true"
      - "traefik.frontend.headers.contentTypeNosniff=true"
      - "traefik.frontend.headers.forceSTSHeader=true"
      - "traefik.frontend.headers.SSLHost=example.com"
      - "traefik.frontend.headers.STSIncludeSubdomains=true"
      - "traefik.frontend.headers.STSPreload=true"
#      - "traefik.frontend.headers.frameDeny: true" #customFrameOptionsValue overrides this
      - "traefik.frontend.headers.customFrameOptionsValue: allow-from https:${DOMAINNAME}"
Replace/Configure:
XXXX- It could be the same port as the container: 8181 (must be free). This setting is optional. Review other key points listed above.- Additional Configuration - If you are using the subdirectory option then set
HTTP Rootto tautulli in Tautulli's settings Web Interface tab after starting the container.
Save and run the docker-compose.yml and check the logs for any errors:
docker-compose -f ${USERDIR}/docker/docker-compose.yml up -d ; docker-compose logs -tf --tail="50" tautulli
If you see no error messages, press Ctrl C to exit. Tautulli WebUI should be available at https://tautulli.example.com or https://example.com/tautulli/ (forward slash at the end is needed) depending on what option you chose.
Ombi – Accept Requests for your Media Server
Ombi allows Plex users to request media to the owner of the media server or even automatically download them. To reverse proxy Ombi behind Traefik, here is the code to add (copy-paste) in the docker-compose file (pay attention to blank spaces at the beginning of each line):
  ombi:
    container_name: ombi
    restart: always
    image: linuxserver/ombi
    volumes:
      - ${USERDIR}/docker/ombi:/config
      - ${USERDIR}/docker/shared:/shared
#    ports:
#      - "XXXX:3579"
    environment:
      - PUID=${PUID}
      - PGID=${PGID}
      - TZ=${TZ}
    networks:
      - t1_proxy
    labels:
      - "traefik.enable=true"
      - "traefik.backend=ombi"
      - "traefik.frontend.rule=Host:ombi.${DOMAINNAME}"
#      - "traefik.frontend.rule=Host:${DOMAINNAME}; PathPrefix: /ombi"
      - "traefik.port=3579"
      - "traefik.docker.network=t1_proxy"
      - "traefik.frontend.headers.SSLRedirect=true"
      - "traefik.frontend.headers.STSSeconds=315360000"
      - "traefik.frontend.headers.browserXSSFilter=true"
      - "traefik.frontend.headers.contentTypeNosniff=true"
      - "traefik.frontend.headers.forceSTSHeader=true"
      - "traefik.frontend.headers.SSLHost=example.com"
      - "traefik.frontend.headers.STSIncludeSubdomains=true"
      - "traefik.frontend.headers.STSPreload=true"
#      - "traefik.frontend.headers.frameDeny: true" #customFrameOptionsValue overrides this
      - "traefik.frontend.headers.customFrameOptionsValue: allow-from https:${DOMAINNAME}"
Replace/Configure:
XXXX- It could be the same port as the container: 3579 (must be free). This setting is optional. Review other key points listed above.- Additional Configuration - If you are using the subdirectory option then set
Base Urlto ombi in Ombi's settings Ombi tab after starting the container.
Save and run the docker-compose.yml and check the logs for any errors:
docker-compose -f ${USERDIR}/docker/docker-compose.yml up -d ; docker-compose logs -tf --tail="50" ombi
If you see no error messages, press Ctrl C to exit. Ombi WebUI should be available at https://ombi.example.com or https://example.com/ombi/ (forward slash at the end is needed) depending on what option you chose.
Searchers
NZBHydra – NZB Meta Search
NZB Hydra allows you to search NZB files and add them to your NZB client for downloading. To proxy NZB Hydra behind Traefik, here is the code to add (copy-paste) in the docker-compose file (pay attention to blank spaces at the beginning of each line):
  hydra:
    image: "linuxserver/hydra"
    container_name: "hydra"
    volumes:
      - ${USERDIR}/docker/hydra:/config
      - ${USERDIR}/Downloads:/downloads
      - ${USERDIR}/docker/shared:/shared
#    ports:
#      - "XXXX:5075"
    restart: always
    environment:
      - PUID=${PUID}
      - PGID=${PGID}
      - TZ=${TZ}
    networks:
      - t1_proxy
    labels:
      - "traefik.enable=true"
      - "traefik.backend=hydra"
      - "traefik.frontend.rule=Host:hydra.${DOMAINNAME}"
#      - "traefik.frontend.rule=Host:${DOMAINNAME}; PathPrefix: /hydra"
      - "traefik.port=5075"
      - "traefik.docker.network=t1_proxy"
      - "traefik.frontend.headers.SSLRedirect=true"
      - "traefik.frontend.headers.STSSeconds=315360000"
      - "traefik.frontend.headers.browserXSSFilter=true"
      - "traefik.frontend.headers.contentTypeNosniff=true"
      - "traefik.frontend.headers.forceSTSHeader=true"
      - "traefik.frontend.headers.SSLHost=example.com"
      - "traefik.frontend.headers.STSIncludeSubdomains=true"
      - "traefik.frontend.headers.STSPreload=true"
#      - "traefik.frontend.headers.frameDeny: true" #customFrameOptionsValue overrides this
      - "traefik.frontend.headers.customFrameOptionsValue: allow-from https:${DOMAINNAME}"
Replace/Configure:
${USERDIR}/Downloads- Path where to save downloaded files.${USERDIR}is filled automatically from the environment file we created previously.XXXX- It could be the same port as the container: 5075 (must be free). This setting is optional. Review other key points listed above.- Additional Configuration - If you are using the subdirectory option then set
URL Baseto hydra in Hydra's settings Main tab after starting the container.
Save and run the docker-compose.yml and check the logs for any errors:
docker-compose -f ${USERDIR}/docker/docker-compose.yml up -d ; docker-compose logs -tf --tail="50" hydra
If you see no error messages, press Ctrl C to exit. NZB Hydra WebUI should be available at https://hydra.example.com or https://example.com/hydra/ (forward slash at the end is needed) depending on what option you chose.
Jackett – Torrent Proxy
Jackett serves as a proxy for several torrent indexes and extends the sources available for apps such as Sonarr and Radarr. To proxy Jackett behind Traefik, here is the code to add (copy-paste) in the docker-compose file (pay attention to blank spaces at the beginning of each line):
  jackett:
    image: "linuxserver/jackett"
    container_name: "jackett"
    volumes:
      - ${USERDIR}/docker/jackett:/config
      - ${USERDIR}/Downloads/completed:/downloads
      - "/etc/localtime:/etc/localtime:ro"
      - ${USERDIR}/docker/shared:/shared
#    ports:
#      - "XXXX:9117"
    restart: always
    environment:
      - PUID=${PUID}
      - PGID=${PGID}
      - TZ=${TZ}
    networks:
      - t1_proxy
    labels:
      - "traefik.enable=true"
      - "traefik.backend=jackett"
      - "traefik.frontend.rule=Host:jackett.${DOMAINNAME}"
#      - "traefik.frontend.rule=Host:${DOMAINNAME}; PathPrefix: /jackett"
      - "traefik.port=9117"
      - "traefik.docker.network=t1_proxy"
      - "traefik.frontend.headers.SSLRedirect=true"
      - "traefik.frontend.headers.STSSeconds=315360000"
      - "traefik.frontend.headers.browserXSSFilter=true"
      - "traefik.frontend.headers.contentTypeNosniff=true"
      - "traefik.frontend.headers.forceSTSHeader=true"
      - "traefik.frontend.headers.SSLHost=example.com"
      - "traefik.frontend.headers.STSIncludeSubdomains=true"
      - "traefik.frontend.headers.STSPreload=true"
#      - "traefik.frontend.headers.frameDeny: true" #customFrameOptionsValue overrides this
      - "traefik.frontend.headers.customFrameOptionsValue: allow-from https:${DOMAINNAME}"
Replace/Configure:
${USERDIR}/Downloads- Path where to save downloaded files.${USERDIR}is filled automatically from the environment file we created previously.XXXX- It could be the same port as the container: 9117 (must be free). This setting is optional. Review other key points listed above.- Additional Configuration - If you are using the subdirectory option then set
Base Path Overrideto jackett in Jackett's settings after starting the container.
Save and run the docker-compose.yml and check the logs for any errors:
docker-compose -f ${USERDIR}/docker/docker-compose.yml up -d ; docker-compose logs -tf --tail="50" jackett
If you see no error messages, press Ctrl C to exit. Jackett WebUI should be available at https://jackett.example.com or https://example.com/jackett/ (forward slash at the end is needed) depending on what option you chose.
Utilities
I leftout MariaDB here since it does not have to be proxied. You can reuse the compose code from my basic guide.
NextCloud – Your Own Cloud Storage
NextCloud gives you your personal/private cloud storage. NextCloud is one of the apps that I could not get to work as a subdirectory. So you will need to use a subdomain (eg. mynextcloud.crabdance.com). In the case of dynamic DNS, you will need to create separate subdomain. To proxy NextCloud behind Traefik reverse proxy, here is the code to add (copy-paste) in the docker-compose file (pay attention to blank spaces at the beginning of each line):
  nextcloud:
    container_name: nextcloud
    restart: always
    image: linuxserver/nextcloud
    volumes:
      - ${USERDIR}/docker/nextcloud:/config
      - ${USERDIR}/shared_data:/data
      - ${USERDIR}/docker/shared:/shared
#    ports:
#      - "XXXX:443"
    environment:
      - PUID=${PUID}
      - PGID=${PGID}
    networks:
      - t1_proxy
    labels:
      - "traefik.enable=true"
      - "traefik.backend=nextcloud"
      - "traefik.frontend.rule=Host:nextcloud.${DOMAINNAME}"
      - "traefik.port=443"
      - "traefik.protocol=https"
      - "traefik.docker.network=t1_proxy"
      - "traefik.frontend.headers.SSLRedirect=true"
      - "traefik.frontend.headers.STSSeconds=315360000"
      - "traefik.frontend.headers.browserXSSFilter=true"
      - "traefik.frontend.headers.contentTypeNosniff=true"
      - "traefik.frontend.headers.forceSTSHeader=true"
      - "traefik.frontend.headers.SSLHost=example.com"
      - "traefik.frontend.headers.STSIncludeSubdomains=true"
      - "traefik.frontend.headers.STSPreload=true"
#      - "traefik.frontend.headers.frameDeny: true" #customFrameOptionsValue overrides this
      - "traefik.frontend.headers.customFrameOptionsValue: allow-from https:${DOMAINNAME}"
Replace/Configure:
${USERDIR}/shared_data- Path to data you want to share/sync.${USERDIR}is filled automatically from the environment file we created previously.XXXX- It cannot be 443 since Traefik is already using 443. This setting is optional. Review other key points listed above.
Save and run the docker-compose.yml and check the logs for any errors:
docker-compose -f ${USERDIR}/docker/docker-compose.yml up -d ; docker-compose logs -tf --tail="50" nextcloud
If you see no error messages, press Ctrl C to exit. NextCloud WebUI should be available at https://nextcloud.example.com. Note that this setup does not include a backend database such as MySQL or MariaDB. Therefore, data will be stored as SQLite database. A backend database is recommended for better performance. This will be covered in a separate guide. Briefly, you can use phpMyAdmin to create a database, username, and password for NextCloud and provide that during setup.
Proxying Non-Docker Host System Apps
What about those apps that are not on docker but on your host system? I have a few of those (eg. Webmin). Traefik can also reverse proxy them and it is easy to implement. Unfortunately, that is outside the scope of this guide, which is already close to 8000 words. But if you cannot wait for my next guide then you may take a look at this Traefik documentation to figure that out. In essence, you will have to specify the [backends] and [frontends] for each app in the rules.toml file inside ${USERDIR}/docker/traefik folder. Traefik will auto detect and update its configurations.
For example, here is the rules.toml file for proxying my Raspberry Pi Pihole setup behind Traefik Proxy:
# Putting non-docker apps behind traefik proxy.  This example shows pihole.
[backends]
  [backends.backend-pihole]
    [backends.backend-pihole.servers]
      [backends.backend-pihole.servers.server-pihole-ext]
        url = "http://192.168.100.26"
        weight = 0

[frontends]
  [frontends.frontend-pihole]
    backend = "backend-pihole"
    passHostHeader = true
#    basicAuth = [
#      HTTP Authentication
#      "xxx:yyyyyyyyyyyy",
#    ]
    [frontends.frontend-pihole.routes]
          [frontends.frontend-pihole.routes.route-pihole-ext]
        rule = "Host:pi.example.com"
Troubleshooting
If you run into issues while following this Traefik docker guide, the best way is to follow the Traefik logs as described previously in this guide. In addition, you may also set your LogLevel to DEBUG in your traefik.toml and recreate your Traefik container.
If you are not able to reach some of your proxied apps, then review troubleshooting section of my docker guide. In addition, ensure that you are using the forward slash at the end of the URLs (eg. https://example.com/app/). If you have additional issues, Traefik slack channel is an amazing source of help with several awesome people. I could not have completed my setup without help from @Giblet's help.
Complete Traefik Docker Compose Example File
We are almost at the end of this Traefik tutorial. My entire docker compose file for Traefik is available here. In the end your docker-compose.yml should look very similar. You can also copy-paste the entire contents of the file linked above as a starting point for your docker-compose.yml file.
Starting, Stopping, and Autostarting Containers
Starting, Stopping, and Autostarting were all described in my basic docker server guide. Since all containers above are built with restart: always clause, they will automatically start after a system boot. If for some reason you do not want this behavior you can set restart to "no".
Traefik Docker Compose Guide - Final Thoughts
You may have exposed your ports to the internet after following my previous docker media server guide. As mentioned before, one of the main advantages of a reverse proxy is the ability to expose the app to the internet without exposing their ports. If you have successfully implemented reverse proxy for docker then at this point I strongly recommend disabling port forwards on your router (except 80 and 443 that Traefik needs). You would still be able to access your apps using hostname:port from your home network.
Once Traefik is working, I strongly recommend setting up Google OAuth for convenient single-sign-on to services and added security.
Writing this guide was not easy. I had no idea about Traefik and most people on the internet didn't since Traefik is still relatively new. It took nearly 2 months and several hundred trials to get this guide to work for both private domains and free dynamic DNS. So I hope this guide makes your life easier. As in my previous docker guide, everything in this guide can also be done using docker commands. But Docker compose makes it much more easier for newbies.
There are multiple ways to setup what I showed above. I did what I thought was the easiest way for newbies. I am sure there are better ways to do certain things. If you are aware of such things, please do not hesitate to share your thoughts in the comments below. Otherwise, I hope that this Traefik Docker-Compose tutorial guide helped you.

