If you have been reading our latest tutorials, then you know by now that you can easily install a Kodi VPN Windows connection or configure an Android VPN for Kodi for your media center by using the encryption apps provided by paid services such as IPVanish. There are also other more complex methods you can follow when there are no apps available for your OS. For example, you can configure the VPN connection manually. If you want to set up a Kodi VPN Ubuntu connection, this is the method you will have to use. You can use OpenVPN to configure the connection on Ubuntu, or you can use PPTP (Point-to-Point Tunneling Protocol), which is an easier method. We will see in this guide how to perform a Kodi VPN Ubuntu setup with the PPTP method. [Read: Guide: How to install OpenVPN on Windows HTPC]

Using Kodi for Ubuntu with a VPN, you can unlock geoblocked content such as the kind found in Kodi sports addons. Some legal streaming addons for Kodi are also geoblocked. In this regard, VPN connections are great for helping you find legal content. They also keep your web browsing secure, so they are a great investment. Even though you can not select your VPN location with a drop down menu with IPVanish for Ubuntu (as there is no client developed), you can get an experience close to this by configuring your favorite servers for easy access. That sounds good, but you probably are asking yourself “how do I do it?” Well, here’s our guide for that:
Surfshark VPN Exclusive Offer - 82% off ($2.39/month):
♦ Hide your browsing (no logs), Anonymize Streaming and Downloads
♦ Wireguard Protocol support for VPN.
♦ Circumvent Geo/Country Restrictions and access worldwide content
♦ Works on Windows, Mac, Linux, Android, iOS, Router, and more
♦ 1 TB Encrypted Storage
♦ Money back guarantee - Sign Up Now
How to Set Up a Kodi VPN Ubuntu Connection With IPVanish
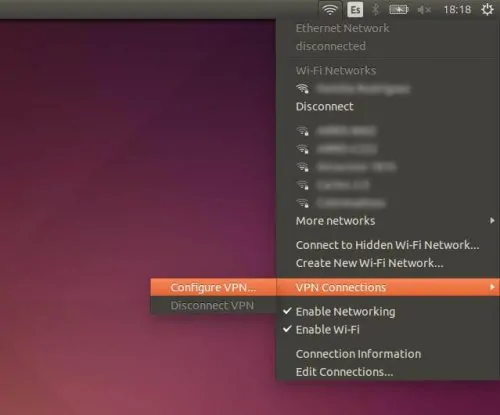
To configure a connection through VPN for Ubuntu, simply click on the wireless (or internet connection) symbol, on the top right corner. Here you will get a drop down menu with several options. Hover the mouse over VPN Connections and then click on Configure VPN… in order to initiate the setup.
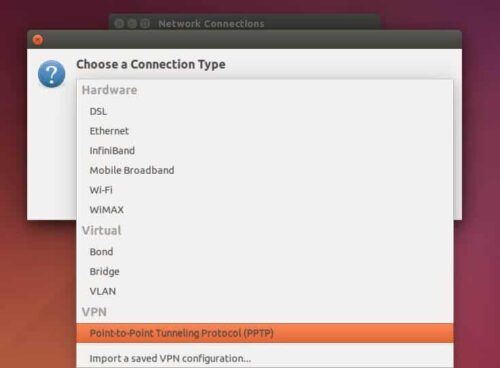
You will get a dialog with all the internet connections available. You should typically see your wired and wireless connection here. Click on the Add button to add a Kodi VPN Ubuntu connection to your system. You will get another dialog asking you to choose a connection type. Click on the drop-down menu, and select VPN -> Point-to-Point Tunneling Protocol (PPTP), since that’s the type of VPN connection we will use with IPVanish.
VPN for Ubuntu: Advanced options
After you click that option, a configuration dialog will come up for your VPN connection. To set up a Kodi VPN Ubuntu connection with IPVanish, all you have to do is fill out the information in the form fields. Give a name to your connection, in this case I named it VPN Connection 1. To move forward with your Ubuntu Kodi VPN setup, input the gateway for the VPN server you want to connect to. If you have an IPVanish account, you can find IPVanish gateways in your account management section (by logging into their website via the My Account option on the top-right, and then clicking on Server List, where you can select a server address). Write your username and password, and then click Advanced… to configure more options.

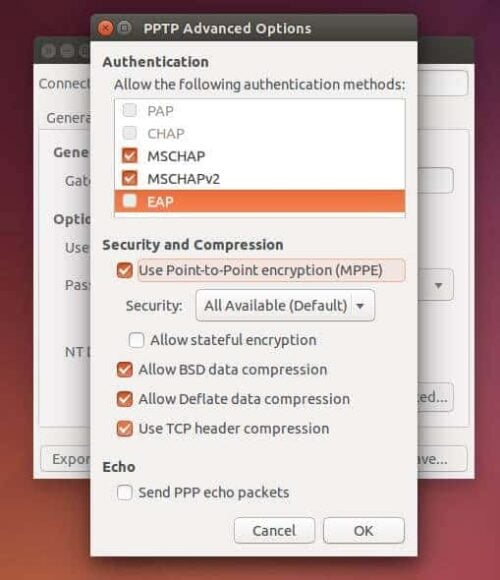
In the next dialog, make sure that MSCHAP and MSCHAPv2 are checked in the Authentication area of the dialog. You should also make sure that Use Point-to-Point encryption (MPPE) is enabled. Leave everything else as it is. Click OK and then Save… in order to save your changes.
Is the VPN for Ubuntu ready to use?
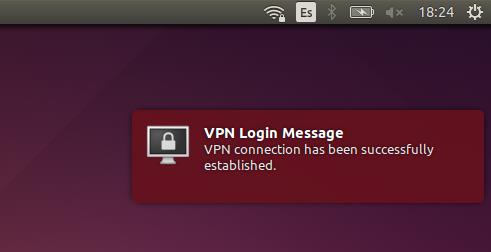
Now you should see VPN Connection 1 (or whatever name you titled) in the network drop down menu after clicking the wireless connection symbol on the top right. Clicking that new menu item will connect you to the server you chose. If all goes well, you should see this notification:
Now you can access geoblocked content with your Ubuntu HTPC and your Kodi VPN Ubuntu connection. Test how your VPN can unlock content for you by using one of the Kodi live TV addons with geoblocked streams. There is also a method that lets you set up a VPN with the OpenVPN Kodi VPN add on, and hopefully we will soon have a tutorial on it as well. Explore the endless connection and content options you can unlock with IPVanish and Kodi in your Ubuntu HTPC!


![8 Amazing Raspberry Pi Ideas [2022]: Beginners and Enthusiasts Raspberry Pi ideas](https://www.smarthomebeginner.com/images/2021/09/raspberry-pi-4-dev-board.jpg)
