This site was built on building and maintaining a Home Server using Ubuntu. My first server was an Atom 330 Dual Core MSI Wind PC. This was an awesome low-energy machine that served as a great home server based on Ubuntu Lucid Lynx. With the addition of a Broadcom CrystalHD stick, I used it as an HTPC booting automatically to Kodi (XBMC at that time). Finally in 2015, I setup my first Home Server from individual components, based on this energy-efficient home server build. In 2016, I upgraded it a little bit to this HTPC-NAS Combo build.
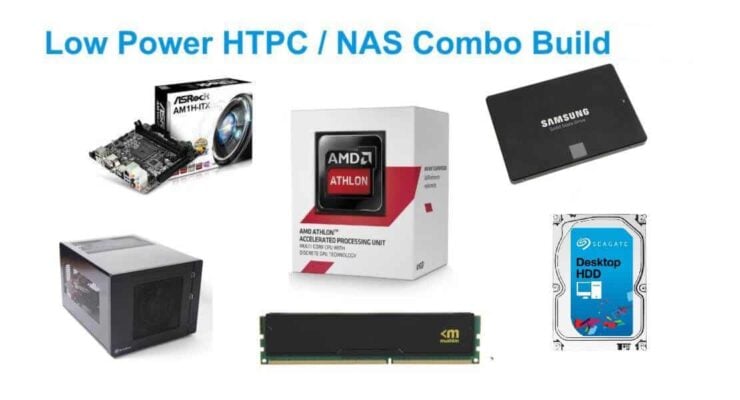
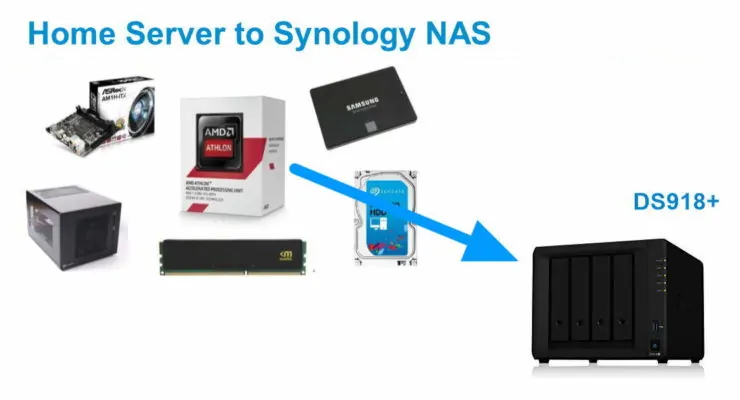
This AMD 5350 based home server has served me well for nearly 3.5 years. Unfortunately, I have to move on (partially) from this setup and I have decided to add a dedicated NAS to my setup. In this post, I will document my migration from home server to NAS with why I decided to migrate from Home Server to NAS, what I have learned, and offer some suggestions based on what worked for me. I will continue to update this post to link to several individual posts where I will delve deeper into my transition.
Anyone considering a NAS or a move from Home Server to NAS, should find these notes helpful.
Table of Contents
Why did I decide to move from Home Server to NAS?
First, the big question. Why did I decide to move from a self-built Home Server, which is a better value (performance to price) and is more flexible than a "locked down" NAS? The answer is simple, over the years my needs have grown.
My Home Server requirements until 2017
- HTPC NAS Combo Build with Ubuntu Server 16.04
- CouchPotato
- SickRage
- SABnzbd
- qBittorrent
- MySQL for Kodi Library Syncing
- Samba Share to Windows PCs around the house
- NFS Share to Kodi boxes around the house
All running natively on Ubuntu. This was it. This is now:
My Home Server needs since 2018
- The same HTPC NAS Combo Build but with Ubuntu Server 18.04
- A slew of Home Server Apps on Docker - Traefik Reverse Proxy, Portainer, Plex, Radarr, Sonarr, Lidarr, SABnzbd, Transmission-VPN, Jackett, UniFI controller, etc.
- A bunch of Smart Home Apps on Docker - Home Assistant, ZoneMinder, Grafana, InfluxDB, SmartThings MQTT Bridge, HA-DockerMon, etc.
- Samba Share to Windows PCs around the house
- NFS Share to Kodi boxes around the house - Kodi is now a backup to Plex
First, I decided to move to Plex from Kodi for several reasons. Plex and Kodi have their own benefits, but my move was motivated by the increasing use of Roku devices in my household and my interest in reducing the number of media players (Kodi boxes) that needed to be maintained. I addition, I could stream my media outside my house. [Read: 5 Tips for users moving from Kodi to Plex – Things to consider]
In addition to needing a good Plex server, my Smart Home Automation activities were maxing out the CPU of my server, frequently leading to the server being unresponsive. My tinkering habits were also messing with certain core functionalities being available 24/7: Plex, backup server, Home Automation, ZoneMinder, MariaDB/MySQL, etc. The result is a frustrated family.
Therefore, after much thought, I decided to invest in a dedicated NAS unit that made these essential services available at all times and use my home server for running Docker apps and tinkering. This way, I can continue my tinkering, testing, breaking, fixing, etc. that are key to me sharing my experiences and guides through this site, without affecting my family's needs.
Why did I choose Synology NAS?
When I decided to move certain core functionalities to a NAS, I did consider a separate self-built home server. But with increasing day-to-day responsibilities, maintaining that server would require additional time that I did not have. So a NAS was a perfect solution. But which one?
Even though most NASs these days can do all of what I wanted to do, including Docker, I decided to continue to have a home server due to some reasons discussed later in this post. I only needed the NAS for the following functions:
- Samba Share to Windows PCs around the house
- NFS Share to Kodi boxes around the house - Kodi is now a backup to Plex
- Plex Media Server
- MariaDB
- Surveillance - Preferrably
I only have about 5TB of total content stored on my home server, most of which are non-critical content (Media). I frequently backup my home server to an external HDD and remote server. Therefore, I have never needed a RAID setup (RAID is not a backup).
Based on these requirements, I only seriously considered the Drobo 5N2 and Synology DS918+. I know QNAP and Asustor also have similar products. I have setup a Synology for my buddy and therefore, I felt comfortable with it. NASCompares already has a good write up on Synology DS918+ vs Drobo 5N2. So I am not going to explain the differences here. In the end, for $60 more on the Synology DS918+ I got NFS support, Surveillance Station (although only 2 camera licenses are included), eSATA, 2 USB ports to share external HDDs, 3-year warranty, NVMe M2 Cache, and more.
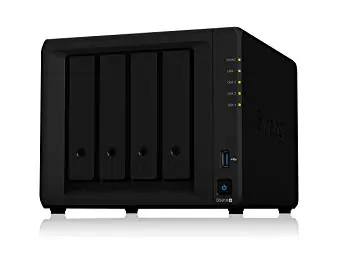
I know it only has 5 bays instead of 5 on Drobo 5N2, but for my storage requirements, this is a non-issue for the foreseeable future. Plus, Synology DSM has a great looking WebUI.
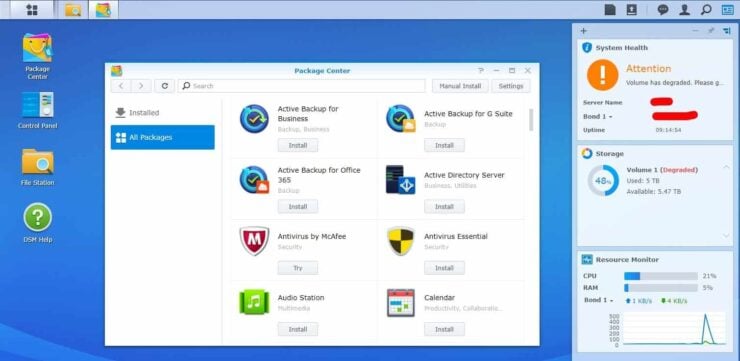
HDD vs SSD, BTRFS vs EXT4, RAID vs non-RAID, etc.
First, let me talk about the hard disks and RAID vs non-RAID setup. Then I will talk about my filesystem choice.
1. HDD vs SSD and RAID vs non-RAID
I had a TB WD Green from my 2016 Build. Last year, I bought and shucked two WD EasyStore 8 TB drives. These are said to be WD Red 8 TB NAS drives (but with White label instead of Red). It is cheaper to get the EasyStore 8TB External HDD and shuck it (may void Warranty) than to buy a bare WD Red internal HDD. [Read: WD EasyStore Compendium]
So in total, I had 3 HDDs. Like I said before, I have never needed or liked RAID for several reasons:
- Do not want to complicate things (some may disagree here). Synology Hybrid Raid (SHR) is easy and offers several benefits though.
- I do not have critical data and all my critical data are already on my laptop, an external hard drive, and remotely backed up.
- I am always interested in keeping energy consumption low.
But with my DS918+, I thought I will pool my drive and create a Synology Hybrid Raid. This way, I do not have to manually backup my NAS with my external HDD.
Then I realized several things:
- My setup was consuming 30 Watts of power with 3 disks.
- RAID is a redundancy method and not a backup. It is still advisable to manually backup to another device (preferably in a remote location).
- RAID made all 3 disks spin up for each read/write, which led to lag in my Plex interface loading on Plex clients, including on NVIDIA Shield TV. [Read: 10 Best Plex client devices 2018: Pre-built and DIY options]
One way to speed up Plex was by adding an M2 SSD read cache (discussed later) but my other two problems would still remain.
2. BTRFS vs EXT4
I am by no means an expert on filesystems. But my research showed that BTRFS has come a long way. While many mainstream vendors are still sticking to EXT4, some say BTRFS is the next step in the evolution of filesystems. Synology believes in it and so they have made it the default filesystem.
Plenty of BTRFS vs EXT4 comparisons available on the web (eg. ) from including Synology. BTRFS offers snapshot, which allows you to rollback files. It also protects you against bit-rot (rare) and auto-heals disks. None of these have caused any problems for me in the past.

I started with BTRFS on my original 3-disk, one-volume, SHR setup. But redid differently within a few days. Running virtual machines require a BTRFS volume. So I went with two volumes: SSD Volume 1 SHR (BTRFS) for apps and virtual machines and HDD Volume 2 SHR (EXT4) for storing data, media, and backups. EXT4 offers:
- Wide-spread compatibility with Linux systems
- Better performance compared to BTRFS, although some will argue that the difference in negligible
- Better suited for surveillance according to Synology
- I have had no issues with bit-rot in the past (fingers-crossed) - plus I will have an external backup anyways
- Snapshots are great for small businesses or offices where files are being changed constantly and data integrity is important. For a typical home setup focussed on media serving, I do not see this as a big need.
My home servers were running EXT4 and I had no problems. Some may say I am choosing to stay in the past with EXT4. But for my requirements, the better performing (although slightly) EXT4 works.
3. My SSD-HDD Setup for Synology DS918+
Finally, after a lot of research, understanding my requirements, and trial and error, I decided on the following scheme:
- 1 TB SSD basic SHR Volume - To house the apps such as Plex and virtual machines - SHR but without redundancy at this point. I may decide to add another SSD later on to add redundancy. Plex Library folder/metadata and Music will be stored here as well.Note that while App data reading and music list loading will be fast, apps (including DSM) themselves will not run any faster as SHR will RAID the apps partition across all disks. Therefore, the slowest disk in your NAS will determine the speed.
- 8 TB WD Red (Shucked White Label) - To store all my media. Remember that my storage requirements are only 5 TB at this point. So this is more than enough for "me" at "at this point".
- SSD Volume 1 with Apps and App data will be periodically backed up into the HDD Volume 2.
- HDD Volume 2 will be backed manually into an external HDD periodically and to remote storage.
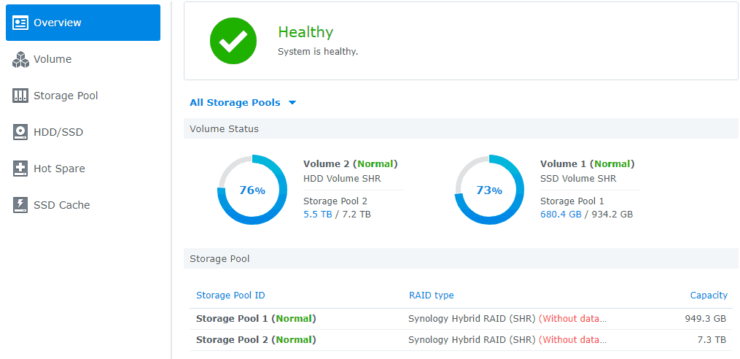
This setup addresses all the 3 points listed above, with power consumption hovering around just 15 Watts or less. This also allows my HDD to hibernate to conserve power when nothing is being used. Of course, I am not saying that this is the best there is.
Moving Data from Home Server to Synology NAS
Once our basic setup on the NAS is done, a big question is how do I move my Terabytes of data from your backup device into your NAS? How can you move your Plex media server without having to go through Library setup again? This is a key consideration, as some methods transfer data better than others.
1. Data Transfer Methods
There are multiple ways to transfer data into your NAS:
- Copy-paste in FileStation from DSM WebUI
- USB Copy App from Synology
- HyperBackup App
- Rsync on a remote terminal with SSH
- Samba or NFS Share
These are by no means exhaustive but covers the most common transfer methods. What works well depends on the types of files you are transferring. I tried most of them but what I found to be the best was this approach:
- Bunch of Small Files (eg. Plex Library) - Zip it up into a compressed file. Transfer the compressed file into your NAS and unzip it.
- Videos and Large Files - Rsync from an external USB drive to NAS but on a remote terminal. Other methods will be fine in this case as well.
Rsync, allows breaks, stops, continue, etc., at point resuming from where we left off. I also like to see more detailed progress. The screenshot below shows a 60 MB/s transfer speed. This is while copying several large videos on FileStation at the same time. USB rsync speeds typically hovered around 125 MB/s or more (sometimes in the 2XXs).
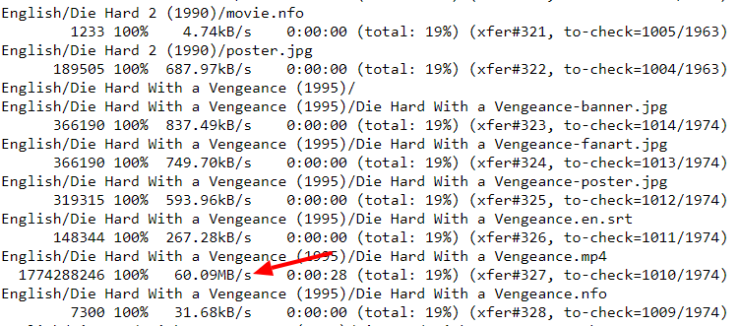
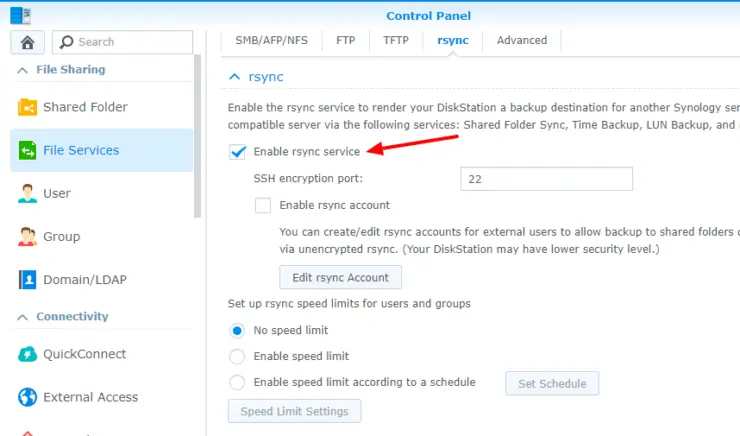
Rsync is disabled by default on Synology. To enable it, you will have to open Control Panel on DiskStation Manager and go to File Services->rsync and enable it as shown below.
If you do not have an external USB drive, then copying from another networked device using Samba or NFS protocol is more common. Synology's share can be mounted on a remote computer (or vice versa) for copying data In a separate post, I will explain the following:
- Mounting SMB share from Synology on client devices
- Mounting NFS share from Synology on client devices
Mounting network shares with correct privileges on remote computers is more challenging than you think. This is especially true in the case of NFS share. One of the main reason I purchased a Synology is for its NFS support. However, several forum posts like these exist for a reason. Getting NFS working correctly with appropriate permissions is not easy.
2. Moving Plex Media Server
Next comes the big task of moving Plex library without having to recreate everything. In my case, I had to move Plex from my home server to Synology NAS. There are some great resources for doing this: here and here. I will cover this in detail in a separate post. But here is a brief process:
How to move Plex Media Server to Synology NAS with losing the Library?
- Disable Disable Emptying of Trash on current Plex Media Server (PMS)
- Install PMS on Synology NAS
- Start Plex on Synology and Stop it. You do not have to configure your Libraries now.
- You should now have a Plex shared folder, inside which you will find the Library folder
- Rename the Library folder to something else (eg. Library-default)
- Copy Library folder from old PMS server to the new oneAs mentioned previously, copying Library folder as compressed file and extracting it on NAS is highly recommened. Plex library has 1000s of files and could take a long time if copied one by one.
- Start new PMS. You should see your library loadup.
- Edit Libraries and point the paths to the new file location
- Enable emptying of trash during Library scan
- Run a full library scan fix the file paths
- Empty trash, clean bundles, and optimize database
- Enjoy streaming from Plex on Synology NAS
Hardware Transcoding for Plex
Don't forget to subscribe to Plex Pass to enable Hardware transcoding. Otherwise, the Intel Celeron J3455 processor on DS918+ (Passmark 2162) cannot handle multiple streams. In addition, you may want to consider adding automatic media encoders such as SickBeard MP4 Automator that can work with Sonarr, Radarr, and SABnzbd to make your media "Direct Play" friendly for plex.
Best Plex Client Devices:
- NVIDIA SHIELD TV Pro Home Media Server - $199.99
- Amazon Fire TV Streaming Media Player - $89.99
- Roku Premiere+ 4K UHD - $83.99
- CanaKit Raspberry Pi 3 Complete Starter Kit - $69.99
- Xbox One 500 GB Console - $264.99
Updating Plex Media Server on synology
You will have to manually download and update Plex periodically. Another option is to setup Plex in docker. It was previously thought that HW transcoding cannot be enabled in this scenario. However, there is a way to enable HW transcoding with Plex on Docker. Therefore, it is much easier to keep your PMS up-to-date automatically.
Moving Apps and Data Between Volumes
If you have multiple volumes on your Synology NAS (there are 2 volumes in my setup), there is a way to move Apps from one volume to another. By default, DSM installs apps in Volume 1, which is then RAIDed to other Volumes. Synology allows you to move App data from one volume to another from the Shared Folders option, as shown below.
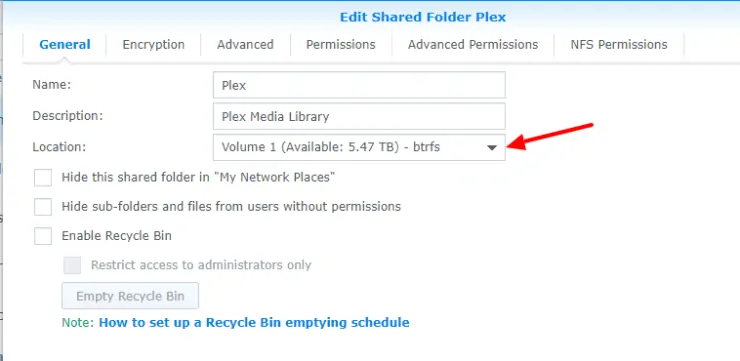
However, this is not the same as moving the App itself to another volume. That has to be done from a remote SSH terminal. For example, in my case, I had 3 HDDs installed originally as one volume. Say, I wanted to move the apps to an SSD in my 4th bay as a new volume, then I would do that from the SSH terminal, as described in the linked guide.
Synology DS918+ Hardware Upgrades
RAM Upgrade
Synology DS918+ comes with 4 GB of RAM installed in one of the two slots. This may be enough for most file serving purposes. However, if you plan to run Docker containers or Virtual Machines then 4 GB can fill up quite quickly. And this where the extra memory slot comes in handy.
Synology has "official" RAM sticks for the DS918+. However, these are pricier than some of the other options. The most commonly recommended ones are from Crucial:
- Crucial 8GB KiT (4GBx2) DDR3/DDR3L 1866 MT/s (PC3-14900) Unbuffered SODIMM 204-Pin Memory - ~$57
- Crucial 16GB Kit (8GBx2) DDR3/DDR3L 1866 MT/s (PC3-14900) Unbuffered SODIMM 204-Pin Memory
- ~$110
Note that Synology advertises the DS918+ with 8 GB max of RAM, the Celeron J3455 can support up to 16 GB of RAM. Therefore, many have successfully upgraded the ram to 16 GB.
I decided to stay with the initial 4 GB and add another 4 GB module for now.
Synology SSD Cache or Not?
The next big question was whether to invest in SSD M2 Cache or not. There are several discussion on this topic on Reddit, Synology, and Plex forum. For my purposes, which is Plex and file serving, adding an SSD cache may not be beneficial. Even in Synology's own support page, the following is mentioned:
For example, both large sequential read or write operations (e.g., HD video streaming) and entirely random data reading patterns lack re-reading patterns, and thus will not benefit significantly from SSD caching.
However, based on this thread, an SSD read cache can help with loading Plex interface faster as metadata can be read from the cache. In addition, the reduction in disk reads can "theoretically" prolong the life of the disks. At the time or writing this guide, the highly rated 256 GB M2 Cache disk, the Samsung EVO 970, costs about $75. Whether this investment is worth it for you or not is a decision you will have to make.
In my case, I am going to start rolling with metadata in SSD volume (not cache) and see how it goes. If this helps, I may not need a cache. Otherwise, I will consider adding a 256GB read-only cache.
Co-existing with Home Server and NAS
OK so, I decided to move certain functions of my home server to Synology DS918+. What happens to the home server now? My original plan (maybe still is) is to replace my AMD 5350 server with Intel NUC. In fact, I already purchased the Intel NUC 8 Mainstream Kit (NUC8i7BEH) with 32 GB RAM sticks. Intel NUCs are notoriously expensive and inflexible (think expansion) but they can be compact HTPCs / Home Servers.
My initial thought was to let Synology do just the file serving with the NUC running Plex. The Intel Core i7-8559U processor has a Passmark of 12,206, which is 5 times more than the DS918+ or my current AMD 5350. It can handle multiple Plex streams with transcoding without breaking a sweat. With a TDP of just 28W, the performance to power consumption ratio of i7-8559U is amazing. If I went with a NUC purely for energy savings though, it will take me years if not at least a decade to break even the incremental cost.
But at this point, I am only looking at a maximum of 2 simultaneous Plex streams. This may change in the future and I might move my Plex back to my home server at that point. So I have decided to keep running my old home server with 256 GB of SSD just for Docker applications: Sonarr, Radarr, Home Assistant, etc., with my DS918+ shared folders mounted on it. I may consider adding another 8 GB of RAM. Instead of spending close to $700 on a new NUC system, this might be a better value for me.
If you plan to move from Home Server to NAS, then I hope that the experiences I shared through this post are helpful to you.

![10 Best Media Server for Plex + one SURPRISING bonus [2022] Media Server for Plex](https://www.smarthomebeginner.com/images/2020/04/plex-free-movies-and-tv.jpg)
![Ultimate Docker Server: Getting Started with OS Preparation [Part 1] Docker Server Tutorials 1 OS Preparation](https://www.smarthomebeginner.com/images/2024/01/Docker-Series-01-Intro-and-OS-Prep.png)
![8 Best NAS with Plex Server Support [2022] - 4k, Transcoding, etc. Best NAS Server for Plex](https://www.smarthomebeginner.com/images/2020/02/best-media-server-for-plex-ft.jpg)
![8 Amazing Raspberry Pi Ideas [2022]: Beginners and Enthusiasts Raspberry Pi ideas](https://www.smarthomebeginner.com/images/2021/09/raspberry-pi-4-dev-board.jpg)
