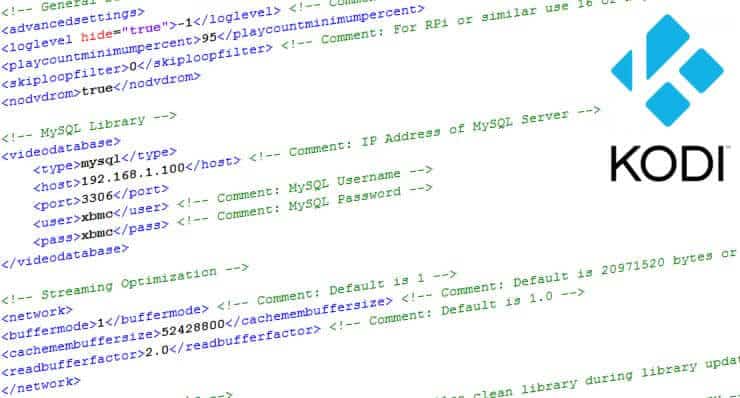
Kodi advanced settings stored in advancedsettings.xml can be used to tweak various settings that cannot be edited through the GUI. Advanced settings, as the name suggests, are "advanced" and hence most users do not have to set them. Some examples of Kodi or XBMC advancedsettings.xml include MySQL library, episode naming patterns, special behaviors, and more. We have shown how to install XBMC or Kodi on Ubuntu, Windows, and Amazon FireTV. We have even shown how to install OpenELEC on Raspberry Pi, which is one the Kodi media center OS options. Now let us see how to take your Kodi entertainment center to the next level by tweaking some of the Kodi advanced settings. [Read: Raspberry Pi vs Amazon Fire TV for Kodi media center]

Table of Contents
Why do I need to set Kodi Advanced Settings?
There are multiple reasons to to have advanced settings XML file for XBMC or Kodi. Below are the reasons why I use it:
- Disable logging
- Tweak for low power devices
- Move library to MySQL
- Set Kodi or XBMC cache settings
- Tweaking video library scanning and operation
- Personalize playback controls
If you have a low power device such as Raspberry Pi, then you definitely need to look at Kodi or XBMC buffering settings to improve performance and decrease stuttering.
Kodi advancedsettings.xml Location
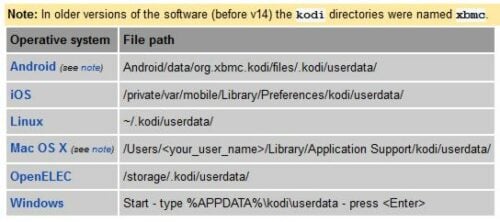
XBMC or Kodi advancedsettings.xml file location depends on the operating system. The screenshot below shows the folders in which advanced settings XML file is saved. Note that advancedsettings.xml file does not exist by default. It has to be created by the user in the userdata folder.

Now let us look at the five groups of Kodi advanced settings I always have in my Kodi installations. Note that the content between are comments. They can be copied into advancedsettings.xml or left (it's your choice). For further explanation on what a specific advanced setting does, refer to the advancedsettings.xml Wiki entry.
1. General Settings
<loglevel hide="true">-1</loglevel> <!-- Disables logging -->
<playcountminimumpercent>95</playcountminimumpercent>
<skiploopfilter>0</skiploopfilter> <!-- For low CPU device use 16 or higher -->
<nodvdrom>true</nodvdrom>
Just a general group of settings disable logs, set minimum percent for play count, etc. skiploopfilter is a setting that enables skipping unwanted frames and improves performance in low resource devices. [Read: 10 of the Best XBMC Addons in 2014]
2. MySQL Library Settings
I have 4 Kodi installations in my home that share the same video library. To storing the video library on MySQL server allows me to sync library status, watched status, etc. between all the devices. I can pause on one Kodi box and resume on another.
<videodatabase>
   <type>mysql</type>
   <host>192.168.1.100</host> <!-- IP Address of MySQL Server -->
   <port>3306</port>
   <user>xbmc</user> <!-- MySQL Username -->
   <pass>xbmc</pass> <!-- MySQL Password -->
</videodatabase>
You can do the same thing if you share a MySQL Music library. [Read: How to Listen to Google Music on XBMC?]
3. Streaming Optimizations
This is one of my favorite Kodi advanced settings for streaming content stored on network storage. I have written in detail about how to fix Kodi buffering issues. And these settings allow me to do just that.
<network>
   <buffermode>1</buffermode> <!-- Default is 1 -->
   <cachemembuffersize>52428800</cachemembuffersize> <!-- Default is 20971520 bytes or 20 MB -->
   <readbufferfactor>2.0</readbufferfactor> <!-- Default is 1.0 -->
</network>
Note that you may have to tweak the settings to fit your needs and hardware capabilities. [Read: 8 Raspberry Pi OpenELEC tweaks to do after installation]
Recommended HTPC / Home Server Builds:
- Best Home Theater PC Build 2017 to do it all (Plex, Kodi, NAS, Gaming)
- Best Emby Server builds 2018 – Pre-built and DIY options
- Medium Budget 4K HTPC Build 2017 for Kodi, Plex and Gaming
- Cheap 4K HTPC Build for Kodi, OpenELEC, and LibreELEC 2017
- Low Power Home Server Build 2017 for Network File and Media Storage
- Best HTPC for Kodi with 4K on a Medium Budget 2017 (~$400)
- Energy efficient budget HTPC-NAS combo build 2016
4. Video Library Tweaks
I like to clean video library during update, import watched status from .nfo files while importing Kodi library from previous exports, hide All Items from video library, and hide empty TV series. The settings below do just that.
<videolibrary>
   <cleanonupdate>true</cleanonupdate> <!-- Also clean library during library update -->
   <importwatchedstate>true</importwatchedstate>
   <hideallitems>true</hideallitems> <!-- removes the "*All" items from the video library -->
   <hideemptyseries>true</hideemptyseries>  <!-- hide empty series in the video library -->
</videolibrary>

<videoscanner>
   <ignoreerrors>true</ignoreerrors> <!-- Silently ignore errors while scanning videos. -->
</videoscanner>
The ignoreerrors setting ignores any errors encountered during video library scanning. Set to true to silently ignore errors while scanning videos. This prevents the error dialogue box, so you don't have to keep hitting "yes" to keep scanning.
5. Playback Tweaks
And setting for Kodi advancedsettings.xml file is to tweak controls during video playback. During playback when you hit the left or right direction on remote or keyboard, the video skips a few seconds forward or backward (sort of quick rewind). The default skip length is 30s. I like it a bit shorter. That is what the timeseekforward or timeseekbackward settings do. [Read: 15 XBMC keyboard shortcuts you should know]
<video>
   <timeseekforward>15</timeseekforward> <!-- Skip back time 15 s -->
   <timeseekbackward>-15</timeseekbackward> <!-- Skip forward time 15 s -->
   <subsdelayrange>240</subsdelayrange> <!-- Subtitle offset adjustment range -->
</video>
And finally, the subsdelayrange sets the maximum offset limit for subtitles that are out of sync with the audio. If you have a subtitle file that is very out of sync with audio having a larger number here can help. [Read: A simple yet awesome IR Raspberry Pi remote control for $5]
Final Thoughts
Review my advancedsettings.xml gist repository to take full look at my Kodi advanced settings. Note that all these settings must be enclosed within advancedsettings tags. Copy these advanced settings XBMC or Kodi tweaks to a file and save it as advancedsettings.xml in Kodi's userdata folder. Restart your media center for the Kodi advanced settings to take effect and enjoy the new tweaks it brings in.


![8 Amazing Raspberry Pi Ideas [2022]: Beginners and Enthusiasts Raspberry Pi ideas](https://www.smarthomebeginner.com/images/2021/09/raspberry-pi-4-dev-board.jpg)
![15 Best Jellyfin Plugins [2023] - Supercharge your Media Server Jellyfin Intros Plugin Preview Pre-Roll](https://www.smarthomebeginner.com/images/2022/08/jellyfin-intros-preroll-preview.jpg)
![15 Best Plex Alternatives [2022] - FREE and BETTER Options Best Plex Alternatives feature image](https://www.smarthomebeginner.com/images/2022/08/best-plex-alternatives-feature-image.gif)
![10 Best Plex Client Devices [2022] - STUTTER-free Streaming Best Plex Client Devices](https://www.smarthomebeginner.com/images/2022/02/best-nas-for-plex-server-featured-images-from-pexels-photography-maghradze-ph-3764958-e1648542743772.jpg)
